Templot Club Archive 2007-2020
|
|||
| author | remove search highlighting | ||
|---|---|---|---|
|
posted: 3 Jan 2018 01:26 from: Rob Manchester
click the date to link to this post click member name to view archived images |
Hi Martin, Happy New Year to you. I got a new scanner today in the sales - it isn't easy these days to buy just a flatbed scanner without it having a printer attached which are far too bulky. Scans of model track plans are fine. I have been having mixed results when adding these files as picture shapes and then trying to print them. The first one I tried just printed the picture shape as a filled black rectangle so I though that maybe the image was too big for the printer memory and I reduced the scan dpi. This worked OK and the picture shape printed containing the scanned data. However I have just scanned another plan and whilst the file size is similar ( same DPI ) it printed as a black rectangle. Sizing the background image down resulted in a proper print being produced. Is this all down to printer memory or associated issues ? The PC has 32GB of memory of which about 26GB is available. Please let me know if I am missing something. I am saving the files as JPG from the scanner. Each of the scans is usually an area less than 25% of an A4 page. Cheers. Rob |
||
|
posted: 3 Jan 2018 03:46 from: Martin Wynne
click the date to link to this post click member name to view archived images |
Rob Manchester wrote: Each of the scans is usually an area less than 25% of an A4 page.Hi Rob, Do you mean the original on the scanner, or on the printed templates? It is very difficult to advise because every system has different capabilities. It is easy to exceed the capabilities of a system because of the enormous degree of magnification, far beyond what is expected in other software. The internal bitmaps which are created can require hundreds of MB of available memory. If Windows has to swap things to and fro to make room, each template page can take 10 minutes to print. The first thing to do is to reduce the scanned DPI level. 600 dpi is tops, 300dpi or 200dpi will be fine for most scans. Some scanners can use much higher DPI settings if left to themselves and so create very large files. If you can work with a monochrome grey-scale scan instead of colour, that will reduce the size of the internal bitmap by a factor of 9. Also make sure your printer is set for normal text-quality printing, not high-DPI photo printing. If it calls itself a photo printer it might do that by default. Then if it won't print, try splitting the image into several smaller images. That is one of the great advantages of the tiled maps from the NLS. The crop/combine function makes it easy to split an image into smaller sections. It's best to draw all the rectangles over it first, and then swap to the modify tab to do the cropping after selecting each rectangle in turn. It doesn't matter if there are some small overlaps. You won't see the joins in the final print. Remember to delete the original large image after you have chopped it into sections, otherwise you will still be trying to print it. It is much easier to see what you are doing if you switch the picture borders on. More about crop/combine here: http://templot.com/companion/crop_combine.php If your printer can't handle it directly, you could try creating a PDF file and printing that via your PDF reader program. If you do that, you must create only one template page at a time in each PDF file, otherwise the PDF file size will go through the roof. Here's a test print I just made. The large original image caused the system to go off into a sulk, so after 5 minutes I aborted and chopped the image into smaller sections. It then printed straight out without any delay at all: 2_022206_410000000.png  I haven't ever seen the image replaced with a black rectangle, so I assume that must be something specific to your printer. If you would like to attach your image file here I will have a go printing it on my system and report the results. To include picture shapes in the printed output, select the option on the picture shapes tab: 2_022238_120000000.png  regards, Martin. |
||
|
posted: 3 Jan 2018 12:09 from: Martin Wynne
click the date to link to this post click member name to view archived images |
p.s. Rob, My NOD list (nice one day) includes a function to chop a picture shape into multiple tiles. The thinking was to improve screen response by allowing unneeded parts of an image to be deleted. But it would also be a great help in printing picture shapes on the templates. So maybe that's something to look at for 218b.  Martin. |
||
|
posted: 3 Jan 2018 12:49 from: Tony W
click the date to link to this post click member name to view archived images |
One can get strange effects. I have two printer drivers for the same physical printer. One works in normal print picture mode whilst in this mode the other printer driver only produces an outline rectangle. It works reliably in dot picture mode, though one has a long wait before it does, which I can live with. I normally use 100 DPI monochrome or 4 bit grey scale for background picture maps in order to keep the file sizes down for this reason. Regards Tony. |
||
| Last edited on 3 Jan 2018 12:51 by Tony W |
|||
|
posted: 3 Jan 2018 14:33 from: Martin Wynne
click the date to link to this post click member name to view archived images |
Thanks Tony. I didn't know anyone was still using the dots mode. I haven't tested it for years, so I'm pleased to know it is still working. Essentially it sends the image to the printer one dot at a time. Which should work on just about any printer. But takes a fortnight to do so. cheers, Martin. |
||
|
posted: 5 Jan 2018 00:33 from: Rob Manchester
click the date to link to this post click member name to view archived images |
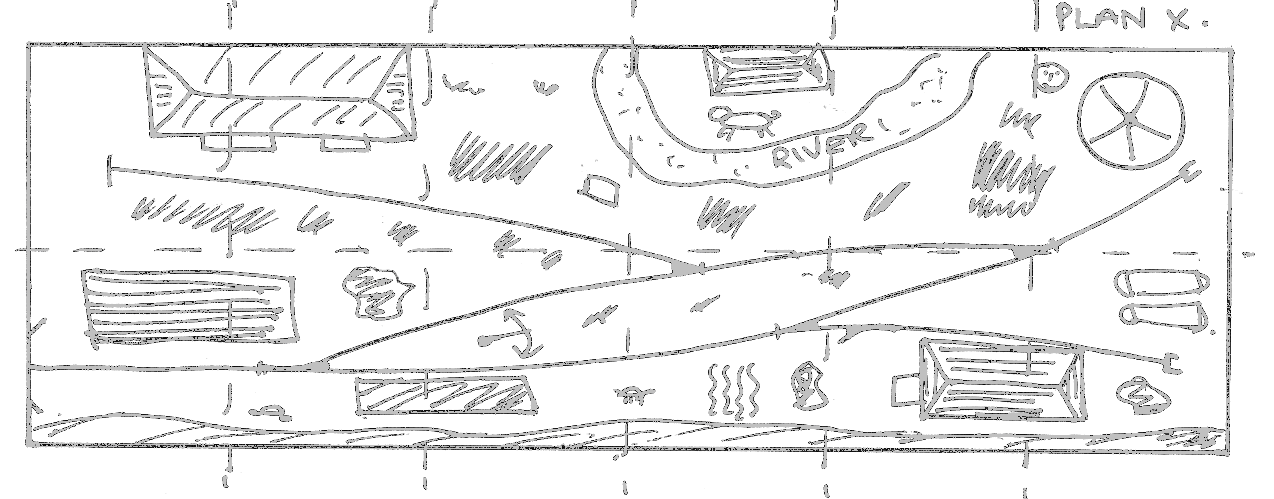
Hi Martin, As requested I am letting you have .box and .bgs files for a (sample) scanned track plan. The image was scanned at 200dpi greyscale on a Canon Lide120 via the Templot dialogue. The image was hand drawn at 1" to 1 foot scale. Using the size option of background shapes the image was increased so the 1 foot grid lines on the drawing match the 300mm grid lines ie the plan is 6 foot ( 1800mm ) wide as per the original. The .box file just has a single item of track. When printed at 100% on my Brother laser it prints the track but no image. Reducing the size of the background image in increments gives no printed image until the width of it gets down to 1250mm or below. Luckily the current projects involve printing at half-size ( 50% ) as I am making dummy mock-ups of several track plans complete with cereal packet buildings and N scale wagons ! All the plans I have tried, including this sample one, print the scanned image correctly at 50% so the non-printing at 100% isn't an urgent issue. Thanks Rob |
||
| Attachment: attach_2611_3169_Martin_Print_Test_1.box 189 | |||
|
posted: 5 Jan 2018 00:34 from: Rob Manchester
click the date to link to this post click member name to view archived images |
and the bgs file. Rob |
||
| Attachment: attach_2612_3169_Martin_Print_Test_1.bgs 214 | |||
|
posted: 5 Jan 2018 00:35 from: Rob Manchester
click the date to link to this post click member name to view archived images |
and the sk1 file. Rob |
||
| Attachment: attach_2613_3169_Martin_Print_Test_1.sk81 215 | |||
|
posted: 5 Jan 2018 02:43 from: Martin Wynne
click the date to link to this post click member name to view archived images |
Hi Rob, Thanks for the files. A couple of general points. You may find that an image which is troublesome will print better after saving a BGS file, deleting the picture shape, and reloading the file. Templot is much happier with PNG files, and saving converts them to a normalized 24-bit format. When printing, Templot will print a page only if there is some actual track on it (unless you use the banner-fill option). Background shapes and sketchboard items don't count. So you may need to put a very short bit of dummy track somewhere on pages which don't contain any track. I was surprised to find the image is only 1274 x 499 dots -- I was expecting some massive file to be causing the problem. It prints full-size here with no problems or delays at all. Which is exactly as expected for such an image size. I can only conclude that it is a limitation in your printer driver. I don't have much experience of using laser printers, generally ink-jets are better for accurate results because lasers heat the paper causing it to shrink and distort a fraction. I suggest going online to find an updated driver, or maybe trying the generic driver from Windows instead of the Brother driver. As it stands your scan is a stark black and white which for me is uncomfortable to work over for track planning (and will also use a lot of ink when printed). I've attached below a greyed version which you might prefer. On the modify shape tab, click the "new image from:" file button. Sorry I can't be more help, but as it's printing fine here there is not much I can investigate. regards, Martin. |
||
| Attachment: attach_2614_3169_rob_image_grey.png 211 | |||
|
posted: 5 Jan 2018 19:36 from: Rob Manchester
click the date to link to this post click member name to view archived images |
Hi Martin, Thanks for looking at my scanned plan. I too am surprised that such a small file should cause issues when printing. Thanks for the tips and yes, the black/white is a bit stark but I can alter that in the scanner settings by lowering the contrast. I will try my A3 inkjet at some point and see what that is capable of. I don't have enough room to keep it ready for use as it is a beefy thing. Thanks agin. Rob |
||


| Please read this important note about copyright: Unless stated otherwise, all the files submitted to this web site are copyright and the property of the respective contributor. You are welcome to use them for your own personal non-commercial purposes, and in your messages on this web site. If you want to publish any of this material elsewhere or use it commercially, you must first obtain the owner's permission to do so. |