Templot Club Archive 2007-2020
|
|||
| author | remove search highlighting | ||
|---|---|---|---|
|
posted: 5 Nov 2020 18:32 from: Rob Manchester
click the date to link to this post click member name to view archived images |
Hello, Is there a right 'size' for 3-point track gauges ? The spacing between the two legs that sit on the outer rail of the curved track seems to vary - my ready made EM and P4 ones seem to have the legs spaced somewhere between 26 and 30mm apart whereas Iain Rice shows some examples is his books that have the legs spaced very wide. My A-level maths was a long time ago, can anybody help with a formula for leg spacing v track gauge v amount of widening at different radii ? I thought I have seen some data on this but can't seem to find it. Thanks Rob |
||
|
posted: 5 Nov 2020 19:30 from: Nigel Brown click the date to link to this post click member name to view archived images |
Rob, if my addled off-white cells are right, the gauge widening is: R - sqrt(R*R - d*d) where R is the radius and 2d is the distance between the two points. Interestingly it's not dependant on the gauge. Nigel |
||
|
posted: 5 Nov 2020 19:31 from: Martin Wynne
click the date to link to this post click member name to view archived images |
Rob Manchester wrote: My A-level maths was a long time ago, can anybody help with a formula for leg spacing v track gauge v amount of widening at different radii ?Hi Rob, L = approx SQ ROOT of (8 x R x W). where R=radius in outer rail, W=amount of widening, L=distance between legs. Putting some numbers in that, say you want the gauge to increase by 0.25mm (prototype max at 4mm/ft) at 750mm radius (outer rail): L = SQ ROOT of ( 8 x 750 x 0.25) = SQ ROOT of 1500 = 38.7mm. So that needs say 39mm between the gauge legs. If you wanted the full widening to apply only when down to 500mm radius, the length is shorter: L = SQ ROOT of ( 8 x 500 x 0.25) = SQ ROOT of 1000 = 31.6mm. No need for A-level, O-level will do.  The track gauge doesn't come into it. Just consider an arc through the outer legs: From Pythagoras: R^2 = (R-W)^2 + (L/2)^2 From which L/2 = SQ ROOT of (2RW-W^2). W^2 is very small in relation to R, so that becomes L = approx SQ ROOT of (8RW). cheers, Martin. |
||
|
posted: 6 Nov 2020 00:11 from: Rob Manchester
click the date to link to this post click member name to view archived images |
Nigel, Not quite sure I understood the logic of your reply  possibly down to me of course. possibly down to me of course.Martin, That looks fine, thanks for the info. The (rounded) figures for widening by 0.25mm are :- Radius Leg Spacing --------- ---------------- 200mm 20mm 300mm 24mm 400mm 28mm 500mm 32mm 600mm 35mm 750mm 39mm(from your example) ....and no I am not going to run EM-SF round 200mm radius track  I need to make some 3 point gauges for other odd modelling scales/track gauges some of which will be running round curves that tight. Mind you some of them are rather more generous with the slop built into the track to rail interface. I can now draw out the gauges I wish to make. I need to make some 3 point gauges for other odd modelling scales/track gauges some of which will be running round curves that tight. Mind you some of them are rather more generous with the slop built into the track to rail interface. I can now draw out the gauges I wish to make.Thanks again Rob |
||
|
posted: 6 Nov 2020 01:21 from: Nigel Brown click the date to link to this post click member name to view archived images |
Hi Rob Depends what you want to calculate. I assumed you know the distance (2d) between the two corners on the 3-point track gauge which sit on the outer rail. Feed in different values of the track radius R into the formula R - sqrt(R*R - d*d) and the formula will give you the corresponding widening. cheers Nigel |
||
|
posted: 6 Nov 2020 02:44 from: Martin Wynne
click the date to link to this post click member name to view archived images |
Rob Manchester wrote: ....and no I am not going to run EM-SF round 200mm radius trackHi Rob, Re-arranging this equation: L = approx SQ ROOT of (8 x R x W). you can find how much widening will be applied by a gauge of known length at any given radius: W approx = L^2 / 8R = L x L / 8 / R so with a gauge 30mm between outer legs on an outer rail radius of 900mm: W = 30 x 30 / 8 / 900 = 0.125mm widening approx. and on 5 metres radius: W = 30 x 30 / 8 / 5000 = 0.023mm widening. cheers, Martin. |
||
| Last edited on 6 Nov 2020 02:50 by Martin Wynne |
|||
|
posted: 6 Nov 2020 10:11 from: Julian Roberts click the date to link to this post click member name to view archived images |
Hi Rob I wrote a reply that got lost when I attached the document below when it was in Word. Now PDF, not time to write my reply all over again! |
||
| Attachment: attach_3171_3809_GAUGE_WIDENING_IN_P4.pdf 12 | |||
|
posted: 6 Nov 2020 10:16 from: Julian Roberts click the date to link to this post click member name to view archived images |
Basically, correct gauge would be between 45mm and 54mm long in 4mm scale. | ||
| Last edited on 6 Nov 2020 10:23 by Julian Roberts |
|||
|
posted: 7 Nov 2020 19:44 from: Rob Manchester
click the date to link to this post click member name to view archived images |
Thanks to Martin and Nigel for the further information. Thanks Julian, that is an interesting article, sorry your original post got zapped. Rob |
||
|
posted: 7 Nov 2020 20:12 from: Julian Roberts click the date to link to this post click member name to view archived images |
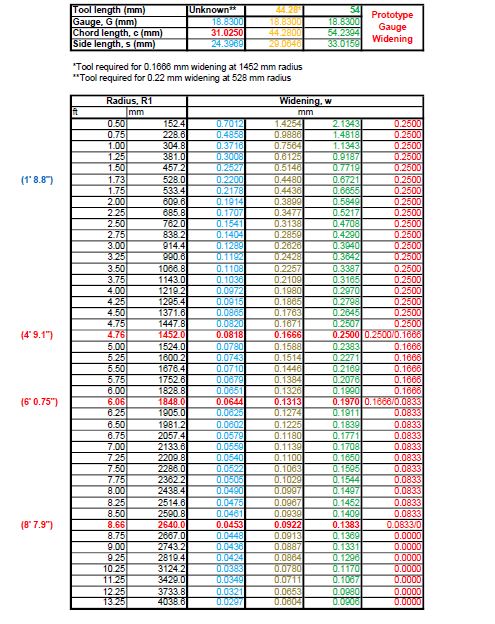
Hi Rob Just to summarize the previously attached rather waffle-y piece. I am thinking in 4mm scale. The prototype (in steam days) widened in steps, a ¼” at a time, according to the radius, with a maximum of ¾” at 5.5 chains. On the model a single triangular tool can do very much the same job perfectly satisfactorily, without the user needing to know the radius of the track. But it will continue to widen the gauge as the radius reduces below 5.5 chains. A prototype ¼” equals 0.083 in 4mm scale, ¾” = 0.25mm On the prototype the maximum widening is at 5.5 chains or less – a pretty sharp curve. That is 4’ 9” in 4mm scale – a fairly gentle curve by most model railway standards. You can choose to interpret the steps of the prototype widening in two different ways, and choose a length of tool that will give you “maximum” (54mm) or “minimum” (45mm) widening. Below, “maximum” widening is shown by the green line, “minimum” widening by the yellowy-brown one. You can see that they only precisely intersect the prototype “steps” at 5.5 chains. Thus they are an “interpretation” of the prototype. For exact precision, don’t use a triangular tool, get some graduated gauges (see photo below). We often use sharper curves than the prototype, so as the radius sharpens below the point that we get 0.25mm widening we should stop using the triangular tool and instead use a tool of our gauge plus 0.25mm, the C&L P4 tool of +0.3 is the nearest equivalent. However, no-one will be able to see the widening, so the question is, how necessary is it to have prototypical gauge widening? – as wheels in 00, EM and P4 have a narrow back to back relative to the track. In P4 we have the best part of 0.2mm more clearance than the prototype, and the flangeways are widened by 0.1mm each side. Only S4 has supposedly prototypical clearances, and even there people seem to use the 30mm tool. My personal approach is to use the triangular tool and use the C&L gauges when I know I want a particular widening in pointwork. 3591_071503_160000000.png  The blue line in the graph shows what the 30mm tool does. It gives nowhere near the prototypical widening at 4’9”, but can be used down to a radius of less than 500mm before it’s giving too much widening. Below is a spreadsheet that gives the same information as the graph 3591_071503_500000000.png  3591_071509_260000000.png  Hopefully Martin will correct anything he considers erroneous. Hopefully Martin will correct anything he considers erroneous. |
||
| Attachment: attach_3172_3809_snip_GW.JPG 93 | |||
| Last edited on 7 Nov 2020 20:17 by Julian Roberts |
|||
|
posted: 7 Nov 2020 23:49 from: Rob Manchester
click the date to link to this post click member name to view archived images |
Hi Julian, Thanks again for your post. I quite like 3 point gauges as you can put a weight on the top of each which keeps them stable when laying track but I agree that it makes sense to have a 'maximum' value for widening and revert to the type in your last photo once the maximum value is reached with the 3 point type. There are of course many variables that dictate how much gauge widening you need or want such as wheel diameters, wheelbases etc. I have several sets of the C&L single point gauges ( some of which have been modified in the past for other uses ) and it is easy to make up extra bits of tube in the lathe if you need a particular size. Rob |
||
|
posted: 10 Nov 2020 11:05 from: Julian Roberts click the date to link to this post click member name to view archived images |
Hi Rob Quite. The great thing about the triangular gauge is that it keeps a good grip of the rails whereas with the C&L type you have to be sure to hold the rails right up against the flanges. I imagine it would not be an easy proposition to produce an accurate triangular gauge to a different length that also holds the rails, and the only need for it, I would think, would be in S4. [I suspect S4 is a lot easier than people suppose (I reckon the BB window could be just as wide as officially in P4, 0.08mm) and track would be that much easier with a 45mm triangular tool.] The other main thing about the triangular tool is you don't need to know the track radius (except as agreed above) - but of course Templot users always do know the radius! Cheers Julian |
||
|
posted: 11 Nov 2020 08:14 from: Hayfield
click the date to link to this post click member name to view archived images |
Julian The gauges referred to as C&L are actually Exactoscale. 4XX TG01 are the gauge widened set 4XX TG02 are the standard set What I do to start off with is to have a standard roller gauge at one or both ends, simply to hold the rail whilst the first few chairs set If building chaired track (this includes 3 point gauges), these gauges must be plastic chair compliant, which allows the head of the rail to rotate in the slot. In the past (it was discussed on this site) I had a gauge narrowing incident when using a new Alan Gibson (the same would go for most makes) 3 point gauge when making a P4 turnout. The gauge is fine for soldered method, but grips the rail too tight, thus counteracting the cant of the plastic chairs, when the gauge was removed the chairs relaxed back into shape and gauge narrowed. The style of the Exactoscale gauges counteracts this allowing the chairs to sit correctly |
||
| Last edited on 11 Nov 2020 08:18 by Hayfield |
|||


| Please read this important note about copyright: Unless stated otherwise, all the files submitted to this web site are copyright and the property of the respective contributor. You are welcome to use them for your own personal non-commercial purposes, and in your messages on this web site. If you want to publish any of this material elsewhere or use it commercially, you must first obtain the owner's permission to do so. |