Templot Club Archive 2007-2020
|
|||
| author | remove search highlighting | ||
|---|---|---|---|
|
posted: 3 Apr 2009 15:25 from: BruceNordstrand
click the date to link to this post click member name to view archived images |
Howdy all I have a new install of Windoze Xp and Templot so I can work on a new plan a friend of mine designed. This is stage 1 of a double deck layout in my garage (pic attached) I have a BMP file all ready to load into Templot as a background image but frankly, I do not know where to start. You see, there is not many straight sections in this plan and very few straight turnouts. Would you suggest I try manipulating a turnout to fit and go from there or start with some plain track sections and insert turnouts into that? I am still very green behind the ears when it comes to Templot so please be gentle... Cheers Bruce |
||
| Attachment: attach_535_778_RFW-Garage.png 205 | |||
| Last edited on 4 Apr 2009 01:02 by BruceNordstrand |
|||
|
posted: 3 Apr 2009 15:40 from: Paul Boyd
click the date to link to this post click member name to view archived images |
Hi Bruce You say you are green with Templot - have you worked your way through the tutorials? Before you can attempt that plan, you really, really need to have a good basic understanding of Templot. But... no doubt you want to dive straight in  What I would do here is to lay out all the basic track formation using plain track. Get all the sweeping curves in the right place, check all the radii are workable etc. Then you can start inserting turnouts into the plain track. What I would do here is to lay out all the basic track formation using plain track. Get all the sweeping curves in the right place, check all the radii are workable etc. Then you can start inserting turnouts into the plain track.Cheers |
||
|
posted: 3 Apr 2009 16:35 from: Jim Guthrie
click the date to link to this post click member name to view archived images |
Bruce, Adding to what Paul has said, you might want to use several items under the "Tools" menu. To make parallel trackwork, use "Make Double Track" on the Tools menu and you get a track which perfectly parallels the curvature of the original track. I can never remember which is TS and MS so I just try one, and if the new track goes on the wrong side, recall the original and make on the other side.  You can also adjust the spacing of parallel tracks in the Tools menu and Templot normally has a default spacing of the minimum allowable. In station areas like in your plan, you might want to increase this spacing. Also, if you insert a turnout in one track of the pair and use "Make Simple Crossover", Templot makes the crossover to match the parallel track exactly. What's also handy is using the "Make Split" functions which allows you to split off plain track attached to a turnout to insert another turnout in that piece of track, and so on. I think I'll stop now since you've probably got enough to be going on with. You're going to find it hard going for a bit until you find your way round Templot and until you understand how it works. Just looking at Martin's video tutorials is worth it to get a feel for how things work. I'm pretty sure it's possible to construct a complete layout starting with one piece of track, insert a turnout, adjust it, split off the plain track, insert another turnout, etc. etc. Maybe that's an idea for a competition. Jim. |
||
|
posted: 3 Apr 2009 17:05 from: Martin Wynne
click the date to link to this post click member name to view archived images |
Jim Guthrie wrote: I'm pretty sure it's possible to construct a complete layout starting with one piece of track, insert a turnout, adjust it, split off the plain track, insert another turnout, etc. etc. Maybe that's an idea for a competition.Hi Jim, Bruce, It certainly is possible, and here's a video to get you started on that way of working: http://www.templot.com/martweb/videos/flash/starter/em_starter.html For a large layout it is probably better to do as Paul suggests and lay out the sweeping curves first, using the "make transition" function between them. That way you know everything is going to fit and your radius constraints will be met. You can then insert turnouts in the templates and continue as in the video to create each area of pointwork. But before doing any of that I would strongly suggest playing about with individual turnouts in the control template. Curving them; extending them; shortening them; trying different combinations of switch and crossing sizes; printing them out. That way you will have a much better understanding of what is and isn't possible and the options available to you, when you start inserting turnouts in your plan. Just ask if you get stuck. regards, Martin. |
||
|
posted: 4 Apr 2009 01:24 from: BruceNordstrand
click the date to link to this post click member name to view archived images |
Thanks everyone, very helpful Paul, green as i haven't spent alot of time with Templot. I have actually owned it for a number of years (as Martin can attest to!) but have never "got into it". I do the tutorial, start a plan with gusto and then abandon it due to frustration. When I come back some time later I need to start all over again and usually end up in the same place. Inbetween these times I usually blow away the machine for one reason or another resulting in the need to hassle Martin for a new release code. This time I decided to see what the masters would do in this situation so hopefully I can get a little further.... I bought Templot many moons ago to just this sort of thing, draw track on plans and not what alot on the list do with it. My friend designs his layouts in Autocad and always uses flowing track & turnouts ignoring the usual standard #4, #5 or #6 definitions. His own layout is just pure beauty with nice flowing track looking like it was built to the terrain and not the other way round. My last layout just abandoned used his design printed 1:1 from Autocad with Fast Tracks curvable turnout bases but it just didn't look right which is why I am turning back to Templot for this one... Jim, Martin Thanks for the useful tips. I very much hope that my frustration levels this time around are a little lower and things don't get the better of me! Martin, that small video will certainly be helpful with the turnout leading into the town as it is a Y of sorts. One day I hope to get to the confidence level shown in the video, seems so easy! From past experience curves have always been difficult for me. I pretty much stuff up the transitions resulting in really weird track. It is about this time I pack things away.... Cheers Bruce |
||
|
posted: 4 Apr 2009 15:30 from: Alan Turner
click the date to link to this post click member name to view archived images |
You don't give any dimensions but estimating a length of 14' then you have some horrendous curves on that plan. Some are down to 19" which is not going to work even for 00/H0. Alan |
||
|
posted: 4 Apr 2009 15:48 from: BruceNordstrand
click the date to link to this post click member name to view archived images |
Hi Alan The plan is actually 17' 1" long x 9' 4" wide. The smallest radius curve on the lower level is 24" and rises from there. For example, entering the staging yard is 24", the smallest inside curve in the staging yard (around the future helix) is 24" and the staging exit curve into the town (across the door) is 26". There will be no huge locos or rolling stock on this line. It is HO and will run 20's US equipment in the coal fields of Virgina around the Appalachian mountains - no sweeping curves anywhwere in that environment Cheers Bruce |
||
|
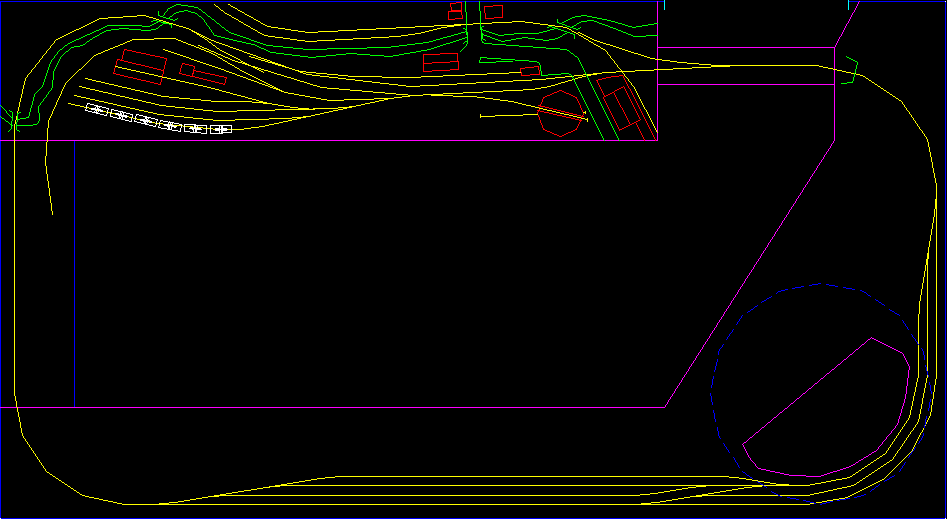
posted: 4 Apr 2009 18:50 from: Alan Turner
click the date to link to this post click member name to view archived images |
OK plan attached. This is where you start from. Alan |
||
| Attachment: attach_536_778_Garage.box 246 | |||
|
posted: 5 Apr 2009 02:00 from: BruceNordstrand
click the date to link to this post click member name to view archived images |
Alan Turner wrote: OK plan attached. This is where you start from.Thank you Alan! Much appreciated.... of to study what you have done Cheers Bruce |
||


| Please read this important note about copyright: Unless stated otherwise, all the files submitted to this web site are copyright and the property of the respective contributor. You are welcome to use them for your own personal non-commercial purposes, and in your messages on this web site. If you want to publish any of this material elsewhere or use it commercially, you must first obtain the owner's permission to do so. |