Templot Club forums powered for Martin Wynne by XenForo :

TEMPLOT 3D PLUG TRACK - To get up to speed with this experimental project click here.   To watch an introductory video click here.   See the User Guide at Bexhill West.

  • The Plug Track functions are experimental and still being developed. Some of the earlier pages of this topic are now out-of-date.

    For an updated overview of this project see this topic.   For some practical modelling aspects of using Plug Track see Building 3D Track.

    The assumption is that you have your own machines on which to experiment, or helpful friends with machines. Please do not send Templot files to commercial laser cutting or 3D printing firms while this project is still experimental, because the results are unpredictable and possibly wasteful.

    Some pages of this and other topics include contributions from members who are creating and posting their own CAD designs for 3D printing and laser-cutting. Do not confuse them with Templot's own exported CAD files. All files derived from Templot are © Martin Wynne.
  • The Plug Track functions are experimental and still being developed.

    For an updated overview of this project see this topic.   For some practical modelling aspects of using Plug Track see Building 3D Track.

    The assumption is that you have your own machines on which to experiment, or helpful friends with machines. Please do not send Templot files to commercial laser cutting or 3D printing firms while this project is still experimental, because the results are unpredictable and possibly wasteful.

    Some pages of this and other topics include contributions from members who are creating and posting their own CAD designs for 3D printing and laser-cutting. Do not confuse them with Templot's own exported CAD files. All files derived from Templot are © Martin Wynne.

GWR Branch Terminus Journey

Quick reply >
@LittleWestern

Hi James,

I have scanned the Paddington 1948 drawing:

padd_ordinary_chairs.png


As you can see, the GWR J joint chair is available only for BS-95R rail. There is no corresponding chair for the GWR OO (1900) rail section. I have never seen a drawing of such, or any reference to one.

It is very likely that GWR-owned sidings in industrial areas would still be using the old OO rail in 30ft lengths, or earlier rail sections. If they are private sidings, the only way to know about the track would be from photographs. They might be flat-bottom rails, or bullhead rails using REA chairs or earlier pre-grouping chairs, or GWR OO chairs.

Whatever, there is no need for joint chairs or wider joint sleepers in sidings, because the low speed and occasional traffic does not require strengthened rail joints.

The GWR changed from the OO rail to BS-95R rail after WW2, but it was a piecemeal changeover as local stocks of OO were used up.

Where BS-95R rail was used in GWR main running lines, the BS-95R J joint chairs may have been used. Or not. I rather doubt the GWR would have used them on branch and secondary lines.

For detailed chapter and verse on all this you need to contact the Great Western Study Group -- my knowledge of GWR is limited.

Some more topics about joint chairs here:

https://85a.uk/templot/archive/topics/topic_3508.php

https://85a.uk/templot/archive/topics/topic_3690.php

https://85a.uk/templot/club/index.php?threads/gwr-j-chairs.34/


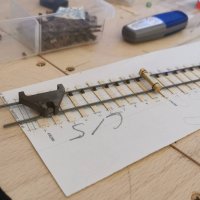
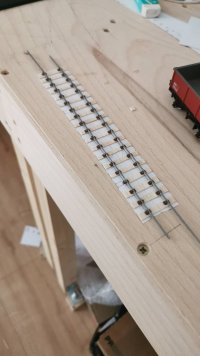
You do not need TinkerCAD to create a jig for plain track, because Templot can export a timbering fret directly, in 2-D or 3-D files, DXF or STL:

timbering_fret_45ft_19.png


The above is for 45ft rails with 19 sleepers, and 12" wide joint sleepers at J, and closed up sleeper spaces towards the joints.

Ask again at (4 pages):

https://85a.uk/templot/club/index.php?threads/building-3d-track.520/

for more info about creating timbering frets by FDM printing or laser cutting. (It's not easy for CNC milling because of the need for square internal corners.)

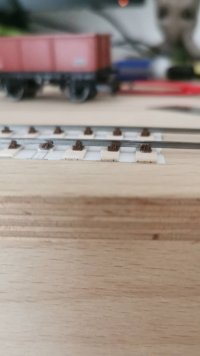
If FDM printing, you could add some vertical lugs to act as rail guides for track assembly.

cheers,

Martin.
 
_______________
message ref: 4914
p.s. James,

It is interesting to note the OO ST 3-H chair shown directly opposite the BS-95R J joint chair on the drawing.

This is a rare beast, a GWR chair with 3 holes. Possibly used by the GWR at rail joints? Unlike the BS-95R joint chair, instead of enlarging the base dimensions for increased strength, it has a thicker base. This has the advantage of not needing a wider sleeper. But this would push the joint sleeper lower in the ballast. Which is of no consequence on the prototype, but a tricky nuisance on a model.

Does anyone have a photo of a GWR rail joint, showing 3-hole chairs or the joint sleeper seemingly lower than the rest?

cheers,

Martin.
 
_______________
message ref: 4915
@Martin Wynne
Thank you so much for your plethora of information! Considering I am modelling a secondary branch leading into Nationalisation I might Rule 1 it and say that the line was never upgraded to BS-95R and stayed 00 for my layouts entirety. But I can use BS-95R dimensions/plans for my mainline when it eventually gets laid in several years. This makes me happy :)

I have added your copied drawings to my data pool for future reference and I am looking for more books to purchase in this regard.
As for the Timbering Jig, fantastic! I will create 1 for 19 sleeper branch traffic and another for 30ft siding sections. I'm happy to say that the GWR owned the sidings to keep it all relative during construction rather than referring to other types of construction etc.
 
_______________
message ref: 4916
p.s. James,

It is interesting to note the OO ST 3-H chair shown directly opposite the BS-95R J joint chair on the drawing.

This is a rare beast, a GWR chair with 3 holes. Possibly used by the GWR at rail joints? Unlike the BS-95R joint chair, instead of enlarging the base dimensions for increased strength, it has a thicker base. This has the advantage of not needing a wider sleeper. But this would push the joint sleeper lower in the ballast. Which is of no consequence on the prototype, but a tricky nuisance on a model.

Does anyone have a photo of a GWR rail joint, showing the joint sleeper seemingly lower than the rest?

cheers,

Martin.
Hi @Martin Wynne,

An interesting notice, I saw this too and thought it was a mis-draw. Perhaps easy to model with a simple 3 bolt running chair?
Maybe I will have to start drawing them myself! I saw in one of the links you posted another member was designing there own chairs but I have not seen anything since.
I will have a search for this elusive "3 bolt chair" and see what I can come up with.

Cheers,

James
 
_______________
message ref: 4917
When I was on the P Way gang at the ESR the original untouched section from Cranmore to Merryfield Lane was a right mixture of rail and standards. By far the greatest was 95lbs rail in 44ft 6ins panels some with J chairs and timbers some without several panels of 00, no J timbers. 10 panels of 85lbs rail with 2 bolt fishplates, 60ft panels, the end chairs were very close to the end of the rail and there was about a 4 or 5ins gap between adjacent sleepers.

What remained of the sidings at Cranmore had fewer sleepers per length than the running line. We never measured the rail lengths in the siding.

All turnout timbers were 12ins.

I can't remember whether there were any 14ins timbers in the diamond or single slip. As I am currently away from home and using a mobile phone, I am not going to search the old forum for my special GW chairs thread to check for 14ins timbers.

The general consensus was that no major work had been carried out since before WW2 and only the barest possible maintenance since.

HTH.
 
_______________
message ref: 4920
Sounds about right. The use and provision of Joint chairs is another matter of course. In 4mm only Exactoscale produce an M1 chair of any kind, in 7mm it's Off the rails. The former is only practicable for society members and the latter involves the use of Shapeways, which has its own issues.
 
_______________
message ref: 4922
I can't remember whether there were any 14ins timbers in the diamond or single slip. As I am currently away from home and using a mobile phone, I am not going to search the old forum for my special GW chairs topic to check for 14ins timbers.
@Phil O

Hi Phil,

This keeps coming up. I have posted links to your original posts in the past, and here they are again:

topic: 182 - GW special chairs
topic: 184 - GW special Chairs
topic: 186 - GW special chairs
topic: 187 - GW special chairs
topic: 188 - GW special chairs
topic: 189 - GW special chairs
topic: 190 - GW special chairs
topic: 191 - GW special chairs
topic: 192 - GW special chairs
topic: 204 - GW special chairs

To find them again, put "GW special chairs" (with the quotation marks) in the Full Templot Search.

In addition I have now placed the list in the Resources section, to make it easier to find:

https://85a.uk/templot/club/index.php?resources/gwr-switch-and-crossing-chairs-photos.13/

If you need to refer to them again, just post the above link. :)

Thanks again for posting these valuable photos.

cheers,

Martin.
 
_______________
message ref: 4927
When I was on the P Way gang at the ESR the original untouched section from Cranmore to Merryfield Lane was a right mixture of rail and standards. By far the greatest was 95lbs rail in 44ft 6ins panels some with J chairs and timbers some without several panels of 00, no J timbers. 10 panels of 85lbs rail with 2 bolt fishplates, 60ft panels, the end chairs were very close to the end of the rail and there was about a 4 or 5ins gap between adjacent sleepers.

What remained of the sidings at Cranmore had fewer sleepers per length than the running line. We never measured the rail lengths in the siding.

All turnout timbers were 12ins.

I can't remember whether there were any 14ins timbers in the diamond or single slip. As I am currently away from home and using a mobile phone, I am not going to search the old forum for my special GW chairs thread to check for 14ins timbers.

The general consensus was that no major work had been carried out since before WW2 and only the barest possible maintenance since.

HTH.
Hi @Phil O
Thanks for your experience! Trying to gauge what the correct situation would be for modelling 00 track panels and it seems like your PWay time has come in handy.
As for the 'general consensus' you mentioned regarding work carried out, it's music to my ears :D I can safely lay some 00 panels and have it correctly modelled for the entire timespan the layout should depict.

Cheers,

James
 
_______________
message ref: 4930
@Phil O

Hi Phil,

This keeps coming up. I have posted links to your original posts in the past, and here they are again:

topic: 182 - GW special chairs
topic: 184 - GW special Chairs
topic: 186 - GW special chairs
topic: 187 - GW special chairs
topic: 188 - GW special chairs
topic: 189 - GW special chairs
topic: 190 - GW special chairs
topic: 191 - GW special chairs
topic: 192 - GW special chairs
topic: 204 - GW special chairs

To find them again, put "GW special chairs" (with the quotation marks) in the Full Templot Search.

In addition I have now placed the list in the Resources section, to make it easier to find:

https://85a.uk/templot/club/index.php?resources/gwr-switch-and-crossing-chairs-photos.13/

If you need to refer to them again, just post the above link. :)

Thanks again for posting these valuable photos.

cheers,

Martin.

Hi Martin,

Thanks again for these links, I have been referring to them quite often and comparing them to David Smith's book. GWR had to be different didn't they :D

Cheers,

James
 
_______________
message ref: 4931
@Phil O

Hi Phil,

This keeps coming up. I have posted links to your original posts in the past, and here they are again:

topic: 182 - GW special chairs
topic: 184 - GW special Chairs
topic: 186 - GW special chairs
topic: 187 - GW special chairs
topic: 188 - GW special chairs
topic: 189 - GW special chairs
topic: 190 - GW special chairs
topic: 191 - GW special chairs
topic: 192 - GW special chairs
topic: 204 - GW special chairs

To find them again, put "GW special chairs" (with the quotation marks) in the Full Templot Search.

In addition I have now placed the list in the Resources section, to make it easier to find:

https://85a.uk/templot/club/index.php?resources/gwr-switch-and-crossing-chairs-photos.13/

If you need to refer to them again, just post the above link. :)

Thanks again for posting these valuable photos.

cheers,

Martin.

Hi Martin,

Thanks for that, I have been away on holiday in Switzerland, with only a mobile phone, at best with it, I can read and reply to messages, anything else is a chore on such a small screen. Sometime ago I bookmarked the pages on my laptop, to make them easier to find.

Putting the threads in the Resources section seems to be a good move, if it makes it easier for others to find and will also help me, when away from home without my laptop.


Thanks again.
 
_______________
message ref: 4935
Hi all,
So finally track laying update! I managed to get some 0.8mm & 1.5mm balsa to do some test panels and get my fingers into the world of hand-built track.
Basic cut strips roughly to size, dab of superglue, then ease the chair in place. all chairs were on the rail and then moved along and glued 1 by 1.
Lot's of lessons learned from this, will be picking up some 1.5mm plywood next week to be ready for actual trackwork to begin but progress is progress.
See some attached pictures and please give me your thoughts.
I need to make a jig of some sort to accurately cut each sleeper to length and width but that will be done in the next week or so.

So this panel is 19x 0.8mm balsa Timbers, C&L Finescale 2Bolt GWR ORD Chairs and C&L Steel Code 75 Bullhead.

Cheers,

James
 

Attachments

  • 312431216_2432319597075476_7003449192047220098_n.jpg
    312431216_2432319597075476_7003449192047220098_n.jpg
    141.2 KB · Views: 102
  • 312562417_3240335972883602_5356975604575023291_n.jpg
    312562417_3240335972883602_5356975604575023291_n.jpg
    97.9 KB · Views: 88
  • 312537544_2530819907072214_3334896482980240304_n.jpg
    312537544_2530819907072214_3334896482980240304_n.jpg
    74.4 KB · Views: 91
_______________
message ref: 5129
Hi all,

Further Update on industry design, I have completed what I feel is the final version of the track-plan. (Attached)
Having read through "GWR Switch and Crossing Practice" a fair few times I feel the choice of Old Type 10ft Heel Switches is an appropriate choice. I've also mainly used 44'6" 19 Sleeper panels (although I may program 30' panels before the final print) for the plain track.
The layout consists of:
- A single 700mm main siding that will serve as the loading/unloading platform for the industry
- A crossover before the main siding to a shorter track (haven't decided on a small coal merchant facility next to the road or just an additional siding. But seeing as the Brickworks is small I'm not sure it's required)
- A higher track for small shed and loco facilities/Secondary loading/unloading facilities
- A small kickback for Loco relief or additional storage/operational interest.
- The single line branch will be slightly elevated on a rising embankment to show difference, perhaps 7/8 scale meters above the lower track bed to show a short climb out from the station (on a later scenic section between this and terminus station, I will have them align in height and meet before the terminus)

I'm interested in whatever feedback is given, note that for trackwork I would like to be correct but mainly I think just the timbering around the turnouts needs attention.
As for the track layout, I am using "Rule 1" as being an industry they would all look different.
Please if anyone feels like correcting some poor timbering, feel free to look at my turnouts and break it :D

Cheers and happy modelling,
James
 

Attachments

  • Brickworks 1.box
    146.8 KB · Views: 92
_______________
message ref: 5190
So... It has been some time since I posted regarding my layout and a lot had changed, but also a lot has stayed them same and just not moved anywhere due to external circumstances.
The closest thing I can update is I have 1) Settled on a Real world location to model over the next few years, which from extensive research (which is never over :D) should in the long run provide me with oppurtunities for every aspect of the hobby at some point or an other. The location being the Brent Junction - Kingsbridge Branch Line commonly known as "The Primrose Line".
2) I have adapted my previous industry layout (more to come soon) to fit somewhere on that line so that I do not wastes the last year of thought etc..
3) I have begun to dabble in turnout creation and after some reading in Scale4 articles came across a rather handy article by Howard Bolton on "Making a Success of Switches and Crossings" and in addition to other materials has provided me the confidence to persue my hand-built trackwork further.
In the article Howard advises good practises but also provides plans for a Switch Blade and Crossing rail filing jig, this to me is invaluable as I was trying to design one myself and failing too! It denotes the measurements required for REA 'A', 'B' & 'C' blades and crossing rails and the formulas used to achieve the correct distances on the jog etc... Well worth a read, even if you have no plan to make your own turnouts.
Alas, being GWR, the planning lengths are quite different so I have had to adapt the formula (Thickness of Rail/2 + Thickness of brass clamp) in my case meaning (0.9/2)+1.5=1.95mm then you take this result and create the next formula for the jig measurements. Again in my case, for 9ft/10ft/12ft GWR type switches (at the moment) works out as (1.95/0.45)x25=114mm after rounding to the nearest whole number. This then denotes the edge of the brass clamp you file against to get your planning angle on the rail. (If I understand it correctly that is, so please correct me if I am wrong)
This process should allow me to better learn creating my own trackwork in conjunction with the other materials I have. But it has for sure given me my motivation back (Table below for reference)
1682853339672.png


Other than this I have ordered some brass etches for turnout chairs from Masokits. If they provide what I am looking for then a large bulk order over time will be placed :D Better to order now for future proofing considering the number of turnouts planned at scenic level.

Once I have an update on these frets and the jig itself has been made, I will make a better start on turnouts. Some plain lengths of track have already been laid but as stated, due to personal issues, I have had little hobby time of late.

Anyway, as always, criticism and help is always appreciated :)
Thanks all
James
 
_______________
message ref: 6530
Back
Top