Templot Club forums powered for Martin Wynne by XenForo :

TEMPLOT 3D PLUG TRACK - To get up to speed with this experimental project click here.   To watch an introductory video click here.   See the User Guide at Bexhill West.

  • The Plug Track functions are experimental and still being developed. Some of the earlier pages of this topic are now out-of-date.

    For an updated overview of this project see this topic.   For some practical modelling aspects of using Plug Track see Building 3D Track.

    The assumption is that you have your own machines on which to experiment, or helpful friends with machines. Please do not send Templot files to commercial laser cutting or 3D printing firms while this project is still experimental, because the results are unpredictable and possibly wasteful.

    Some pages of this and other topics include contributions from members who are creating and posting their own CAD designs for 3D printing and laser-cutting. Do not confuse them with Templot's own exported CAD files. All files derived from Templot are © Martin Wynne.
  • The Plug Track functions are experimental and still being developed.

    For an updated overview of this project see this topic.   For some practical modelling aspects of using Plug Track see Building 3D Track.

    The assumption is that you have your own machines on which to experiment, or helpful friends with machines. Please do not send Templot files to commercial laser cutting or 3D printing firms while this project is still experimental, because the results are unpredictable and possibly wasteful.

    Some pages of this and other topics include contributions from members who are creating and posting their own CAD designs for 3D printing and laser-cutting. Do not confuse them with Templot's own exported CAD files. All files derived from Templot are © Martin Wynne.

Positioning of sleepers on crossover

Quick reply >

philsandy

Member
Location
Manchester
I have posted this question on RMweb, someone suggested I might get more response on here.

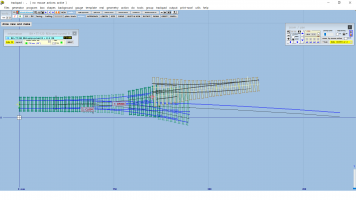
Using Templot I have constructed a branch crossover from a 3 way tandem, but do not know how the sleepers should be positioned at the actual crossover point. Also how long can a sleeper be, ie. would some sleepers span the entire width, (I assume sleepers would not be made that long?), would they be shortened and interlaced?
PS. it's BR circa 1960, Manchester area, so ex L&Y/ LMS.
Screen shot below:
 

Attachments

  • Screenshot (117).png
    Screenshot (117).png
    73 KB · Views: 77
_______________
message ref: 5527
Last edited:
@philsandy

Hi Phil,

Welcome to Templot Club.

That's the first time I have seen anyone using TT-120 in Templot. :)

Stock sizes of timbers usually go up to 19ft-6in for long timbers used under double-track crossovers (at 6ft way).

Longer timbers up to about 30ft are generally treated as a special order and expensive, so only used if essential and traffic levels justify it. Sometimes where a long timber is needed it is done by splicing together shorter timbers, an old fishplate being bolted over the splice as a stiffener (makes an interesting feature on a model and easy to do).

For your tandem, you need to ensure there is timber under the special chair positions, so some interlacing of your timbers might work better than very long ones.

If you post your BOX file here as an attachment, I will do it for you, and then you can see the sort of thing needed.

p.s. "sleepers" go under plain track -- they are 10" wide, 5" thick and only 8ft-6in long. "timbers" go under pointwork -- 12" wide and 6" thick. :)

cheers,

Martin.
 
_______________
message ref: 5529
@philsandy

p.s. Phil,

Your turnout has some rails missing. After creating a tandem you need to click this on the next control template:

reset_tandem_derived.png


Martin.
 
_______________
message ref: 5530
Martin, thanks for your reply. Have attached Box File. The "lower" turnout will actually be a short Y turnout, but I'm new to Templot and have not worked out how to place a Y turnout there.
 

Attachments

  • TT120 3 WAY BRANCH CROSSOVER_2022_12_09_1400_41.box
    49 KB · Views: 91
_______________
message ref: 5531
@philsandy

Hi Phil,

I have done some typical timber shoving on your tandem:

phil_tandem.png


In a plan view like this it can look very untidy. But when painted and ballasted it just looks normal.

There isn't a right or wrong design, someone else would likely produce a very different result. Box file attached below -- others might like to have a go. :)

A neater design could be achieved by changing the position of the turnouts by a few mm -- I left them as in your BOX file above.

But here I moved your upper turnout about 4mm to the right (CTRL-6 snake mouse action):

phil_tandem2.png


Which has allowed a more conventional timbering layout. With one very long timber which would probably be done by splicing two timbers together. Box file 2 below. In both files I have also tidied up the check and wing rails for the tandem.

Generally, where timbers run under a V-crossing you need to retain them, and remove any timbers on other templates which conflict with them. You can lengthen or shorten them at each end, or twist them to different angles, to support the other rails. What you can't do is move them backwards or forwards, because then the special V-crossing chairs (which will fit the rails only in one place) wouldn't have any timber under them. Also where there are rail joints, the adjacent timbers need to be closer than normal.

p.s. After changing the second turnout to 1:6, you forgot to go back and click this:

tandem_continue.png


which makes the middle V-crossing and puts some aligned timbers under it.

cheers,

Martin.
 

Attachments

  • phil_tandem.box
    100.3 KB · Views: 61
  • phil_tandem_2.box
    99.6 KB · Views: 66
_______________
message ref: 5544
Thanks for that Martin, much appreciated.

When I print, anything below the 0 axis is off the bottom of the page. How do I move the group of templates "up" (approx.100 mm). Tried repositioning peg up 100 mm, but just another peg appears, rather than the existing peg being moved.
Or is there something in the printer set up that needs altering?
 
_______________
message ref: 5548
@philsandy

Hi Phil,

Leave the track where it is. Move the printer page outlines to conveniently contain it.

That's the SHIFT+CTRL+F10 move page origin mouse action:

move_page_origin3.png


move_page_origin.png


cheers,

Martin.
 
_______________
message ref: 5549
Back
Top