Templot Club Archive 2007-2020
|
|||
| author | remove search highlighting | ||
|---|---|---|---|
|
posted: 22 Mar 2010 12:06 from: Phil O
click the date to link to this post click member name to view archived images |
Hi All Does anyone have any info on how the GW would have arranged the timbers under a tandem turnout? I have had a look in David Smiths book GWR Switch & Crossing practice and can find no help there. Below is the turnout which I would like to sort out the timbers. 38_220704_280000000.png  TIA Phil |
||
| Last edited on 22 Mar 2010 12:08 by Phil O |
|||
|
posted: 23 Mar 2010 21:26 from: Paul Boyd
click the date to link to this post click member name to view archived images |
Tricky question! This is the way I do it, which may be right or wrong. I work on the basis that each element of the turnout is made up of standard components, i.e., three crossings and two switches. On the prototype, the timber spacing within each component was pretty much fixed so that the special chairs would fit so that's what you have to base the overall timbering on. So, starting with the switches, you know what type of switch you're using and where the rail joint and switch toe is. Timbers need to be placed in the correct relative positions, and they're shown on the screenshot. Same for the crossings. You then just fill in the gaps! As far as I can tell, in the turnout shown in the screenshot all timbers would be perpendicular to the straight through road. What I do is to create a new template with no rails and use that just as a timbering template. Use the timbers shown on the partial templates as a guide, and adjust the timber template timbers accordingly. Once you're happy, remove the timbers from the partial templates. You may also need to slide the check rails about a bit so they line up correctly with the timber spacing - again with the prototype as a reference, the chairs have to be in the right position relative to the flair on the check rail. Another factor I'm not entirely sure about is timber alignment. I think that the ends of the timbers on one side would be aligned, with the other side stepping the usual 6", but I'd like to know what is "correct". Not sure if any of that was any help, but no-one else has answered |
||
|
posted: 24 Mar 2010 12:34 from: Phil O
click the date to link to this post click member name to view archived images |
Hi Paul Many thanks for some input, that was more or less the lines along which I was thinking. The only possible difference is that I was going to increase the timbers symetrically along the centre line of the turnout in 6" increments, rather than have them aligned, as this appears to be the way the GW does the rest of its timbering. It could probably do with some 14" timbers but these do not seem to be commercially available in 4mm. Many Thanks Phil PS. I will add another screen shot once I have got it sorted. |
||
|
posted: 24 Mar 2010 12:44 from: Jim Guthrie
click the date to link to this post click member name to view archived images |
Phil O wrote: It could probably do with some 14" timbers but these do not seem to be commercially available in 4mm.Phil, Exactoscale do 14" plywood timbering if 1.6mm thick suits you. Otherwise, just cut it yourself. I needed 0.8mm thick timbering to match what I had started using and got some 0.8mm (1/32") plywood from the local aero modelling shop and slit it by hand, which is not difficult with that thickness. Jim. |
||
|
posted: 24 Mar 2010 12:49 from: Phil O
click the date to link to this post click member name to view archived images |
Jim Guthrie wrote: Phil O wrote:It could probably do with some 14" timbers but these do not seem to be commercially available in 4mm.Phil, Hi Jim Many thanks for the pointer, I will check Antics tomorrow when I go to work as 1.6mm from Exactoscale is a bit thick when compared to the EM ply I have already. Cheers Phil |
||
|
posted: 26 Mar 2010 15:10 from: Brian Lewis
click the date to link to this post click member name to view archived images |
Timber Tracks have been selling 14" timbers for quite a while Phil. In 4mm, the product ID is T4PT104. We supply them in 0.8mm or 1.5mm thicknesses. We also supply them in 7mm and I know I cut some for the S Scale Society, so they are also available from them if S Scale is your thing. Regards Brian Lewis Phil O wrote: It could probably do with some 14" timbers but these do not seem to be commercially available in 4mm. |
||
|
posted: 26 Mar 2010 16:12 from: Jim Guthrie
click the date to link to this post click member name to view archived images |
Brian Lewis wrote: Timber Tracks have been selling 14" timbers for quite a while Phil. In 4mm, the product ID is T4PT104. We supply them in 0.8mm or 1.5mm thicknesses.Brian, I looked on your web site for 4mm ply sleepers the other week and could only find what I thought was your plastic products in the 4mm section - didn't think of looking in the Timber Tracks section - thought that was only for your plywood lacework. Jim. |
||
|
posted: 26 Mar 2010 16:28 from: Brian Lewis
click the date to link to this post click member name to view archived images |
Hi Jim, We will cut anything anyone wants. Even cut some HO turnout bases earlier this week. At present, I am cutting a commission for the station at Weymouth - in 7mm..... The two road goods shed is 1.8 metres long, the GWR engine shed is nearly as big, then there is the LSWR engine shed and the GWR boiler house. All I have done of the train shed so far is the fascia and the 26 trusses and their intermediate supposts. This is going to be some massive layout. Not sure if Templot is going to be used for the trackwork. Stay well. Brian lewis. PS. Popping over to Clevedon Sunday afternoon. Might see you there? Jim Guthrie wrote: Brian Lewis wrote:Timber Tracks have been selling 14" timbers for quite a while Phil. In 4mm, the product ID is T4PT104. We supply them in 0.8mm or 1.5mm thicknesses.Brian, |
||
|
posted: 26 Mar 2010 18:15 from: Jim Guthrie
click the date to link to this post click member name to view archived images |
PS. Popping over to Clevedon Sunday afternoon. Might see you there? I might be trying to sail a dinghy in gales and rain forecast for that day Jim. |
||
| Last edited on 26 Mar 2010 18:15 by Jim Guthrie |
|||
|
posted: 28 Mar 2010 10:48 from: Phil O
click the date to link to this post click member name to view archived images |
Hi All Many thanks for your input. Brian I have just placed an order for a couple of bundles of the 14" turnout timbers. Cheers Phil PS all I have to do now is sort out the timbering under the turnout. |
||
|
posted: 28 Mar 2010 11:10 from: Brian Lewis
click the date to link to this post click member name to view archived images |
Thanks Phil. They should be with you on Tuesday. Anyone who doubts that railway modelling is really taking off should reflect on this statistic. For C+L, 2008-2009 was a brilliant year. But, at the end of week 38 in 2009-2010, and with 14 weeks remaining, we are only £2,200 short of last year's turnover..... :-) We love it, but it is killing us..... Regards and thanks Brian Lewis Phil O wrote: Hi All |
||
|
posted: 29 Mar 2010 10:18 from: Phil O
click the date to link to this post click member name to view archived images |
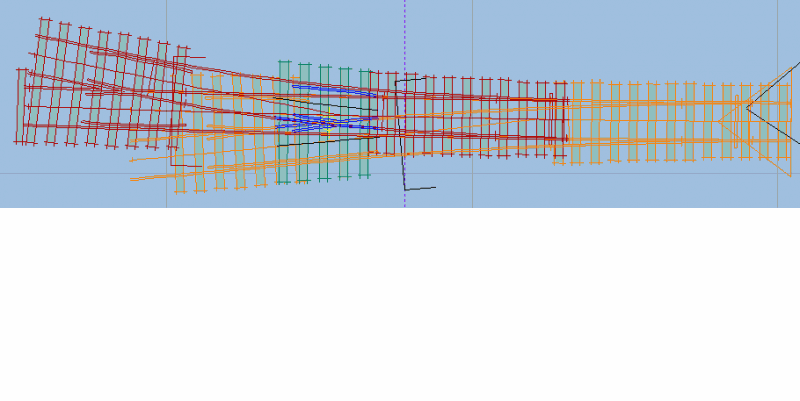
Hi All I have finished shoving the timbers on this. It looks as though I can get away with using standard timbers plus 1 14" timber between the 1st and 2nd crossings from the swicth end where 2 timbers overlap although the chairs will be right up against each other. I can see no way out of this as they are special chairs. Any comments welcome. 38_290517_000000000.png  Cheers Phil |
||
|
posted: 29 Mar 2010 21:48 from: Martin Wynne
click the date to link to this post click member name to view archived images |
Phil O wrote: 1 14" timber between the 1st and 2nd crossings from the switch end where 2 timbers overlap although the chairs will be right up against each other. I can see no way out of this as they are special chairs. Any comments welcome.Hi Phil, The wing rail on the 1st crossing appears to be fouling the adjacent running rail. For a solution to this, see this pic: http://www.scalefour.org/resources/images/chairs-4.jpg From a useful page of track details on the Scalefour Soc. site: http://www.scalefour.org/resources/track.htm Notice some close timbering in there, too. To solve the conflicting chairs problem, you could try easing the crossing angle on the 2nd crossing by half a unit. Then increase the crossing entry straight until the turnout curve matches the previous alignment: action > mouse actions: real > adjust V-crossing entry straight menu item. You can't move the 2nd crossing too far as the check rail will conflict with the 3rd crossing. regards, Martin. |
||
|
posted: 30 Mar 2010 17:23 from: Phil O
click the date to link to this post click member name to view archived images |
Hi Martin Martin Wynne wrote: The Check rail fouls the closure by 1.185mm or actual 3 1/2". I was unsure wether to shorten the flare by 6" or to use the method shown in the photo. A nice set of reference photo's BTW. All I did for the timbering was to go from Equalized - Incremental to square on to main road and lengthen and throw the timbers to get the correct amount outside the running rails. The spacing is what Templot came up with. There is enough room to get a packing bar or Kango between the timbers except where those two timbers overlap. I will have a look at adjusting the 2nd crossing after tea if there is time. Many Thanks Phil I will have a look at adjusting the 2nd crossing angle after tea. Thanks for the tip. |
||
|
posted: 5 Apr 2010 12:39 from: Phil O
click the date to link to this post click member name to view archived images |
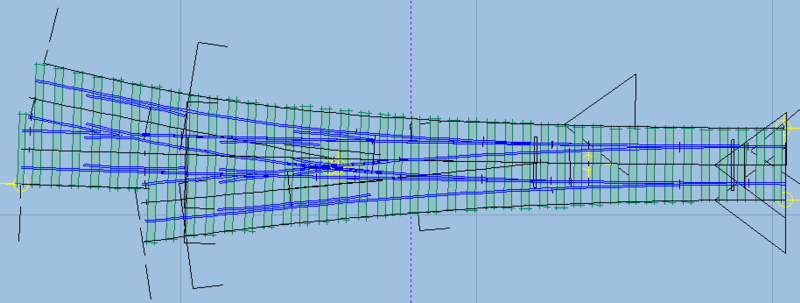
Hi All This I hope is the final incarnation of this tandem turnout. I couldn't get on with Martin's suggestion as it threw up a load more problems but I did move the second turnout 1 sleeper further and below is the result. Some tiding up of the sleepers will be sorted when I construct it, especially those between the second switch and the first crossing. 38_050732_580000000.png  The track centre lines on the edges of the sleepers were used as a guide to position the sleeper ends. Cheers Phil |
||
|
posted: 5 Apr 2010 13:08 from: Martin Wynne
click the date to link to this post click member name to view archived images |
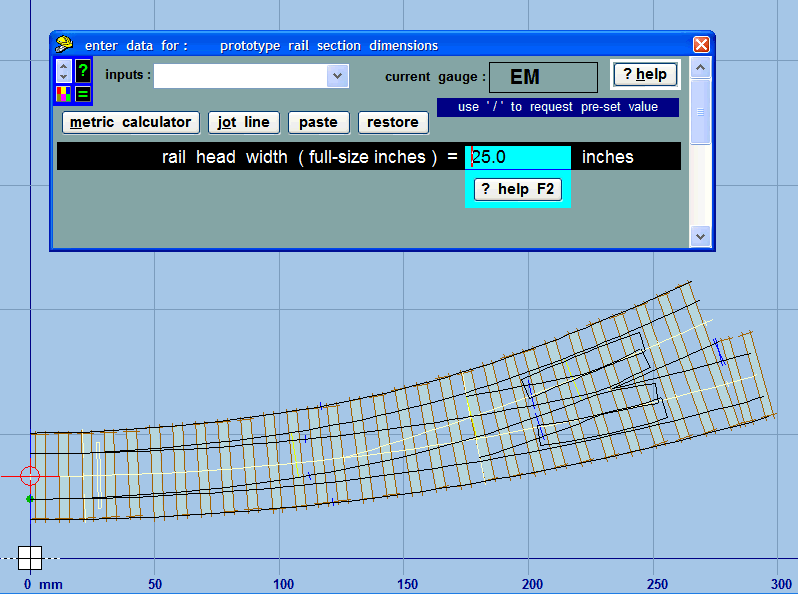
Phil O wrote:The track centre lines on the edges of the sleepers were used as a guide to position the sleeper ends.Hi Phil, A quick way to do that is to temporarily widen the "rails" to about 25 inches: 2_050800_560000000.png  That's at real > rails > rail section data...* menu item. Remember to change it back to 2.75 inches afterwards. (Assuming UK post-grouping standard-gauge.) * at present, the other rail dimensions on that dialog are used only in the 3D option for DXF files. regards, Martin. |
||
|
posted: 5 Apr 2010 15:28 from: Phil O
click the date to link to this post click member name to view archived images |
Martin Wynne wrote: Phil O wrote:Hi MartinThe track centre lines on the edges of the sleepers were used as a guide to position the sleeper ends.Hi Phil, Thanks for the info, as always there is more than one way to skin the cat. Cheers Phil |
||
| Please read this important note about copyright: Unless stated otherwise, all the files submitted to this web site are copyright and the property of the respective contributor. You are welcome to use them for your own personal non-commercial purposes, and in your messages on this web site. If you want to publish any of this material elsewhere or use it commercially, you must first obtain the owner's permission to do so. |