Templot Club Archive 2007-2020
|
|||
| author | remove search highlighting | ||
|---|---|---|---|
|
posted: 6 Jan 2012 12:32 from: r_wilton
click the date to link to this post click member name to view archived images |
I'm new to templot and have just finished my first soldered PCB turnout. My attentions are now on producing a small layout (12' x 16") using templot. I've played around a bit with templates and looked at a few of the tutorial videos but i've come a bit stuck with one (of many i'm sure) problem. I have two offset parallel straight sections separated by about 12". I want to join these with an s bend to form a single track and then add some turnouts along the length. My problem is joining the two sections with the s bend while maintaining the parallel straight section at the start and end of the track. I've tried transition curves (easement from straight) etc. but i always end up with a curve at the end or the straights not being parallel. I'm sure there's a simple solution, but i'm still trying to get my head around all the options and get lost so any pointers would be appreciated. Ray. |
||
|
posted: posted: 6 Jan 2012 12:58 from: Alan Turner
click the date to link to this post click member name to view archived images |
Do you mean like this: 42_060757_590000000.png  Alan |
||
|
6 Jan 2012 12:58 from: Martin Wynne
click the date to link to this post click member name to view archived images |
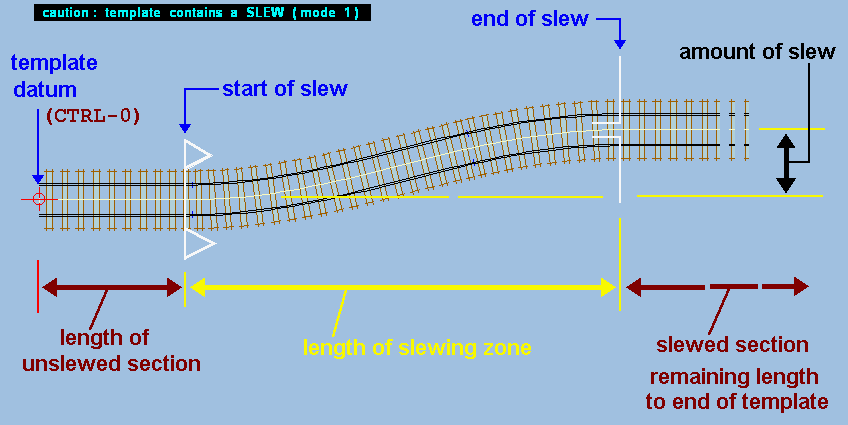
r_wilton wrote: I have two offset parallel straight sections separated by about 12".Hi Ray, For that you use the slewing functions. You need only the first template, discard the second one. Extend the first one, then you can set the position, length, and amount of slew by mouse action: slew_marks.gif  Full notes at: http://www.templot.com/martweb/gs_geometry.htm#slewing regards, Martin. |
||
|
posted: 6 Jan 2012 13:08 from: r_wilton
click the date to link to this post click member name to view archived images |
Thanks for the quick replies. Martin, i did look at the slewing function but was put off by the notes as I want to add a 3 way turnout and double slip along the length of the s bend. (i might be a bit ambitous here) I've now found by moving the peg along the straight i can use the s curve transition to get across to the other straight section. I think all i need then is a transition from the other straight to s curve. I'll post a picture later. Ray. |
||
|
posted: 6 Jan 2012 13:24 from: Martin Wynne
click the date to link to this post click member name to view archived images |
r_wilton wrote: Martin, i did look at the slewing function but was put off by the notes as I want to add a 3 way turnout and double slip along the length of the s bend.Hi Ray, The notes about not inserting a turnout in a slewing zone are perhaps a bit too severe. I wrote them a long time ago. Alternatively you can build up what you want using 3 transition curve templates -- easement from straight to first curve; S-curve transition from first curve to second curve; easement from second curve to straight. Use the make transition functions to create the central S-curve (remembering to move the outer pegs to the curved ends while you do it). The disadvantage there will be inserting the tandem turnout and double slip across the template boundaries, leading to lots of additional partial templates. With a slew it is a single template and you can insert a turnout anywhere within it and then roam the turnout into position. If you post a screenshot or .box file it will be easier to suggest the best approach. regards, Martin. |
||
|
posted: 6 Jan 2012 14:53 from: r_wilton
click the date to link to this post click member name to view archived images |
Hi Martin. I'm trying to achieve something like this (from AnyRail) 2200_060941_460000000.png  Unfortunately Templot won't let me create a transition from the top straight back to the S bend so i'm stuck again. Ray. |
||
| Last edited on 6 Jan 2012 15:20 by r_wilton |
|||
|
posted: 6 Jan 2012 16:23 from: r_wilton
click the date to link to this post click member name to view archived images |
Hi Martin. I took your earlier advice and created the S-bend by slewing a straight piece of track. Many thanks. Ray. |
||
|
posted: 6 Jan 2012 17:47 from: Martin Wynne
click the date to link to this post click member name to view archived images |
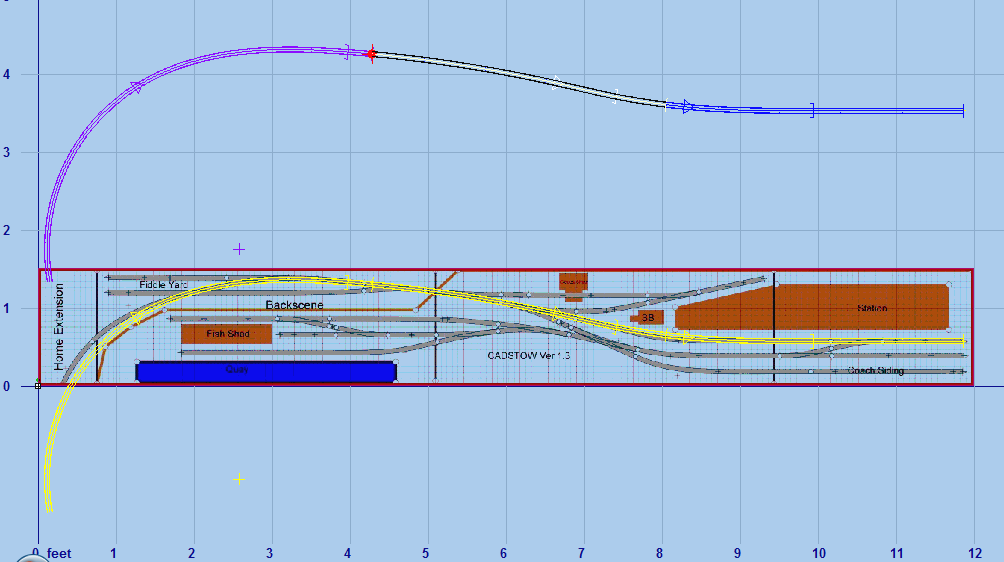
Hi Ray, Now that I can see what you are doing, I would advise against using a slew for that. The slewing geometry isn't really intended to have an entire station throat inserted in it. In any event, you don't actually have straight track at the top -- the running line is curved -- so a slew doesn't fit. Instead you can do what you want with 3 transition curves: 2_061236_470000000.png  Your pointwork can be inserted in the middle template. The running line radius at the left was too sharp, so I eased it to 750mm (still tight in 4mm scale). If you say what gauge you are using, and the exact dimensions of your original image, I will post a .box file. I did this very quickly in EM. regards, Martin. |
||
|
posted: 6 Jan 2012 18:29 from: r_wilton
click the date to link to this post click member name to view archived images |
Hi Martin. Sorry I my have confused the issue slightly by not explaining the layout. Firstly, the gauge is 00-SF. The layout size is 3300mm x 400mm (including the part marked 'House Extension'). The curved section at the left hand side isn't really part of the layout, I've just put it there so I can extend the fiddle yard around the corner of my room for access as I won't be able to get at the fiddle yard proper with the layout against a wall. So if you forget this, the running line is straight into the top straight section of the fiddle yard (access from behind when free standing). I have two issues with the layout at present which I need to resolve before I get too far involved. 1. Does it look reasonable. (I've played around with cardboard cut-outs of locos etc and it seems to work) 2. Am I being too ambitious having only just built my first turnout. Anyway, many thanks for your offer of a .box file to get me started on this. I hope I've not taken up too much of your valuable time. Regards Ray. Edit - I should say I'm not trying to reproduce the Anyrail/Peco layout, just improve upon it. |
||
| Last edited on 6 Jan 2012 18:33 by r_wilton |
|||
|
posted: 7 Jan 2012 10:42 from: Howard
click the date to link to this post click member name to view archived images |
Martin Wynne wrote:
I have a similar problem, but I want the "warp" the background to fit using this neat facility in the TDV, and that only works on the control template. Is it possible to combine the 3 transition curves into 1 control template? Howard Watkins |
||
|
posted: 7 Jan 2012 11:36 from: Martin Wynne
click the date to link to this post click member name to view archived images |
Howard wrote:I want the "warp" the background to fit using this neat facility in the TDV, and that only works on the control template.Hi Howard, Sorry, no. A single template can contain only one transition zone. What you must do is crop your background image into 3 separate sections in your graphics editor program, and then add each one as a separate picture shape, wrapped to the relevant template. You should be able to establish the crop positions by referring to the template length dimensions shown in the info, and calculating the number of dots in each section by proportion. The image wrapping starts at the peg position, so you can get some fine control by moving the peg along the control template (CTRL+F8): 2_070627_240000000.png  n.b. if you need to do some trial and error, you must delete the unwanted wrapped picture shape and reload the original image file as a new picture shape. I will look at an option to save the original image and re-use it. regards, Martin. |
||
|
posted: 7 Jan 2012 17:59 from: r_wilton
click the date to link to this post click member name to view archived images |
Martin Wynne wrote: Alternatively you can build up what you want using 3 transition curve templates -- easement from straight to first curve; S-curve transition from first curve to second curve; easement from second curve to straight. Use the make transition functions to create the central S-curve (remembering to move the outer pegs to the curved ends while you do it). Hi Martin. Sorry to be a bother, I feel a right numptie. I've been trying to replicate your 3 transition curves, i've done easement from straight to first curve; make mirror on peg; S-curve transition from first curve to second curve; make mirror on peg; easement from second curve to straight. This gives me a straight to easement, S-Curve, easement to Straight. Thats OK, but the second straight isn't in the right place so i then adjust the s-curve (delete to control) but the easement to straight section gets left behind. I'm obviously missing some fundamental understanding of how templot works. Can you explain 'Use the make transition functions to create the central S-curve (remembering to move the outer pegs to the curved ends while you do it).' Should i be creating the two easement curves first then connecting them with the S-curve? If so i can't find a way of joining the S-curve to the second easement curve. Ray. |
||
|
posted: 7 Jan 2012 20:38 from: Martin Wynne
click the date to link to this post click member name to view archived images |
r_wilton wrote:Can you explain 'Use the make transition functions to create the central S-curve (remembering to move the outer pegs to the curved ends while you do it).'Hi Ray, When you use the make transition function between templates which are themselves transition templates, the fixing peg is used as a marker to tell Templot which of the two radii within them to use in the calculations. Nearly always this means temporarily swapping the peg to the opposite end from the end where you have it, and swapping it back afterwards. I need to develop a better method for this. A tutorial on the make transition function is here: http://www.templot.com/martweb/info_files/make_trans.htm A short video showing it being used is here: http://www.templot.com/martweb/videos/parallel_platform.exe A much longer video showing it being used several times over a background scan is here: http://www.templot.com/martweb/videos/scruffs/h0_overlay.exe These videos are old. It's time I was making some more for Templot2, but I'm very busy this month and I must find time to make more progress with the coding. I will try to make a bit of video showing how I created the transitions over your track plan. regards, Martin. |
||
|
posted: 7 Jan 2012 22:11 from: r_wilton
click the date to link to this post click member name to view archived images |
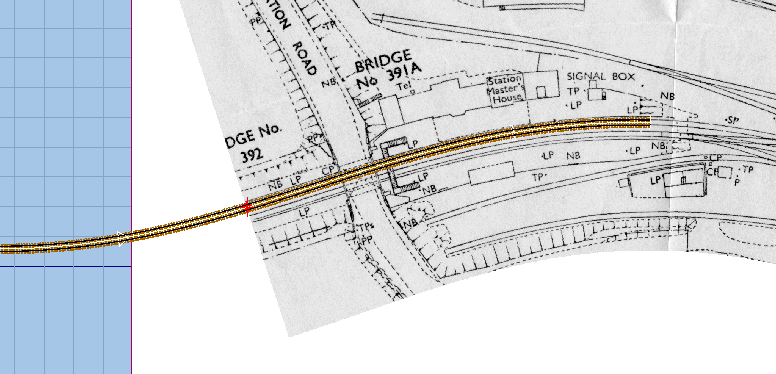
Hi Martin. Things have moved on since my last post and i have now managed by trial and error to get the running line and fiddleyard in place. 2200_071633_060000000.png  Thanks for the link to the make transition function, i'd not seen that one. Are the tutorial videos for the tandem and slip turnouts still relevent to TDV? These look quite advanced. If i just use simple turnouts and diamond crossing for now can these be converted at a later stage? Will keep plugging away and hope to make futher progress over the weekend. Ray |
||
| Last edited on 7 Jan 2012 22:24 by r_wilton |
|||
|
posted: 7 Jan 2012 22:51 from: Martin Wynne
click the date to link to this post click member name to view archived images |
Hi Ray, Your problem with uploads is that you are saving the screenshots in JPG format. JPG should never be used for computer graphics -- it is intended for photographs and scans only. Always save screenshots in PNG format -- output > export a screenshot ... menu item. The file will be smaller and the image will look much better. Are the tutorial videos for the tandem and slip turnouts still relevant to TDV? These look quite advanced.Yes. Often the later Templot versions include extra functions which eliminate or simplify some of the video stages, but the video can still be followed as shown if preferred. For example TDV now supports gaunt turnouts which simplify creating the middle V-crossing in tandem turnouts. More about that here: message 9841 If I just use simple turnouts and diamond crossing for now can these be converted at a later stage?Yes, provided you take some care: For tandem 3-way turnouts the switches must be staggered far enough to allow full opening of the second switch blades behind the first turnout rail. Insufficient stagger is a common beginner mistake. Also the resulting V-crossings should not be exactly opposite each other, otherwise the check rails cannot be fitted to work properly. For inside slips the shortest practical diamond-crossing is 1:6, otherwise the radius will be too tight. For shorter diamonds you can add an outside slip road, but this requires a lot more space. regards, Martin. |
||
|
posted: 7 Jan 2012 23:18 from: Martin Wynne
click the date to link to this post click member name to view archived images |
Martin Wynne wrote: Your problem with uploads is that you are saving the screenshots in JPG format.p.s. there is also a small bug if you get too click-happy. After uploading your picture, wait a few seconds until all the thumbnails are showing in the dialog window before clicking the first one to insert it in your message. If the thumbnails haven't finished loading, the image won't be inserted properly and any text below it may get lost. regards, Martin. |
||
|
posted: 8 Jan 2012 16:25 from: r_wilton
click the date to link to this post click member name to view archived images |
Thanks Martin, I'll try and remember about the png files. One thing I don't seem to be able to get to grips with is modifying a curve after another template (say a straight section) has been snapped(F7) to it. If I change the radius for instance the attached template (straight) gets left behind. Must be missing something as I've seen attached templates move in unison in some of the tutorial videos. Ray. |
||
|
posted: 8 Jan 2012 17:13 from: Martin Wynne
click the date to link to this post click member name to view archived images |
r_wilton wrote: One thing I don't seem to be able to get to grips with is modifying a curve after another template (say a straight section) has been snapped(F7) to it. If I change the radius for instance the attached template (straight) gets left behind. Must be missing something as I've seen attached templates move in unison in some of the tutorial videos.Hi Ray, That is the notch linking function. You need to be careful and set it up in the correct sequence. The full notes are here: http://www.templot.com/martweb/gs_mouse_notes.htm#notch_linking This video shows it in action: http://www.templot.com/martweb/videos/notch_loco_depot.exe regards, Martin. |
||
|
posted: 8 Jan 2012 17:42 from: r_wilton
click the date to link to this post click member name to view archived images |
Hi Martin. Yes, I did look at notch_loco_depot video. However there seems to be a departure in TDV. After 'notch under peg on background template' there is no dialogue box 'yes - put notch under peg and link group' Then on 'Geometry-notch' the mouse disappears so no idea what is selected. Ray. |
||
|
posted: 8 Jan 2012 18:31 from: Martin Wynne
click the date to link to this post click member name to view archived images |
r_wilton wrote:Yes, I did look at notch_loco_depot video. After 'notch under peg on background template' there is no dialogue box 'yes - put notch under peg and link group'Hi Ray, You must create a group beforehand. You can't link a group if there isn't one. You also need to make sure that the peg is in the required position on the member of the group to which you want to link. More info at: http://www.templot.com/martweb/gs_geometry.htm#linking regards, Martin. |
||
|
posted: 8 Jan 2012 18:38 from: r_wilton
click the date to link to this post click member name to view archived images |
Sorted. Many thanks, Ray. |
||
|
posted: 9 Jan 2012 13:20 from: r_wilton
click the date to link to this post click member name to view archived images |
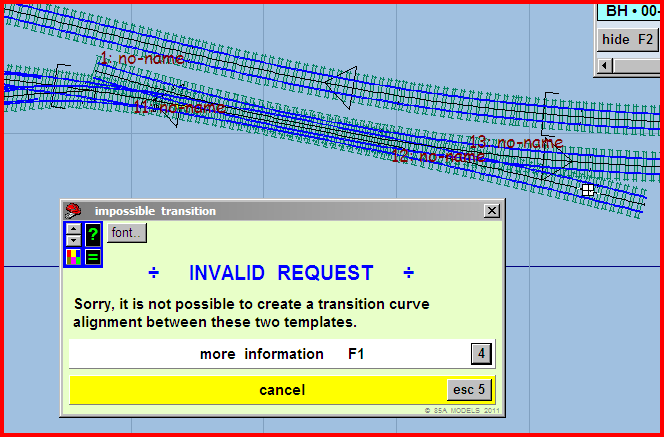
Having problem with transitions. Why won't Templot make a transition between these two approoach tracks (they have been split from the turnout). 2200_090814_380000000.png  I make one the control, select the other, peg align tools, make transition curve from control template. Which ever one i select as the control i get the message shown. Ray. |
||
|
posted: 9 Jan 2012 13:35 from: Martin Wynne
click the date to link to this post click member name to view archived images |
Hi Ray, They are transition curve templates. You must tell Templot which end of them is to be used in the calculations. You do that my moving the fixing peg to the relevant end. For both of these templates, you need to swap the peg to the opposite end by clicking the red peg indicator number at the top left of the workpad. There is not much space between the two existing transition zones, so you may need to adjust the curve centre-lines closer together first (but not enough to touch or overlap -- zoom in to see). Do this before swapping the peg ends. If the new transition zone is too long and overlaps the existing ones, it will not align correctly. regards, Martin. |
||
|
posted: 9 Jan 2012 14:04 from: r_wilton
click the date to link to this post click member name to view archived images |
Thanks again Martin. Worked a treat, so much to learn, but getting there Ray. |
||
| Please read this important note about copyright: Unless stated otherwise, all the files submitted to this web site are copyright and the property of the respective contributor. You are welcome to use them for your own personal non-commercial purposes, and in your messages on this web site. If you want to publish any of this material elsewhere or use it commercially, you must first obtain the owner's permission to do so. |