Templot Club Archive 2007-2020
|
|||
| author | remove search highlighting | ||
|---|---|---|---|
|
posted: 1 Oct 2012 20:57 from: Ray Hughes
click the date to link to this post click member name to view archived images |
I have created a PDF file of an approximate 7ft sq track plan with centre operating well so there's a vast space in the middle with no (printed) pages. I have an HP Photosmart printer and believe that I have calibrated it as best I can. As a matter of routine I tend to re-cycle pre-used paper that has already been printed on one side so I'm not necessarily using paper from the same original packet throughout the print process of 65 sheets. My first error was not to set the PDF print option to print Actual Size which left me wondering why the layout plan did not fit on the baseboards. That and a few other things that I'd failed to do before printing has seen me print the 65 pages more than once before and discard them almost immediately. I'm now working with the first set of sheets that I've totally stuck together, all previous prints have either been loosely overlaid or only had a few sheets stuck together. The latest print fits the baseboards although the overlaid background shapes - the baseboard outlines - don't exactly match the real thing but I haven't checked the dimensions of these shapes to confirm that I entered the details exactly (although I again believe that I did). We're only talking of a few mm difference over the 7ft baseboard span. I can live with this as it isn't that critical and it is on the right side - the print out is slightly smaller than the baseboards. The area where I'm having most difficulty is with joining the single sheets together and getting the alignment correct. I'm trimming the margin of two adjacent sides with a guilotine and then overlaying each sheet as accurately as I can over the margin of the adjacent sheet(s) so that the borders align. The sheets are secured together with invisible tape. That's where my problem arises. The alignment isn't always 100%. Some is no doubt down to slight discrepancies in the overlaying but I don't think it all is. I find that one pair of overlays is accurately aligned but the next row isn't. My questions therefore are:
Many thanks. Ray |
||
|
posted: 1 Oct 2012 21:27 from: Martin Wynne
click the date to link to this post click member name to view archived images |
Ray Hughes wrote:I have an HP Photosmart printer and believe that I have calibrated it as best I can.Hi Ray, Printer calibration applies only to directly printed pages, it has no effect on PDF files. Do you get the same mismatch if you print directly rather than via PDF? Is this an inkjet printer or a laser? Laser printers heat the paper causing differential shrinkage which makes it very difficult to align adjacent pages with total accuracy. I noticed it is called a "photo" printer. Don't use it in photo mode to print track templates -- it will be slow and use vastly more memory, and the extra ink density may cause the paper to cockle with same distortion effects as for lasers. Is the printer standing firm on a level surface? Modern printers seem to be of flimsier construction than older ones. If the frame is distorted it will probably still work but the paper won't feed evenly across the full width of the rollers. What is the thickness of the paper? Generally you get better results with something a bit thicker than ordinary 80gsm office paper. 160gsm is ideal, and much easier to trim and fit together. regards, Martin. |
||
|
posted: 2 Oct 2012 19:45 from: Ray Hughes
click the date to link to this post click member name to view archived images |
Martin Thanks for your response. The printer is an inkjet. However the paper has all previously been through a laser printer when the first side was printed. The printer is on a flat surface. I've only printed in black & white and not in photo mode. The paper is 80gsm or thereabouts. I've been out today and bought some 160gsm. I haven't tried printing direct (this time). However, I did once before in error but cancelled the print part way through and never got round to attempting to paster the pages together. I'd prefer not to have to directly print all 65 pages but I can't immediately see how I can print a selection of pages. Is that possible (like it is when printing a PDF? |
||
|
posted: 2 Oct 2012 20:16 from: Martin Wynne
click the date to link to this post click member name to view archived images |
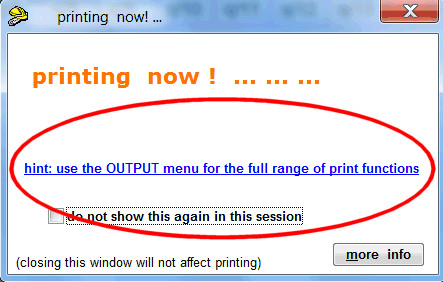
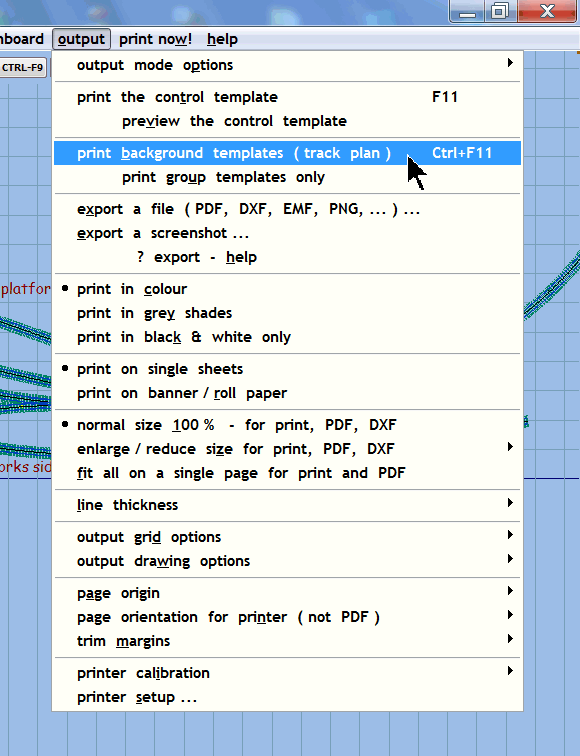
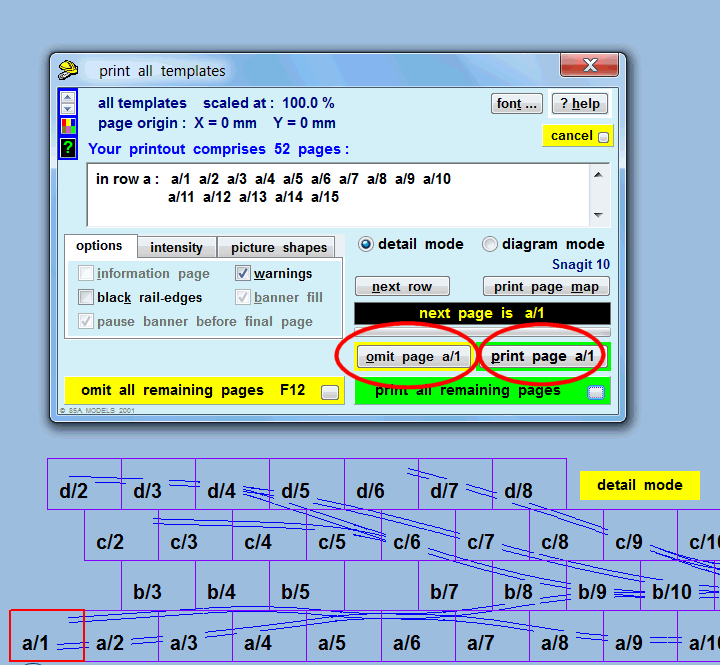
Ray Hughes wrote:I'd prefer not to have to directly print all 65 pages but I can't immediately see how I can print a selection of pages. Is that possible (like it is when printing a PDF?Hi Ray, Of course! To be honest, I'm a bit astonished by this question. I really don't know how more obvious I can make things? Are you using the quick print now! functions? Instead, click the output > print menu items. You can select which pages by clicking the buttons on the preview display. Alternatively, you can select a group of templates and print only the pages which contain them. 2_021508_500000000.png  2_021508_500000001.png  2_021508_500000002.png  Click the print page or omit page buttons to select which pages you want. Then click print all remaining or omit all remaining as you require. regards, Martin. |
||
|
posted: 2 Oct 2012 20:49 from: Ray Hughes
click the date to link to this post click member name to view archived images |
Martin Sorry, my fault, Not reading what I saw. Please accept my apologies. I think I looked at the "Print Now!" menu item and saw "Print all . . . . " When I looked at the "Output" menu item I saw the "Print (and Preview) control template" options and must have overlooked the omission of the word ALL in the following "Print background templates . . . . . " menu option presuming that this was just duplication of the menu item in the "Print Now!" Menu. I've just been checking the print out that I obtained via the PDF. I've overlaid baseboard shapes and, because I'm using Spaceboard framed with plywood, have also overlaid the plywood frame measurements. The X positions across the layout are: 0, 5, 605, 610, 620, 628, 1522, 1530, 1539, 1544, 2144 & 2149 (all in mm). The X positions as printed out and (with the pages) stuck together are: 0, 5, 605, 610, 620, 628, 1520, 1528, 1537, 1542, 2140 & 2145. I'll acknowledge that my pasting together errors may account for about 1mm but it is funny that the first 6 reproduced as expected but there was a drop of 4mm overall between the last 7. The Y measurements showed a slight error overall but that's probably down to paste up tolerances. I shall now head off, with head bowed, and print the first few rows direct from the program and using the 160gsm paper. I'll report back. Apologies once again. Ray |
||
|
posted: 2 Oct 2012 21:03 from: Martin Wynne
click the date to link to this post click member name to view archived images |
Ray Hughes wrote:Apologies once again.No Ray, my apologies. I should not have let my frustration show. It's just that there is so much complex stuff still waiting for proper notes and tutorials. If I can't even assume the basic stuff is obvious I'm at my wits end to know how to proceed. Certainly I don't have enough lifetime left to explain every click and option all over again from the beginning. regards, Martin. |
||
|
posted: 2 Oct 2012 21:14 from: Martin Wynne
click the date to link to this post click member name to view archived images |
p.s Ray, I've just noticed "all templates" in the caption bar of the pages dialog. That's intended to be in contradistinction to "group templates" but I can see it might be confusing. I will change it, so thanks for drawing my attention to it. regards, Martin. |
||
|
posted: 2 Oct 2012 22:13 from: Ray Hughes
click the date to link to this post click member name to view archived images |
A pure fluke I assure you. I ought to know better. I've written enough software oddments myself and complained about users not reading the instructions that I should wrap my own knuckles for doing exactly what I moaned at them for doing. Anyway,I have printed the first three rows, the third of which is not continuous across the whole plan. The alignment is much better although only time will tell how it will pan out by the time that I've printed all eleven rows and endeavoured to rejoin the sheets either side of the control well in the latter two rows. I hope to do that within the next couple of days and report back for your information. I'd previously tried to conserve my coloured ink and only printed in black & white. I overlooked to select this option this time and whilst initially slightly annoyed with myself for doing so, the coloured version is much clearer. Thanks once again for your guidance and sorry for not properly reading what was in front of me. |
||
|
posted: 2 Oct 2012 22:23 from: Martin Wynne
click the date to link to this post click member name to view archived images |
Ray Hughes wrote:I'd previously tried to conserve my coloured ink and only printed in black & white. I overlooked to select this option this time and whilst initially slightly annoyed with myself for doing so, the coloured version is much clearer.Hi Ray, Try the "grey shades" option. It's as clear as the coloured version, but on most printers uses only the black ink. regards, Martin. |
||
|
posted: 3 Oct 2012 22:50 from: Jim Guthrie
click the date to link to this post click member name to view archived images |
Ray, A problem I have found when printing Templot plans is with the paper pickup on the printer not being exactly square and as the paper is being drawn through its length there can be slippage forced on the sheet with the edge guides on the paper fighting the grip on the main roller. My previous printer - an Epson A3 printer - was particularly bad in this respect and my present Canon printer is a bit better, but still not perfect. This is using the front pickup facility. However the error induced was not great and I was always able to get round the creepage generated. I always give myself a safety margin in any case and work in what I call "Templot feet" where I assume that a foot is 300mm. If the baseboards are designed in feet and inches, there are a few spare millimetres floating around to take care of any discrepancies. Jim. |
||
|
posted: 4 Oct 2012 12:04 from: Ray Hughes
click the date to link to this post click member name to view archived images |
Jim Many thanks for the comments/suggestion. Some minor discrepancy over the ten rows/7 sheets would not have surprised me as I doubt I can stick the sixty plus sheets together accurately enough to avoid this. However, my initial variation was out side this expected tolerance, especially when I noted a loss of 2mm over the extremes of two adjacent sheets. I've found the situation a lot better since following Martin's advice although time has precluded me from printing and taping more than the first three rows together. I hope to complete the process over the next few days if I can escape the decorating for even longer than a couple of club visits and all day at an exhibition would normally require. |
||
|
posted: 4 Oct 2012 12:32 from: Paul Boyd
click the date to link to this post click member name to view archived images |
Hi Ray I tend not to rely too much on getting everything aligned by sticking sheets together, but by printing out with (usually) a 100mm grid. I draw a matching grid on the baseboard, then align each individual sheet to that instead of to each other. The sheets are printed directly to the calibrated printer and not via PDF, but you know that now! As far as paper goes, I use either 250gsm Bristol Board or 250gsm white board. The latter I buy in A2 sheets - these are cut in half lengthways, and together with a custom paper size for the printer means I can effectively print two A4 sheets end to end as a single piece of paper - the fewer the pieces of paper, the better! The ink isn't waterproof on the A2 board, but a coat of Ronseal protects it during the hurly-burly of track building and means I can slosh flux and neutralizer around with impunity. All of this will depend on your printer though. If your HP feeds the paper in the front and turns it through 180 degrees, 250gsm may be a bit heavy. You may still be able to set a custom page size though and feed a half-A2 sheet in. Hope this helps! |
||
|
posted: 4 Oct 2012 13:12 from: Ray Hughes
click the date to link to this post click member name to view archived images |
Paul Thanks for that. Unfortunately there's no way that my front load/ front discharge printer will accept 250gsm paper, it seems to struggle a bit with rolling 160gsm through 180 degrees. I like the idea of using cut down A2 sheets. I'll certainly consider that if I'm still in trouble once I've used up a little more of the half ream of 160gsm paper that I've just bought at Martin's suggestion. I'm ever hopeful that once I have the plan on the foam baseboard I shall only need to print off the various point templates so there shouldn't be too much joining up by then. It is my intention to report back on my findings once I've completed the printout & paste up of the current track plan. Ray |
||
| Please read this important note about copyright: Unless stated otherwise, all the files submitted to this web site are copyright and the property of the respective contributor. You are welcome to use them for your own personal non-commercial purposes, and in your messages on this web site. If you want to publish any of this material elsewhere or use it commercially, you must first obtain the owner's permission to do so. |