Templot Club Archive 2007-2020
|
|||
| author | remove search highlighting | ||
|---|---|---|---|
|
posted: 13 Dec 2007 03:16 from: Martin Wynne
click the date to link to this post click member name to view archived images |
To drill or punch rivet holes in the correct place there is a trick you can use in Templot to help. If Templot is set to print the rail centre-lines instead of the rail edges, you get the rivet positions for riveted plywood construction, where the rail centres cross the timber centres, like this: rivet_centres.png 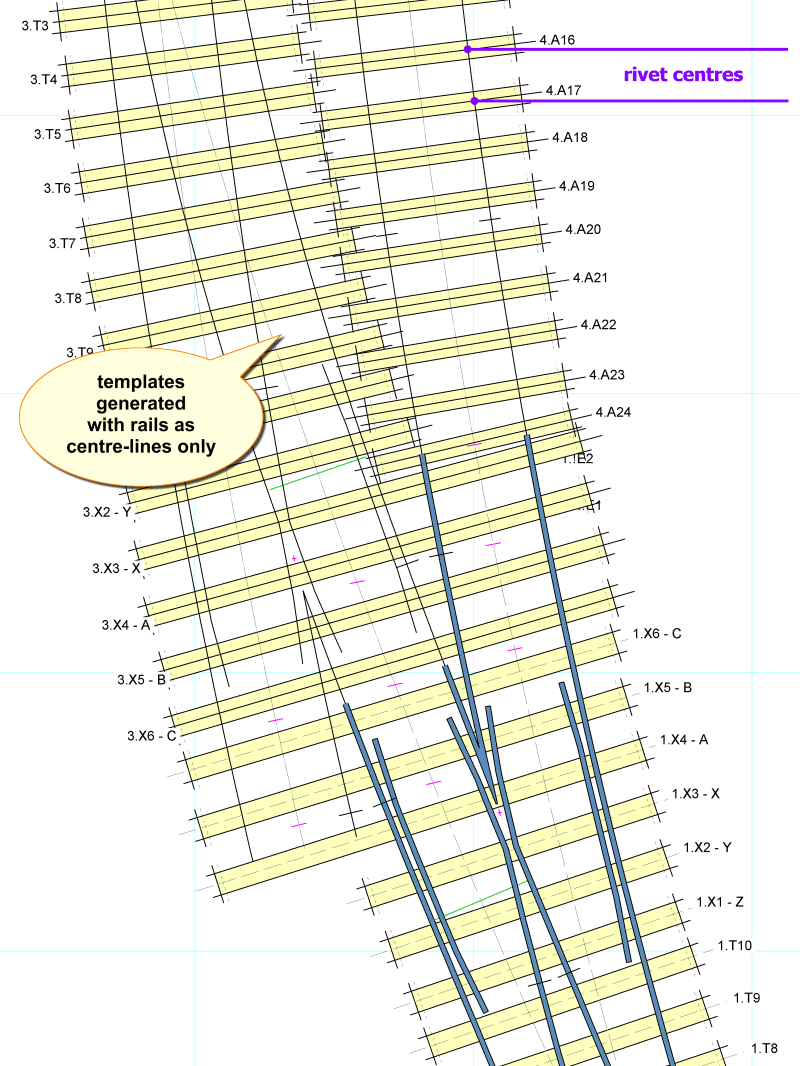 This shows a crossover in EM. One turnout has the more usual style of rail detail for comparison. Click the generator > generator settings > rails > rail centre-lines only menu option, then rebuild the required templates as a group (or all of them), before printing them. Print on tracing paper (which works fine in an inkjet printer if you load a single sheet in the tray at a time), then spray the print with Spraymount adhesive (blue can -- removable) and lay the plywood timbers in position. Then turn the whole thing over and prick through with a scriber to mark the rivet centres onto the timbers. This saves the tedious business of marking them out individually, and gets the rivets exactly under the middle of the rail, which makes it a lot easier to fit the cosmetic chairs later. The timbers can then be peeled off for punching or jig drilling, or using a mini-drill they could be drilled directly through the tracing paper. You then print a normal template for construction, of course, and having fixed the riveted timbers in place on it, the tracing paper version (or a fresh one) can be laid over the rivets to check for any riveting or timber alignment errors before adding the rails. Templot lets you set the printed line thicknesses to suit your printer. For precision marking like this it's probably best to set thinner lines than usual, as in the above print. That's at output > line thickness > menu options. Notice also that when you print the rails as centre-lines, Templot makes the timber centre-lines solid instead of the usual dashed centre-lines. n.b. for the greatest accuracy, do a separate printer calibration for the tracing paper. regards, Martin. |
||
|
posted: 13 Dec 2007 23:51 from: JohnM
click the date to link to this post click member name to view archived images |
The EM Society also sell a copper rivet, intended for S4/P4; it is much smaller. This fits under the rail very nicely, in EM, and enables cosmetic chairs to be easily fitted. You have of course to drill your own holes as Martin suggests. However an easier approach is to 'butone' the chairs directly to the wooded sleepers and only use the Cu rivets to strengthen, check rails, vees etc. I find it prudent to reinforce turnouts, although I know of others who do not. Regards, John M |
||
|
posted: 14 Dec 2007 01:31 from: Dave Smith
click the date to link to this post click member name to view archived images |
Yup. That's basically my method but in 16.2mm  (Should I now say 'here we go again'?)  Dave Smith |
||

| Please read this important note about copyright: Unless stated otherwise, all the files submitted to this web site are copyright and the property of the respective contributor. You are welcome to use them for your own personal non-commercial purposes, and in your messages on this web site. If you want to publish any of this material elsewhere or use it commercially, you must first obtain the owner's permission to do so. |