Templot Club Archive 2007-2020
|
|||
| author | remove search highlighting | ||
|---|---|---|---|
|
posted: 7 Dec 2016 16:42 from: 4railsman
click the date to link to this post click member name to view archived images |
I'm currently designing two new baseboards to fit between two existing stations built in 00FS with copperclad sleepers and code 75 bullhead rail, way back in the late 1970's. Fortunately, I still have unused sleepers, rail and tiebars, so can build new items that will be compatible. 1 x Straight mainline Crossing with a curved 60" radius single slip crossing it 2 x Straight Points with 60" radius RH 1 x 24" / 60" radius Crossover and possibly a Scissors Crossover on a 60" radius curve if the above are successfully built!
So, can anyone tell me which settings to use on Templot for the above switches/crossings? Thanks for reading and any help you can provide. regards Brian |
||
|
posted: 7 Dec 2016 19:49 from: Phil O
click the date to link to this post click member name to view archived images |
I wouldn't worry too much about it, draw in you main line and then " insert turnouts in plain track " adjust the 'V' angle using F5 to suit where you want the branch track to go, which keeps the radius at or above your minimum radius. If one of the roads carries passengers use the larger switch, if not use the smaller switch. If both roads carry passengers I try to use a 1 in 10 crossing if I have the room, but I don't drop below 1 in 8 plus a 'C' switch. For goods only you can come down to an 'A'switch. You may have to accept compromises if you can't fit your switch and crossing work in the space available. Phil. |
||
|
posted: 8 Dec 2016 13:39 from: Martin Wynne
click the date to link to this post click member name to view archived images |
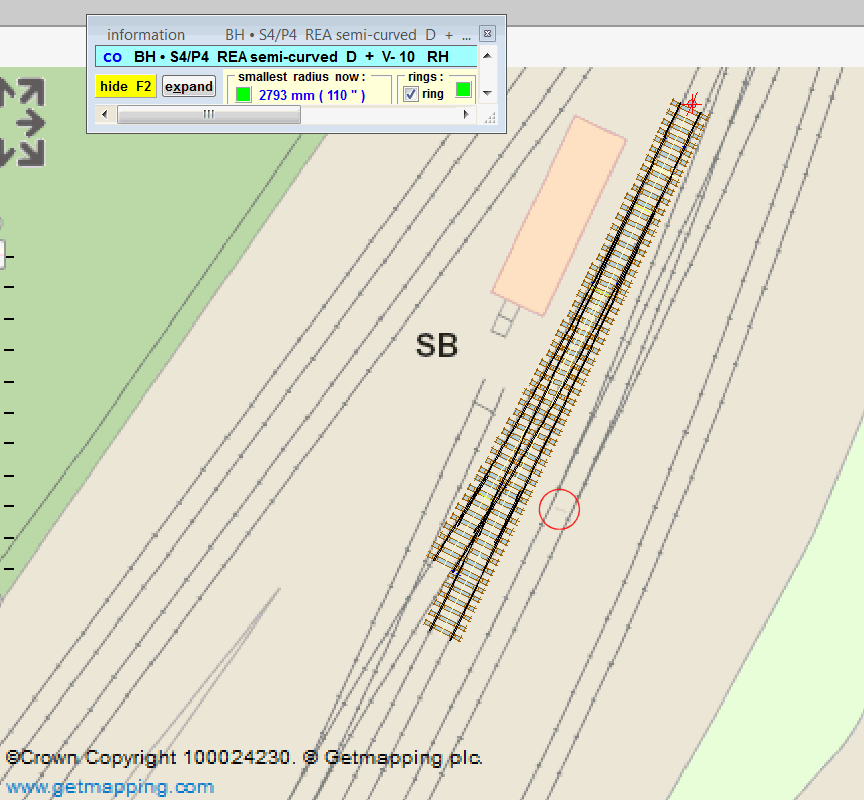
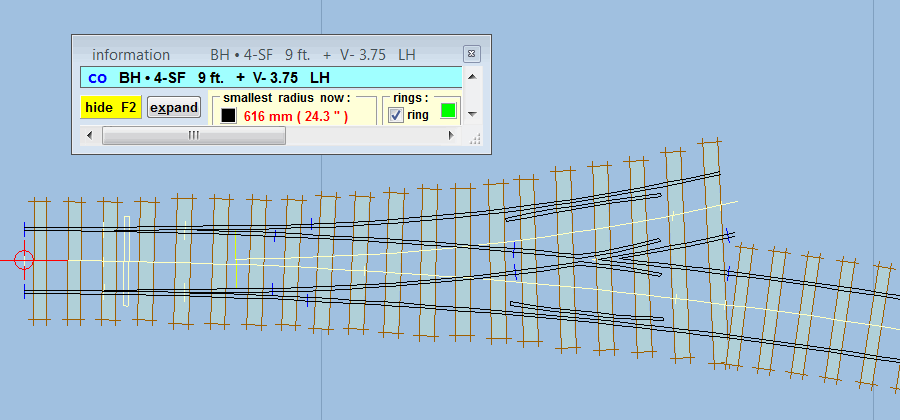
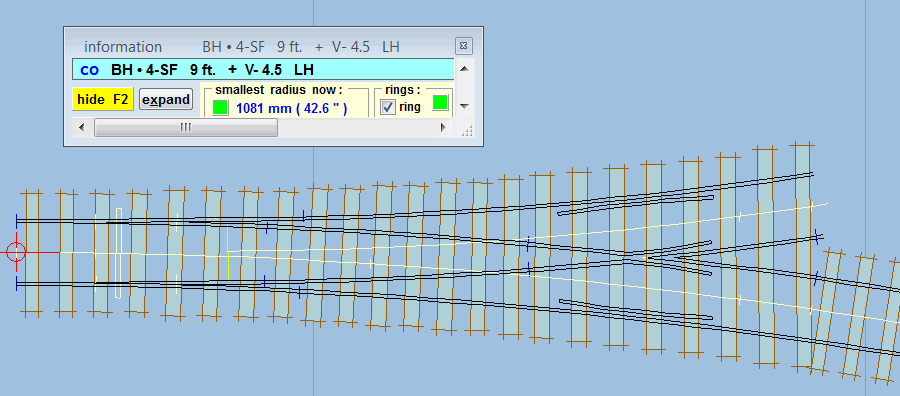
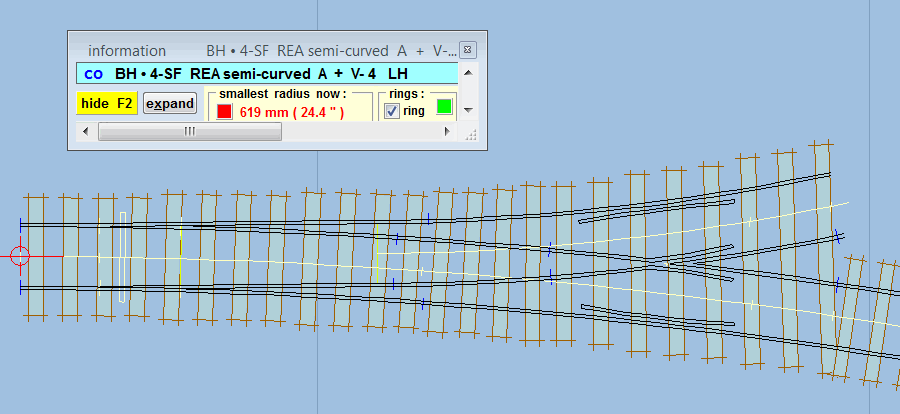
Hi Brian, The only way to know for sure is to align templates over a large scale map of your prototype. For example this turnout is found to be a D-10: 2_231419_130000000.png  The switch toe marks are very faint, but are there (ringed red above). Align this to the blade tip marks in Templot. More about this: topic 2830 - message 19866 Otherwise there are some general guidelines, but of course LPTB requirements differ from other standard-gauge railways. Generally: "A" switches are not used in running lines, only in yards, depots, sidings. "B" switches are used for low-speed connections such as trailing crossovers, access to yards, etc. "C" switches are the shortest normally used by in-service passenger trains -- except at very low speeds, such as at the approach to terminal platforms. Longer switches than "C" are used where space permits to allow increased line speeds. For each size of switch there is a "natural" crossing angle, which is more often used in each case than other crossing angles: A-7 B-8 C-10 D-12 E-16 But for models there often isn't space for these, so the intention then is to use shorter turnouts, in sizes which can look the part. For example a B-6 is not common on the prototype but is popular in models as the shortest turnout which can be used in running lines and still look reasonable. To match specified radii: Set your track gauge and scale. Curve your turnout to the required main-road radius (F6 mouse action). Adjust the turnout size (F5 mouse action) until your required turnout-road radius shows in the info panel as the smallest radius. 4railsman wrote: You almost certainly don't want a Y-turnout (Wye is a river, not a turnout. What you probably mean is that the main-road curving radius (F6 mouse action) is negative (contraflexure). If that is part of a crossover, leave the V-crossing type as regular. Otherwise in many cases of contraflexure you will usually want to change to a curviform V-crossing. (A Y-turnout is unhanded, contraflexure turnouts are handed left and right.) More about types of V-crossing here: http://templot.com/martweb/gs_realtrack.htm#xing_types This is the result of the above in 4-SF (00-SF), with a curviform V-crossing: 2_080815_260000000.png  That is such a short turnout that I suggest it is not what you want. Or if it is, the fact that you are modelling LPTB is irrelevant. To get a satisfactory result I used to the shortest 9ft straight switch. If you ease the crossing angle from 1:3.75 to say 1:4.5 you get something looking more reasonable, but at these angles you still need to use a short straight switch rather than an "A" switch: 2_080831_130000000.png  In this case the turnout radius is now around 42", still with the 9ft straight switch. If you want to do it as an A-4 because that size is in the LPTB list, it looks like this: 2_080851_000000000.png  Which looks horrible, and wastes space. regards, Martin. |
||
|
posted: 8 Dec 2016 19:50 from: 4railsman
click the date to link to this post click member name to view archived images |
Phil O wrote: I wouldn't worry too much about it, draw in you main line and then " insert turnouts in plain track " adjust the 'V' angle using F5 to suit where you want the branch track to go, which keeps the radius at or above your minimum radius. If one of the roads carries passengers use the larger switch, if not use the smaller switch. If both roads carry passengers I try to use a 1 in 10 crossing if I have the room, but I don't drop below 1 in 8 plus a 'C' switch. For goods only you can come down to an 'A'switch.Thanks for your advice, Phil Brian |
||
|
posted: 8 Dec 2016 20:39 from: 4railsman
click the date to link to this post click member name to view archived images |
Hi Martin Many, many thanks for your very informative response to my original post. I am not, however, copying a prototype location as I am severely limited to the baseboard size/area that fits between my two existing stations, although I found your explanation very interesting and no doubt will be a help to others reading the forum. I am very grateful for your explanation of the Guide to switch usage: "A" switches are not used in running lines, only in yards, depots, sidings.Wye oh Y I used that spelling instead of the proper "Y-turnout" I don't know. I must have had a "very senior moment" when I writ it!! LOL. What you probably mean is that the main-road curving radius (F6 mouse action) is negative (contraflexure). If that is part of a crossover, leave the V-crossing type as regular.Yes, that was exactly what I "thought" I needed, but since reading your post on the subject I have revisited my plan and realised the revised radius (of around 42") would not work, and so have now decided to omit the Parcel Depot from the layout and will therefore not need such non-prototypical "short" radius turnout. Your knowledge sharing has saved me wasting time on building a turnout which I would probably have ended up despatching to the rubbish bin, so many thanks for giving me this advice so freely. Thanks again Martin Brian |
||
|
posted: 8 Dec 2016 22:01 from: Martin Wynne
click the date to link to this post click member name to view archived images |
4railsman wrote:have now decided to omit the Parcel Depot from the layout and will therefore not need such non-prototypical "short" radius turnout.Hi Brian, Don't give up so easily. There is usually a way. If you attach your .box file here we can have a look. For example we may be able to improve the short turnout by splitting the deflection, or perhaps incorporate it into the next turnout as a tandem. The great advantage of hand-building track is that you can tweak it to fit. If your space is extremely tight, strict prototype accuracy is a luxury which can be dispensed with. One advantage of LPTB is that you probably don't have any long-wheelbase locomotives, so tight curves are not such a problem. regards, Martin. |
||
|
posted: 9 Dec 2016 23:48 from: 4railsman
click the date to link to this post click member name to view archived images |
Hi Martin I'm certainly not giving up so soon ~ in fact I had only just started to work with Templot when I ran into the problem of which switch/angle combination to input before I could make any progress. I'm grateful for your offer to look at my .box file, and may take you up on that at a later date when I have actually got something to show! I have spent time today looking at other track layout possibilities, with a view of making a more simple track plan than I originally intended. On reflection, I think I may have been trying to squeeze too much trackwork in too small a space and am now contemplating a single track branch with fewer and more standard turnouts and crossings. I hope to finalise my ideas over the weekend in order that I can start some serious design/construction work sometime next week. You are quite correct in your assumption about long-wheelbase locomotives, as I will only have 0-6-0 steam locos plus the Heljan Metropolitan Electric Bo-Bo's running on the branch with associated bogie coaching stock. I was convinced way back in the late 1970's of the benefits of handbuilding all my trackwork in copperclad material by a fellow member of a model railway club, when I lived in North Devon and would never contemplate using any other method. Thanks again, Martin regards Brian |
||
|
posted: 11 Dec 2016 13:02 from: Tony W
click the date to link to this post click member name to view archived images |
Hi Brian. This is a common source of confusion for those used to commercial model trackwork when compared to prototype trackwork as the two bear little comparison. Commercial pointwork generally forms a unit part of a circle at a specified radius. Prototype pointwork is specified in a completely different way. A Turnout (point) is formed from a combination of a switch type ( A to F for bullhead track) and the angle of the crossing (1 in 4 to 1 in 20 measured by an offset method rather than in degrees). The effective radius of the resulting Turnout is down to the specific combination of Switch and Crossing chosen and not all combinations are possible. As the switch becomes longer, the permitted range of crossing angles becomes flatter, hence the range of sizes you have already mentioned. This is the major reason why commercial trackwork never looks right, because the geometry is so different. As has already been explained, it is a matter of trial and error adjusting the Turnout size to find the nearest match to the radius required if you wish to use that approach. It is generally better to use the largest radius Turnout that will fit the situation. Prototype track design is a subject in its own right and a large one at that. The above is a very much simplified explanation. Regards Tony W. |
||
| Please read this important note about copyright: Unless stated otherwise, all the files submitted to this web site are copyright and the property of the respective contributor. You are welcome to use them for your own personal non-commercial purposes, and in your messages on this web site. If you want to publish any of this material elsewhere or use it commercially, you must first obtain the owner's permission to do so. |