Templot Club Archive 2007-2020
|
|||
| author | remove search highlighting | ||
|---|---|---|---|
|
posted: 11 Mar 2008 18:25 from: Andy G click the date to link to this post click member name to view archived images |
What is the best way of setting Templot up to produce templates for 7mm scale 2 foot gauge track, O-14? My primary interest is to produce a track plan representing Ffestiniog practice (1880s). Sleeper positioning is not important as they will be buried under what I think is slate waste ballast. The standards are basically EM Original less 4mm. Thanks Andy |
||
|
posted: 11 Mar 2008 20:06 from: Martin Wynne
click the date to link to this post click member name to view archived images |
Andy G wrote: What is the best way of setting Templot up to produce templates for 7mm scale 2 foot gauge track, O-14?Hi Andy, There are no pre-set sizes for narrow-gauge prototypes in Templot because of the huge variety of sizes and scales in use. However it's quite straightforward to make the custom settings needed -- I will do you a video shortly for 0-14 (or 0n2 or 0n24 as it's often known  ). ).In the meantime there is a screenshot and download available for 0n30 (16.5mm gauge) in the Samples and examples area: topic 28 which you can explore to see how it's done. regards, Martin. |
||
|
posted: 11 Mar 2008 20:30 from: Andy G click the date to link to this post click member name to view archived images |
Thanks Martin, I'll look forward to that. In the meantime I'll have a look at the On30 sample. Andy |
||
|
posted: 11 Mar 2008 21:54 from: Ian Everett
click the date to link to this post click member name to view archived images |
Martin Wynne wroteIn the meantime there is a screenshot and download available for 0n30 (16.5mm gauge) in the Samples and examples area How does 16.5mm gauge in 7mm scale translate to "On30"? Ian (Confused of Wharfedale...) |
||
|
posted: 11 Mar 2008 22:05 from: Martin Wynne
click the date to link to this post click member name to view archived images |
Ian Everett wrote:(Confused of Wharfedale...)Hi Ian, Aren't we all? How does 16.5mm gauge in 7mm scale translate to "On30"?0n30 is the common designation for 0 scale n.g. modelling on 16.5mm gauge track. The 30 means 30" = 2ft-6in gauge. In the UK 0 scale means 7mm/ft, so 2ft-6in should really be 17.5mm gauge. In America 0 scale means 1:48, so 2ft-6in should really be 5/8" = 15.9mm gauge. Narrow-gauge modellers have the happy knack of skating over such discrepancies. regards, Martin. |
||
|
posted: 12 Mar 2008 01:26 from: Thor Lawrence
click the date to link to this post click member name to view archived images |
Ian Everett asked:How does 16.5mm gauge in 7mm scale translate to "On30"?It doesn't. However, under the terms of our collective modellers' licence, we are allowed to "adjust" matters to our individual satisfaction. 0n30 implies 0 scale on the equivalent of 30 inch track. 30 inch = 2.5 feet. At 7 mm/ft, that gives a track gauge of 17.5 mm. Hmmm. There are no commercial track parts available (AFAIK) for 17.5 mm gauge track. Right let us invoke Modellers' licence. All together now, raise your pints and say "Use standard 00/H0 track, and we promise to buy a pint for them wot can tell the difference. Cheers!" I believe the technical term for such adjustments to reality are known as "sleight of hand". Yrs Thor Thor Lawrence Technical writing and editing for the applied natural sciences GSM: +354+ 868 5124 HMRS: 3751; GOG: 8090 Skype: thorlawrence |
||
|
posted: 12 Mar 2008 02:06 from: Andy G click the date to link to this post click member name to view archived images |
Thor Lawrence wrote: and we promise to buy a pint for them wot can tell the difference. Cheers!But heading back towards the topic I easily spotted that Dinas 1869 is 14mm gauge rather than the more common 16.5, but then 2.5 is a bit more noticeable. Andy |
||
|
posted: 12 Mar 2008 06:04 from: Alan Turner
click the date to link to this post click member name to view archived images |
Andy G wrote: I easily spotted that Dinas 1869 is 14mm gauge rather than the more common 16.5, but then 2.5 is a bit more noticeable. That's because Dinas is a 2ft prototype therefore 2x7=14mm. Alan |
||
|
posted: 12 Mar 2008 13:54 from: Paul Boyd
click the date to link to this post click member name to view archived images |
Alan wrote:That's because Dinas is a 2ft prototype therefore 2x7=14mmNot being the slightest bit pedantic, of course, but wasn't Dinas 1ft 11½in gauge?  |
||
|
posted: 12 Mar 2008 14:41 from: Andy G click the date to link to this post click member name to view archived images |
Paul Boyd wrote: Alan wrote:Apparently it varied over the years, the original dimension given by James Spooner was 2'1" over the centres of the rails, which should roughly equate to the above gauge. The current dimension, I think, is 1ft 11 5/8in. The half inch difference equates to approx 0.2mm in 7mm scale, hardly discernible to the naked eye and as there is already a standard at 14mm it seems more sensible to make use of that. Andy |
||
|
posted: 20 Mar 2008 22:47 from: Martin Wynne
click the date to link to this post click member name to view archived images |
Hi Andy, I have now prepared the video which I promised showing how to customize a turnout for 7mm scale, 14mm narrow-gauge. Details at: topic 376 regards, Martin. |
||
|
posted: 22 Mar 2008 06:10 from: Bruce Wilson
click the date to link to this post click member name to view archived images |
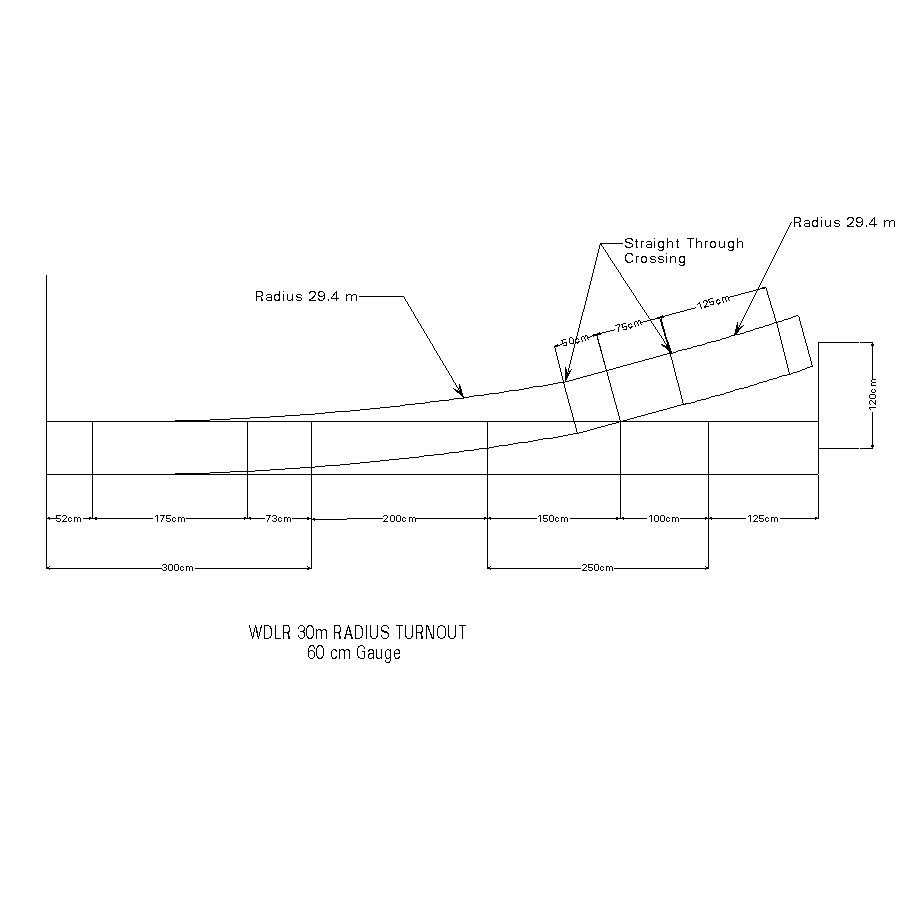
I am trying to make a template for a WDLR 30 m radius turnout. David Woodcock on the O14 yahoo group provided the following information " Since Bruce asks about the 30 metre radius points in particular, I |
||
| Attachment: attach_260_361_WDLR30mRadiusTurnout.PNG 850 | |||
|
posted: 22 Mar 2008 11:57 from: Martin Wynne
click the date to link to this post click member name to view archived images |
Hi Bruce, The missing information is either the planing angle on the blades, or the heel spread (offset) dimension (distance between the running edges at the switch heel): wdlr_ng1.png  Also needed is the angle at the V-crossing (frog), the 15 degrees is presumably the exit angle beyond the curve? Can you obtain this information? If not we can proceed on trial and error and guesswork. Ideally we also need the rail top width and the width of the blunt nose on the vee. In a single template Templot can provide either a straight section all through the V-crossing ("regular" type) or a curve running all through ("curviform" type). To add a curved divergence beyond a straight V-crossing requires a separate additional template. The two templates can be grouped for the purpose of making crossovers, etc. regards, Martin. |
||
|
posted: 22 Mar 2008 17:33 from: Bruce Wilson
click the date to link to this post click member name to view archived images |
Martin: I have emailed David to see if he has any more information. I can tell you this is based on 20 lb/yd rail. Based on information John Clutterbuck has on the O-14 yahoo group the closest commercial rail size is MicroEngineering Code 55 and that is what I will be using to build the track. I have looked around the web but can not, yet, find the dimensions for this rail but I am sure I have seen it somewhere. I appears John's diagram has been drawn to scale so failing anything else I will get some dimensions from it. Thanks Bruce Wilson Barrie, Ontario |
||
|
posted: 22 Mar 2008 18:53 from: Martin Wynne
click the date to link to this post click member name to view archived images |
Bruce Wilson wrote: the closest commercial rail size is MicroEngineering Code 55 and that is what I will be using to build the track. I have looked around the web but can not, yet, find the dimensions for this rail but I am sure I have seen it somewhere.Hi Bruce, I meant the prototype rail head width. For British Standard FB rails, 25lb/yd is the smallest with a head width of 1.1/2". For the Mining rail sections, 20lb FB rail has a head width of 1.7/32". We can use these sizes as typical. regards, Martin. |
||
|
posted: 23 Mar 2008 03:57 from: Bruce Wilson
click the date to link to this post click member name to view archived images |
Thanks for the information Martin. Waht I was going to do was measure the code 55 rail and convert that to prototype size but since you have the dimensionsx handy for soemthing close that will work. I am still in touch with David and will let you know what he comes up with. I amy ask him to join use here Bruce Wilson Barrie, Ontario |
||
|
posted: 23 Mar 2008 20:35 from: Andy G click the date to link to this post click member name to view archived images |
Martin, Many thanks for the video. I'd managed to work out quite a few of the settings but had many unanswered questions and wasn't sure I'd done it the right way. I'll spend sometime working through the video and finding out what each setting refers to and then all I'll need to do is find out the correct dimensions for an FR turnout - wish I'd measured the Welsh Highland turnouts we were working on three years ago! Thanks again for your time and effort Andy |
||
|
posted: 25 Mar 2008 05:44 from: Bruce Wilson
click the date to link to this post click member name to view archived images |
Martin: Some more information from David "Note however that: 1) I think the inner stock rail is curved (at 29.4m inside rail-head radius) from the point where the point blades start to the end of the divergent track - except for the straight lengths indicated opposite the crossing, (but I haven't attempted the algebraic geometry to prove it - if it doesn't quite work out then there are some transitional elements in it). 2) Because the point blades are straight, the outer "curved" divergent rail does not precisely parallel the inner curved divergent rail through this area of the point. The geometry is comprised, the practice differing from the theoretical, but it works. (Note that this - and all sorts of other compromises - happen as a matter of course in prototype pointwork - narrow or standard gauge.) 3) My references to the crossing nose refer to the theoretical "vanishing point" where the two rail running faces would cross, ignoring blunting (which I guess would be 1 cm or 1.25 cm). 4) The rail width is immaterial to the geometry of the point which all centres round rail running faces - a nominal 60 cm apart - or the mid-point - 30 cm/30 cm - between them. If you draw up the point on this basis, you just add the rail head width that your model will actually use (typically ~0.80 mm). Hope this is helpful David" |
||
|
posted: 25 Apr 2008 17:38 from: John Clutterbuck click the date to link to this post click member name to view archived images |
I have only just joined this forum and am not currently a Templot user as I had built most of the track for my grand project (in O-14 & ScaleSeven) some years ago. However I am now considering buying it as I may remodel some of the O-14 trackwork, and have therefore been exploring it's features and came across this forum and this topic. I watched the video on defining an O-14 turnout with great interest and feel its a very helpful way of gaining an insight into how the product works before you take the plunge with the credit card - I wish some of the "enterprise modelling products" I have to use for work would do the same! However, in the video I noticed that the point blades seem continuous with the closure rails whereas usually I model them as per the prototype with a hinged switch heel using a fishplate and simulated spacer block. The switch blades themselves being straight throughout. This is perhaps my ignorance of Templot notation. Perhaps someone can enlighten me. John |
||
|
posted: 25 Apr 2008 22:22 from: Martin Wynne
click the date to link to this post click member name to view archived images |
John Clutterbuck wrote: However, in the video I noticed that the point blades seem continuous with the closure rails whereas usually I model them as per the prototype with a hinged switch heel using a fishplate and simulated spacer block. The switch blades themselves being straight throughout. This is perhaps my ignorance of Templot notation. Perhaps someone can enlighten me.Hi John, If you are in the US, you may not be aware that flexible switches have been the norm for the UK standard-gauge prototype for about the last 70 years. Narrow-gauge switches are almost invariably loose-heel. Templot doesn't differentiate between flexible and loose-heel (hinged) construction of the switches, because it doesn't affect the geometry of the switch rails when closed. It is up to you to use (or not) the appropriate method of constructing the switches when building the turnout, according to your prototype. There is a radial end mark shown at the switch heel position, and there is a rail-joint mark shown at the end of the switch rail. Frequently these coincide, according to the prototype data entered in creating the custom switch. In some prototype designs the heel data refers to a virtual heel some way short of the physical rail joint, and in this case these two positions do not coincide. The rail joint mark shows where the switch rails (points) would be hinged in a loose-heel switch. Whether you model it hinged or flexible is up to you. Here's a diagram showing that: switch_marks.png  In some designs the loose heel occurs between the timbers, using a loose fishplate design. In other designs the loose heel is combined with a heel-block chair or rail fixing, and in that case it occurs on a timber centre. If you are modelling with overscale flangeway gaps, it may not be possible to have a working loose-heel in the correct prototype position, because there would not be sufficient flangeway clearance behind it. You then have the choice of extending the switch rails and moving the hinge position; or modelling it as a flexible switch instead, with a dummy joint at the heel position. There is some further discusion about custom switches in the Fn3 topic. regards, Martin. |
||
|
posted: 26 Apr 2008 03:20 from: John Clutterbuck click the date to link to this post click member name to view archived images |
Martin Wynne wrote: If you are in the US, you may not be aware that flexible switches have been the norm for the UK standard-gauge prototype for about the last 70 years. Narrow-gauge switches are almost invariably loose-heel.Hi Martin, Thanks for the explanation. Just for clarification I am very much based in the UK and model in 7mm scale an albeit ficticous British 2' narrow gauge railway along the lines of the Ashover LR or original WHR. Others have already commented about my trackwork articles I wrote a while back for Roy Link's Industrial and Narrow Gauge Railway Modelling Review: http://www.narrowgaugeandindustrial.com/ Regards John |
||
|
posted: 24 May 2008 03:59 from: Paul Holmes click the date to link to this post click member name to view archived images |
Hi All A bit late in the discussion - but I have just joined up after using Templot for several years. Dinas WAS designed using Templot and I decided to use Roy Link's 14mm gauge standards - ie 18mm EM standards less 4mm. I nearly went for 13.8mm gauge but decided that this would make using Romford RP25 driving wheels and 14mm gauge axles too difficult. Dinas was supposed to be a quick layout as an interlude from 4mm narrow gauge - also built with templot but to 7.83mm gauge - but that is another story..... Track on Dinas is built using S scale Sociaety components - code 95 bullhead and cast whitemetal chairs - on 7mm scale ply sleepers standard gauge cut in half. Paul Holmes - builder of Dinas Andy G wrote: Paul Boyd wrote:Alan wrote:Apparently it varied over the years, the original dimension given by James Spooner was 2'1" over the centres of the rails, which should roughly equate to the above gauge. The current dimension, I think, is 1ft 11 5/8in. |
||
|
posted: 8 Aug 2011 13:34 from: Bruce A Wilson
click the date to link to this post click member name to view archived images |
Martin: The heel spread is 50 mm and I think the question on the crossing angle has been answered Martin Wynne wrote: Hi Bruce, |
||


| Please read this important note about copyright: Unless stated otherwise, all the files submitted to this web site are copyright and the property of the respective contributor. You are welcome to use them for your own personal non-commercial purposes, and in your messages on this web site. If you want to publish any of this material elsewhere or use it commercially, you must first obtain the owner's permission to do so. |