Templot Club Archive 2007-2020
|
|||
| author | remove search highlighting | ||
|---|---|---|---|
|
posted: 21 May 2008 06:46 from: dwhellum
click the date to link to this post click member name to view archived images |
I am modelling in FN3 and wish to make turnout templates for holding the ties and the rails in place whilst they are spiked. The idea would be to get Templot to print out 1 page with just the ties in place and another with the rails only, I was hoping i could then use the files to get a laser cut aluminium sheet to make the templates. however, as I use flat bottom rail is there a way to get Templot to do this? Regards to all Dave |
||
|
posted: 21 May 2008 20:22 from: Martin Wynne
click the date to link to this post click member name to view archived images |
dwhellum wrote: I am modelling in FN3 and wish to make turnout templates for holding the ties and the rails in place whilst they are spiked.Hi Dave, Are you sure you want assembly jigs? It means that you will have lots of identical turnouts, whereas the great advantage of Templot is that you can have the full variety of prototype designs in your track plan. Quite often a Templot track plan will contain no two templates exactly the same. Also, please bear in mind the licence terms for Templot. If you manufacture metal jigs from Templot designs, they must be for your own personal use only, not for sale. Templot doesn't yet have functions to create the foot lines for flat-bottom rail. It's on my to-do list, but I can't say when it will be implemented. In the meantime, there are a couple of tricks you can use: 1. Measure your rail carefully, and set the rail head width to a dummy dimension equal to the distance from the running face of the rail to the outer edge of the rail foot, at real > rails > rail section data... menu item. Then generator > generator settings > rails > rail outer edges only menu item. Then rebuild the track plan if necessary. Now you will have rail lines corresponding to one edge of the rail foot, and you can set your machine to cut a slot of the appropriate rail foot width offset from those edge lines. 2. Alternatively, try generator > generator settings > rails > rail centre-lines only menu item, and rebuild as necessary. Now you will have rail lines corresponding to the centre-line of the rail, and you can set your machine to cut a slot of the appropriate rail foot width centred along those lines. n.b. don't try both methods at once, changing the rail width will change the rail centre-line. regards, Martin. |
||
|
posted: 22 May 2008 05:44 from: dwhellum
click the date to link to this post click member name to view archived images |
Martin Wynne wrote: Are you sure you want assembly jigs? It means that you will have lots of identical turnouts, whereas the great advantage of Templot is that you can have the full variety of prototype designs in your track plan. Quite often a Templot track plan will contain no two templates exactly the same.Martin, Thanks for the reply, I understand what you are referring to with Templot's versatility, but i don't use it for designing a layout, however I am using it for the designing of my turn outs. At this time I wish to do an indoor storage area and want a dozen turnouts of the same size. My thought is I can design the turnout on Templot and then have the metal jig made. The Jig would be three parts. The base, which would just be a flat piece of 6mm aluminium, then the tie jig (3mm) and the rail jig (3mm). The base will have four pins in it and the other parts, holes to correspond with the pins, this way I can turn them over to make LH or Rh turnouts. I would not be selling the jig, it will be for my own use. Regards Dave |
||
|
posted: 22 May 2008 22:05 from: Andy Reichert click the date to link to this post click member name to view archived images |
dwhellum wrote:The Jig would be three parts. The base, which would just be a flat piece of 6mm aluminium, then the tie jig (3mm) and the rail jig (3mm). The base will have four pins in it and the other parts, holes to correspond with the pins, this way I can turn them over to make LH or RH turnouts.You mean like these? switch_work_choice1.jpg  See: http://www.proto87.com/turnout-building-tools.html I have the template drawings already, it's just a matter of re-scaling them. However, "having jigs made" is not usually a particularly cheap solution. You can contact me off forum if you wish. Email is on the Proto:87 Stores page header. Andy |
||
|
posted: 23 May 2008 05:29 from: dwhellum
click the date to link to this post click member name to view archived images |
Andy, thanks for the link. Your system is very interesting, however I am not using tie plates but just spiking directly to the ties. here is a photo of what I have achieved so far, this was my first attempt at turnouts Picture052.jpg  a closer look at the frog under construction crossover5.jpg  Your jig system is different to what I had in mind. My idea is to have the tie template as one piece to capture the ties, then the rail template lays over the top. I am still working on how to hold the rail whilst it gets spiked. I may have to find some system of gluing them to the ties and then spiking after removing the rail jig. Thanks again Regards Dave |
||
|
posted: 23 May 2008 13:31 from: Andy Reichert click the date to link to this post click member name to view archived images |
dwhellum wrote: Your system is very interesting, however I am not using tie plates but just spiking directly to the ties.Your prototype may be one of the very few NG lines that didn't use tie plates at all. The very common US modeling idea of just spiking track, is a considerable compromise, based on reducing work, that was invented half a century ago, and stuck, due to no-one questioning why real track looks so different. Just about all US modeling magazines consider "track" merely an unnoticed means for steering toy trains out of the box, that must be constructed with the least possible delay and effort. They sell more advertising that way. I'm more of a stickler for striving for easily achieved realism and actually modeling US style track rather than "quickly knocking up" a reduced detail equivalent functionality. So I made a series of jigs that take advantage of tie plate engineering, rather than just leaving them out entirely. I do have a full set of bridge gauges that go in the holes you can see on the sides, which do hold the rail as you want, but I found them to be unnecessary when my self gauging tie plates are used I you want to put together something a lot simpler, You'll find something very similar to your design ideas in terms of holding the rail in place, in the product line of the 2mm society. Just make it bigger. Andy |
||
|
posted: 23 May 2008 14:07 from: Martin Wynne
click the date to link to this post click member name to view archived images |
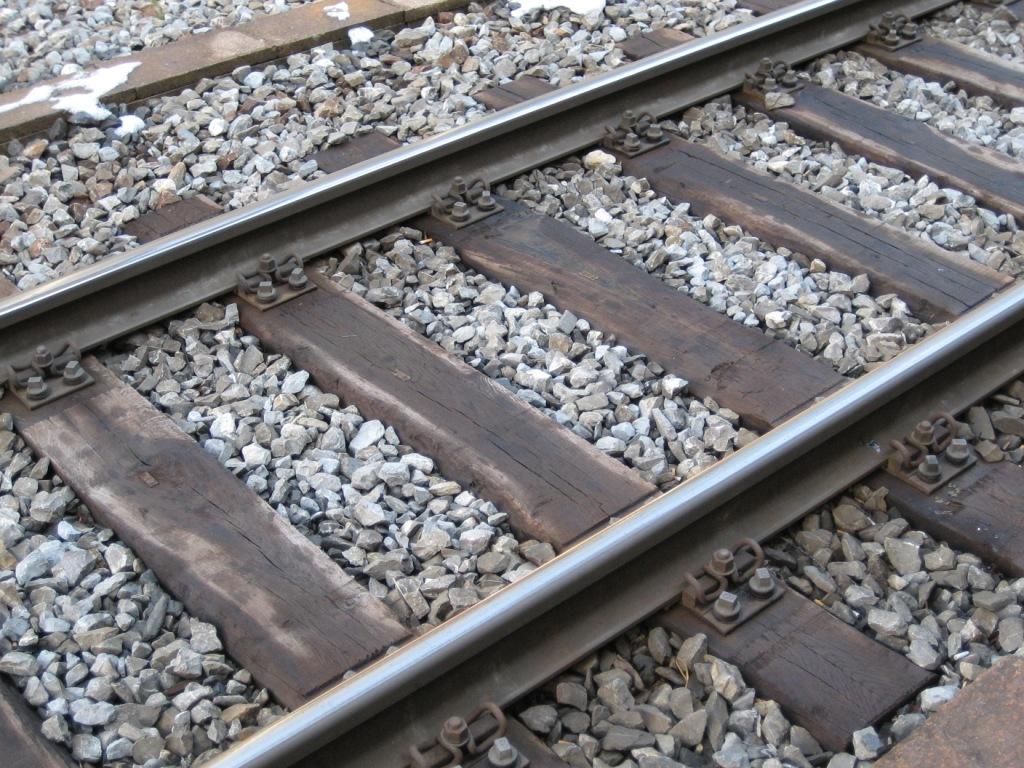
Andy Reichert wrote:Your prototype may be one of the very few NG lines that didn't use tie plates at all.Hi Andy, The track on the right in this picture appears not to have any tie-plates: 1a34663v.jpg  Tracks at C & NW RR's Proviso yard, Chicago, Ill. 1943 April The original idea of flat-bottom rail (a difficult section to roll) was that the wide foot would be able to spread the load directly onto the timbers. When flat-bottom rail was generally adopted by BR, the existing range of BS FB rails were regarded as having an unnecessarily wide foot when used on baseplates, and a new series of sections with a narrower foot was introduced. Quoting from BRT3: "The BS 110lb rail was not considered to be an ideal section. Originally designed for use directly on the sleepers, the 6" width of foot is somewhat more than is necessary when the rails are carried on baseplates." I think your statement that a "very few NG lines" didn't use tie plates might be a little wide of the mark. Here are a couple of pictures of the Talyllyn Railway. No tie-plates here: 1apprforestry.jpg  1abovequarry.jpg  (Delightful pictures linked from Alan Newble's Talyllyn Gallery.) regards, Martin. |
||
|
posted: 23 May 2008 21:02 from: Andy Reichert click the date to link to this post click member name to view archived images |
If you don't use tieplates, (or chairs for BH) you don't get canted rails. No Cant, you get excessive wear on coned wheels and major hunting at speed. Hence the original construction savings for most NG lines that had a real economic and time dependent purpose (other than being preserved), disappear quite quickly, once ongoing maintenance costs become an issue. The UK is hardly a good example of a country having prolific, economically driven independent NG lines. I can't tell if the photo of the old US yard was originally colour, or colorized later. The box cars (ALL wood outside framed) indicate the picture was taken no later than the early 30's, but the side tracks were probably laid in the 1910's, if not earlier than that. Back then, the need for cant in a very slow running environment would have been underestimated. It's not clear than the central track is untieplated, but one assumes it's just another yard track, as it isn't raised any higher. Andy |
||
|
posted: 23 May 2008 21:07 from: Martin Wynne
click the date to link to this post click member name to view archived images |
Andy Reichert wrote: The box cars (ALL wood outside framed) indicate the picture was taken no later than the early 30'sHi Andy, It's dated April 1943, from: "America from the Great Depression to World War II: Color Photographs from the FSA-OWI, 1939-1945" More of the same at: topic 434 regards, Martin. |
||
|
posted: 23 May 2008 22:01 from: Bruce Wilson
click the date to link to this post click member name to view archived images |
Outside braced boxcars were around a fairly long time so seeing them in the 1943 photo is not surprising. Steel boxcars were introduced in the late 1930s and early 1940s so there would not be that many around to start with and given materials priorities caused by WWII the wood cars would have soldiered on. Major replacement began after the war. Bruce Wilson Barrie, Ontario Martin Wynne wrote: Andy Reichert wrote:The box cars (ALL wood outside framed) indicate the picture was taken no later than the early 30'sHi Andy, |
||
|
posted: 24 May 2008 00:21 from: Andy Reichert click the date to link to this post click member name to view archived images |
So I wasn't close enough for the cigar  I think this is a photo of a more desolate area, to make the author's point of the Depression impact. If the yard was in heavy use, at least some of the various box cars would have been more modern in '43. And many would have been flat sided "reefer's" for perishables. I doubt the early lower height cars on the left were in much, if any use. They might even be a line of cars awaiting scrap. And if the color was correct, the front lines have an intermittent use, light, rust film. While there is an apparent steam loco in the centre distance, the plumes of smoke seem to be elsewhere. The looks like a picture of a fairly quiet area or one that may be on the verge of being abandoned, at until the war effort sped up. Streetcar construction switched from wood bodies to steel bodies in the '20's, even though a lot of wooden bodied cars lasted up to WWII. Most wooden cars were destined for replacement/scrap from the mid 30's on, but some were saved at the last moment by the increased need once the war effort commenced. I'm nowhere near as familiar with the timing of the introduction of the more common flat sided cars, so I'll defer to the experts on that. Andy |
||
|
posted: 26 May 2008 16:37 from: Alan Turner
click the date to link to this post click member name to view archived images |
The Swiss railways don't seem to have canted rails. I would show a picture but I can't fathom out how to embed a picture. Alan |
||
| Attachment: attach_278_442_Swiss_track.jpg 686 | |||
| Last edited on 26 May 2008 19:57 by Alan Turner |
|||
|
posted: 26 May 2008 17:21 from: Martin Wynne
click the date to link to this post click member name to view archived images |
Alan Turner wrote: The Swiss railways don't seem to have canted rails. I would show a picture but I can't fathom out how to embed a picture.Hi Alan, 1. If the picture is on a web site, click the image button above the editor, and enter your picture URL link in the box which appears. Like this: insert_image.png  If that button isn't present in your browser, or doesn't work, you can enter the codes directly: image_tags.png  You can have as many such in-line images in a message as you wish. 2. If the picture file is on your own computer, click the Browse button below the message editor and then navigate to the required file. It will then appear as an attachment below your message. In this case you can have only one picture per message. If you have several pictures, just send a new message for each one. 3. Click the Help button at the top right of every page in Templot Club for more notes about how to do things in the message editor. regards, Martin. |
||
|
posted: 27 May 2008 00:23 from: John Lewis
click the date to link to this post click member name to view archived images |
Alan Turner wrote:The Swiss railways don't seem to have canted rails. I would show a picture but I can't fathom out how to embed a picture.How can you tell if a length of track is canted or not, eg the picture now with Alan's e-mail on the Templot Forum, please? John |
||
|
posted: 27 May 2008 03:43 from: Martin Wynne
click the date to link to this post click member name to view archived images |
John Lewis wrote:How can you tell if a length of track is canted or not, eg the picture now with Alan's e-mail on the Templot Forum, please?Hi John, If the rails are inclined, the baseplate thickness below the rail on the outside (at A) will be about 1/4" thicker than on the inside (at B): inclined_query.jpg  Make your own judgement. I think they look about equal in Alan's picture, which means that the rails are vertical, not inclined. But it's difficult to be sure.Many thanks for the pic, Alan. regards, Martin. |
||


| Please read this important note about copyright: Unless stated otherwise, all the files submitted to this web site are copyright and the property of the respective contributor. You are welcome to use them for your own personal non-commercial purposes, and in your messages on this web site. If you want to publish any of this material elsewhere or use it commercially, you must first obtain the owner's permission to do so. |