Templot Club Archive 2007-2020
|
|||
| author | remove search highlighting | ||
|---|---|---|---|
|
posted: 17 Sep 2008 02:47 from: gsmorris click the date to link to this post click member name to view archived images |
the knotty problem. what do people think are the best ways of making these horribly problematic things? given - the moving sleeper tie is not an option? | ||
|
posted: 17 Sep 2008 12:42 from: Templot User
click the date to link to this post click member name to view archived images |
----- from Robert Kosmider ----- for members of Templot Club Hello GS Morris I hate moving sleepers - so I refined methods used by Iain Rice (per his books) and Norman Solomon (MRJ) and had it written up in GOG Gazette and elsewhere. Can send you a copy if you e-mail me off group. Robert email: rbrtkos at adam dot com dot au |
||
|
posted: 17 Sep 2008 12:47 from: lippydavies click the date to link to this post click member name to view archived images |
I am building Flat bottom turnouts, using the method from Exactoscale. Tortoise Point motor bases the P4 track company sells. Solder two NS droppers from the blades down through the baseboards into brass tube sleeves inserted into the rod from the motor. If you give me an e-mail address I will send you a picture of how they look. Failing that I hope to get some pictures uploaded to the layout fotopic soon. Lee |
||
|
posted: 17 Sep 2008 13:05 from: Brian Lewis
click the date to link to this post click member name to view archived images |
gsmorris wrote: the knotty problem. what do people think are the best ways of making these horribly problematic things? given - the moving sleeper tie is not an option? Surely the easiest solution then, is to get someone else to make them for you C+L Finescale supply them for 00, EM, P4, F7, 0-SF and S7. Regards Brian Lewis |
||
|
posted: 18 Sep 2008 03:51 from: Dasatcopthorne click the date to link to this post click member name to view archived images |
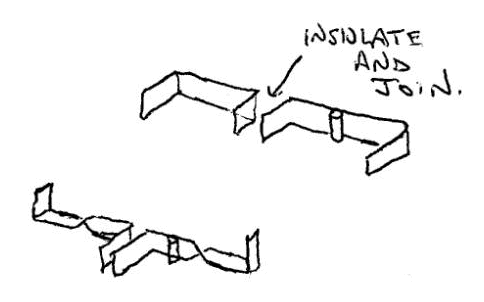
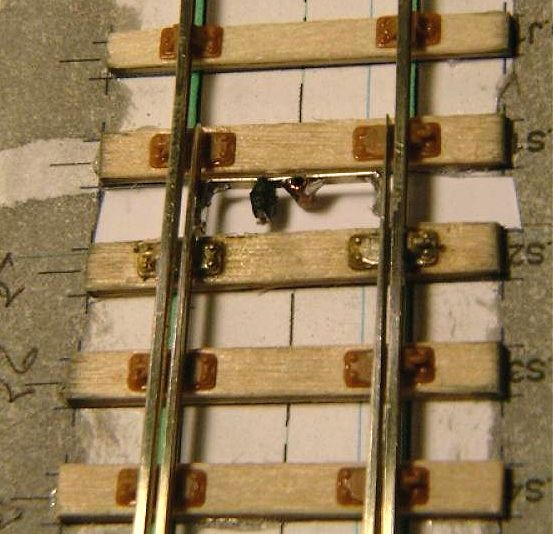
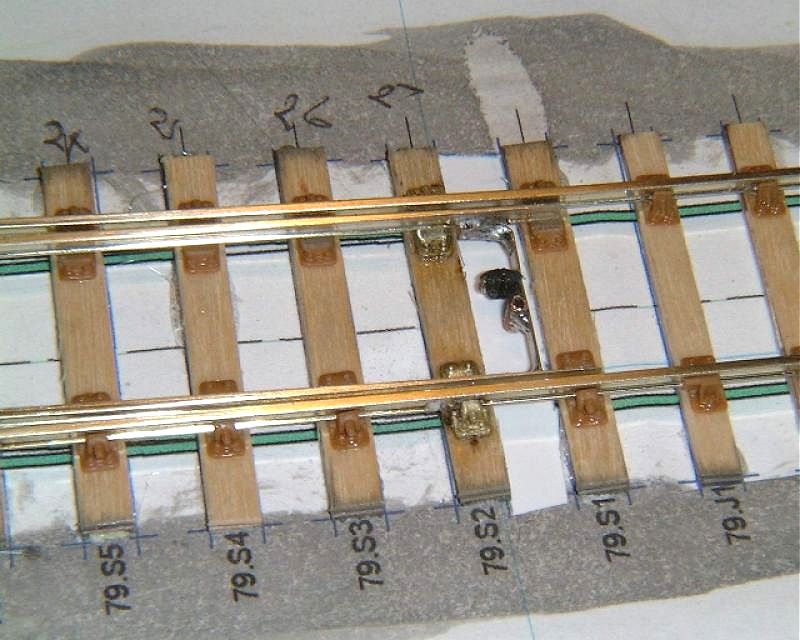
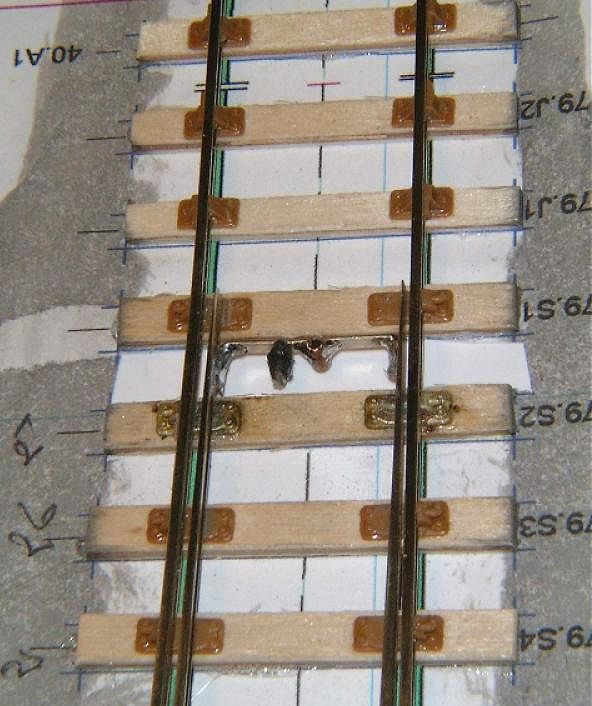
Hi. I have loaded 3 photos to the Photos section on Yahoo Templot Group under the title Tiebars. I now make mine this way but it's not my original idea. I got it from someone else who may have got it from Scalefour or similar. Perhaps someone else on this group knows the origin. The tiebar is made from 1.5 or 2mm wide nickel-silver strip. Each half (either side of the black 'lump' is a 'U' shape with square corners. One leg of the 'U' is soldered to the rail and the other leg is fixed to the opposing leg on the other half of the bar. In either case, the 'joint' is then wrapped in black cotton thread and this is then soaked with superglue. The two legs are fixed together in two differing ways. a. by superglue with thin paper or card between them for insulation or by soldering to a small piece of double-sided 1mm think copper-clad. The tiebar then has a 2mm length of tubing soldered to it to received the drive from a Tortoise motor. But clear to me but I hope the rest of you understand my description. An alternative is to twist each half of the tiebar through 90deg between the centre joint and the 'leg' so that the leg, when bent at 90deg comes up beside the blade in the vertical. I'll try to draw this and upload it later. Dave |
||
|
posted: 18 Sep 2008 03:52 from: Dasatcopthorne click the date to link to this post click member name to view archived images |
I've now added a 'sort of' sketch of what I mean. Dave |
||
|
posted: 19 Sep 2008 22:49 from: Alan Turner
click the date to link to this post click member name to view archived images |
Can someone put the photos and drawings on here please as I no longer have access to the Yahoo site. Alan |
||
|
posted: 19 Sep 2008 23:30 from: Martin Wynne
click the date to link to this post click member name to view archived images |
Alan Turner wrote: Can someone put the photos and drawings on here please as I no longer have access to the Yahoo site.Hi Alan, Thanks to Dave for these: stretcher_sketch.gif  stretcher_bar1.jpg  stretcher_bar2.jpg  stretcher_bar3.jpg  |
||
|
posted: 21 Sep 2008 19:40 from: gsmorris click the date to link to this post click member name to view archived images |
Hi all, I can't thank all enough for the help in responding to my question about tiebars. A question poised while wondering about the problem stuck in a business hotel overnight now with the ban on liquids and small sharp objects has stopped my “hand luggage modeling” accompanying me on what seems to be an endless life in overnight hotels and plains these days. It has all been most interesting and informative. I am particularly pleased with the effort and diagrams uploaded. It is nice to see that some of the various articles and commercial sources have been recorded in on topic. However, to see some of the more original ideas that were new to me is fantastic. Believe me I have been looking for the ideal method for several decades now since first reading about self build track in an MRC show guide mentioning S scale and a @70 Railway modeler article making points from balsa and code 100 rail. The second question I have is that while I make tiebars hold the switch rails down to the level of the stockrails positively. I see often others don’t do you have trouble with rising switchrails causing trouble or is it my fetish for belt and braises? GSmorris |
||
|
posted: 21 Sep 2008 21:54 from: Dasatcopthorne click the date to link to this post click member name to view archived images |
Generally the switchrails behave themselves. But if I have a pair that tend to rise, I solder a shaort length of NS wire to the underside of the switchrail so that it extends under the stockrail. How do you yours? Dave |
||
|
posted: 22 Sep 2008 12:58 from: gsmorris click the date to link to this post click member name to view archived images |
Hi. I use thin metal strip araldited to 1mm thick PCB under each rail and extending under the stock rail with .8 mm wire to hold the spacing. Plastic 35mm film stock or similar is glued on top to make the cosmetic bar with, in my prototypes case, the same plastic film at the toe for the second bar and in long turnouts a third bar of same material as appropriate. Phospbronze or N/S boiler band material is good for this. The switch drive is taken off whatever end of the 0.8 wire is most easily disguised. They are not difficult to make and have been developed from two 1980s MRN articles one in a series by Stewart Hind on track construction which ran irregularly for a number of years which included such good things as "permanent rust" using PCB of the right colour and film stock for cosmetic and slightly structural tiebars. The second was using Araldite tube and wire to for a sort of split axle construction, similar in idea to those sold by C&L as tiebars with which I dont get on with due to the rather small soldering surfac. gsmorris |
||
| Please read this important note about copyright: Unless stated otherwise, all the files submitted to this web site are copyright and the property of the respective contributor. You are welcome to use them for your own personal non-commercial purposes, and in your messages on this web site. If you want to publish any of this material elsewhere or use it commercially, you must first obtain the owner's permission to do so. |