Templot Club Archive 2007-2020
|
|||
| author | remove search highlighting | ||
|---|---|---|---|
|
posted: 5 Nov 2008 03:26 from: Martin Elsworth click the date to link to this post click member name to view archived images |
I have recently produced my first layout using Templot. All my turnouts end up with clashing sleepers. Templates 1&2 in the attached box file show the problem and templates 3&4 show my attempt at resolving it but I don't know if this is correct - how would the big boys have done this in real life? Any advice about shoving sleepers and sorting out clashes would be appreciated. are there any tutorials to look at? Martin Elsworth |
||
| Attachment: attach_399_617_Timbering_query.box 258 | |||
|
posted: 5 Nov 2008 13:48 from: Martin Wynne
click the date to link to this post click member name to view archived images |
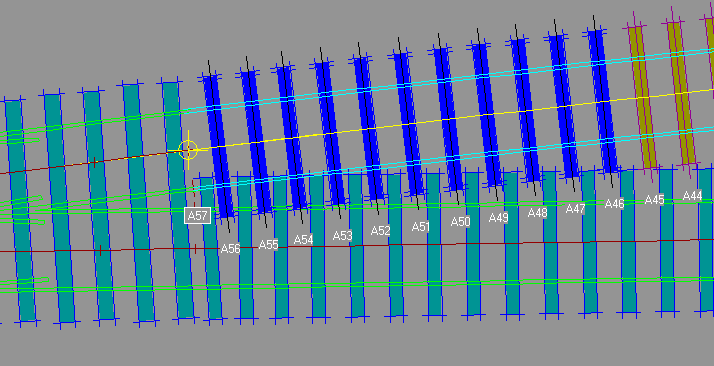
Martin Elsworth wrote: I have recently produced my first layout using Templot. All my turnouts end up with clashing sleepers. Templates 1&2 in the attached box file show the problem and templates 3&4 show my attempt at resolving it but I don't know if this is correct - how would the big boys have done this in real life?Hi Martin, Your original templates were nearer to being correct than the ones you changed. Generally railway companies don't use longer timbers or more of them than is strictly necessary. I did a bit of timber shoving on your templates to create this: shove_exit.png  On sleepers A46 to A56 I moved each one forwards or back a little until it fitted clear between the sleepers in the main road. To assist in this, I twisted the first exit sleeper in the main road a little, too. Timbering styles and practice varied a lot, and the only true guide is a photograph of your prototype location and period. But there are a few guiding principles: Special switch and crossing chairs can fit the rails only at pre-determined positions. They must have some timber under them. This often means using more timbers, or wider timbers, so that the chairs are firmly supported and the chair screws are not too near to the edge of a timber. Timbers should be as near as possible at right-angles to the rails. This creates the strongest track, able to resist gauge-spread. This is especially important on curved tracks. Timbers must be able to be packed up level if necessary. This means that the gang must be able to dig out under them, insert jacks, and place fresh ballast. This is very difficult to do if timbers are very close together side by side or end to end. Rail joints are the weakest parts of the track. Timbers on each side of a rail joint should be as close together as possible. This generally means joint timbers are spaced at no more than 25" centres, so that a standard fishplate just fits between the chairs. This isn't always possible, in which case wider joint spacings should be on the diverging track rather than the running line. There is more about timbering practice in these messages on the Yahoo group: message 5006 message 3259 and in this topic on the forum: sleeper spacings . regards, Martin. |
||
|
posted: 5 Nov 2008 21:57 from: Martin Elsworth click the date to link to this post click member name to view archived images |
Thank you Martin - that's much simpler and tidier! I note that you have removed sleeper A57 which then creates the space for moving the others along - I doubt this matters at my scale but is there an easy way to determine if you have made the sleeper spacing too great, particularly at rail joints? Martin |
||
|
posted: 5 Nov 2008 22:24 from: Martin Wynne
click the date to link to this post click member name to view archived images |
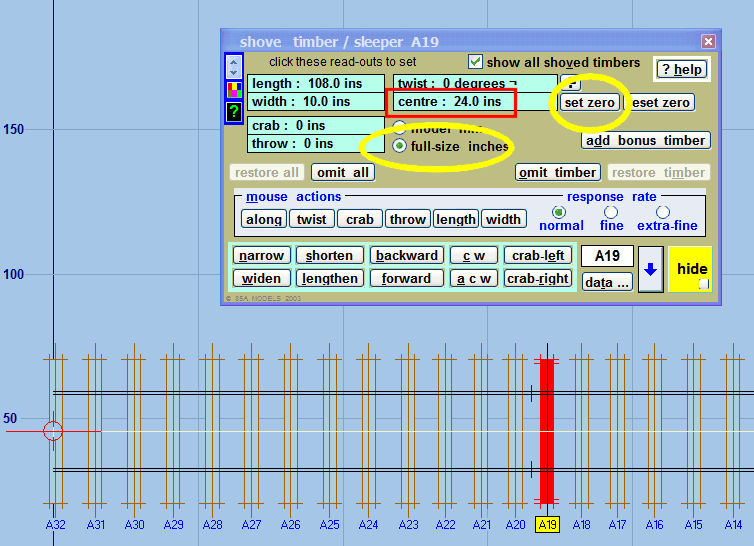
Martin Elsworth wrote: is there an easy way to determine if you have made the sleeper spacing too great, particularly at rail joints? Hi Martin, Select the first timber -- I selected sleeper A20 in this example below. Then click the set zero button (shown ringed). It's also convenient to click the full-size inches option. Now when you select any other timber (I selected sleeper A19), the centre read-out shows you the distance (centre-to-centre) from the timber on which you previously set zero. In this example it's showing the rail joint sleeper spacing is 24" from A20 to A19. If you click the centre read-out, you can set it to any other spacing you require. Or if you move the timber with the buttons or mouse actions, the read-out will show the changing position. shove_set_zero.png  regards, Martin. |
||
|
posted: 5 Nov 2008 22:47 from: Martin Wynne
click the date to link to this post click member name to view archived images |
p.s. To check the timber spacing across a boundary to another template, add a bonus timber. Move it along to align it over the timber on the other template. Then you can see the spacing, or set zero on the bonus timber to adjust others. Remove the bonus timber when done (real > timbering > bonus timbers > remove last added menu item). Martin. |
||
| Please read this important note about copyright: Unless stated otherwise, all the files submitted to this web site are copyright and the property of the respective contributor. You are welcome to use them for your own personal non-commercial purposes, and in your messages on this web site. If you want to publish any of this material elsewhere or use it commercially, you must first obtain the owner's permission to do so. |