Templot Club Archive 2007-2020
|
|||
| author | remove search highlighting | ||
|---|---|---|---|
|
posted: 18 Nov 2008 15:52 from: David click the date to link to this post click member name to view archived images |
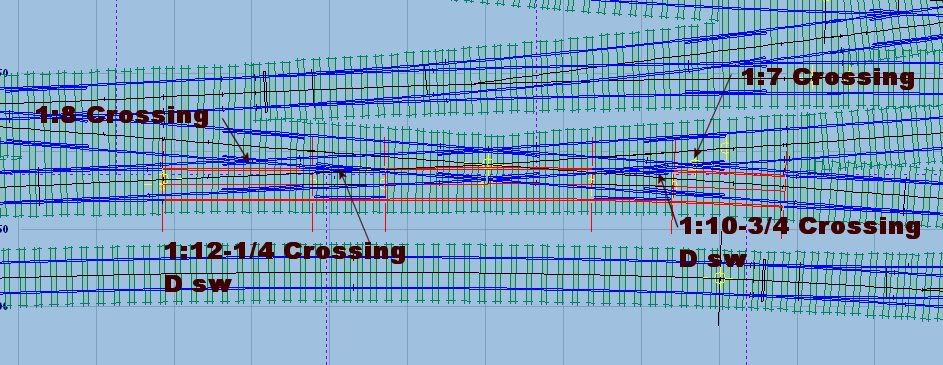
Hiya Guys This is my first attempt at what I believe may be a Semi Outside Single Slip. Not 100% sure about this. semi_outside.jpg?t=1227005077  My main concern is whether the crossing angles, in particular the Slip road are to obtuse (flat I think). I understand that the K-Crossing angles are on the extreme limit for a fixed elbow, according to the GWR Gospel in the GWR handbook. I guess that the formation is probably not prototypical for a GWR terminus, but due to space restrictions and flowing track plan, my options are limited. However, in 4mm is it possible to build, and have reliable running at these angles. Welcome and appreciate any comments, as this is well outside of my knowledge area. Kind regards Dave |
||
| Attachment: attach_418_634_gwr_terminus_08_11_18_0950_34.box 301 | |||
|
posted: 18 Nov 2008 17:07 from: Martin Wynne
click the date to link to this post click member name to view archived images |
Hi Dave, That's great! Proper partial templates for the slip crossings too! There is no problem with those angles. Unlike K-crossings there is no effective limit on V-crossings, apart from the difficulty of actually making the very slender vees. Generally bullhead V-crossings stop at 1:20, so you are well inside that. Provided the check rails are set correctly, they will run fine. By the way, it's not a semi outside slip -- it's a fully outside sip. You are using the incorrect Iain Rice terminology. The "outside" part means that the slip switches are outside the diamond. Both of these are. A "semi" outside slip has one switch inside and one outside the diamond -- a rare thing, but there is a picture of one on the S4 Society web site. What Iain calls a fully outside slip is not usually called a slip at all, but a half-scissors. I have amended the title of this topic accordingly, so that those searching the archive don't get confused. regards, Martin. |
||
|
posted: 18 Nov 2008 17:17 from: Martin Wynne
click the date to link to this post click member name to view archived images |
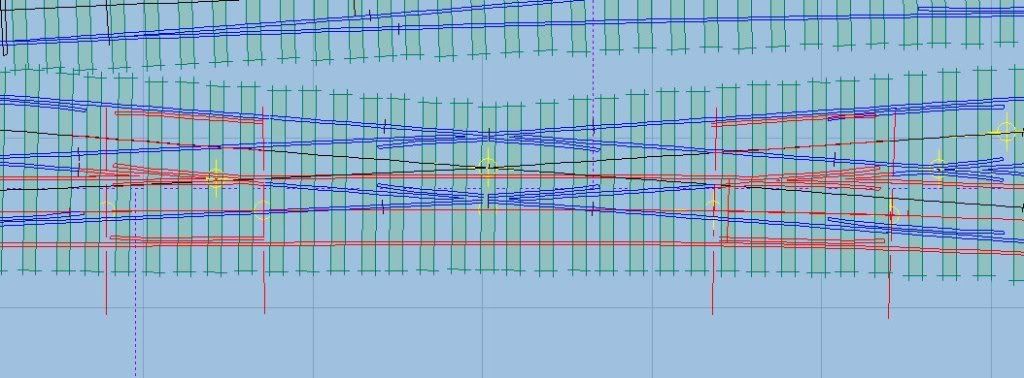
p.s. Dave, I have just noticed that you have some check rails missing. The upper check rails on the diamond V-crossings need to be extended in length to cover the slip road V-crossings. Martin. |
||
|
posted: 18 Nov 2008 18:11 from: David click the date to link to this post click member name to view archived images |
Hiya Martin Thanks for your reply and commendation on my efforts. It was all seat of the pants stuff, but i got there using your 3 way turnout tutorial. Thats great news about the crossing angles. I guess construction is another matter, when I get to it. Thanks for putting me straight on the name of the formation. I must admit, it was Iain Rice's description. Useful to understand the reference to either inside or outside the diamond. I shall add the missing check rails and re-upload. Many thanks again martin Regards Dave |
||
|
posted: 18 Nov 2008 18:53 from: David click the date to link to this post click member name to view archived images |
Hi Martin Hope this is what you mean't. outside_slip.jpg?t=1227015207  I assume the two wing rails get constructed as one continious rail, but that this kind of representation is sufficent. Regards Dave |
||
| Attachment: attach_419_634_Outside_Slip.box 292 | |||
|
posted: 18 Nov 2008 22:29 from: Martin Wynne
click the date to link to this post click member name to view archived images |
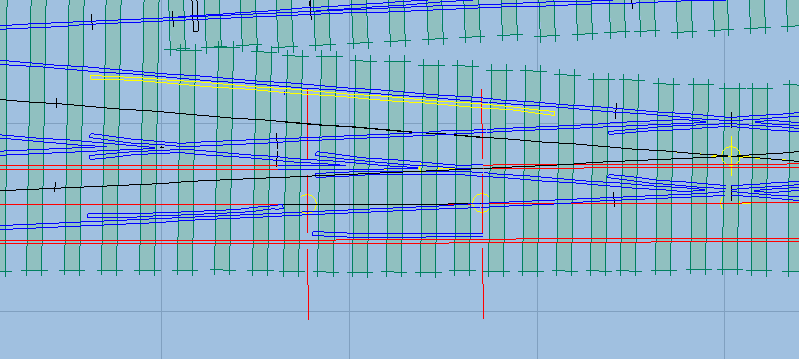
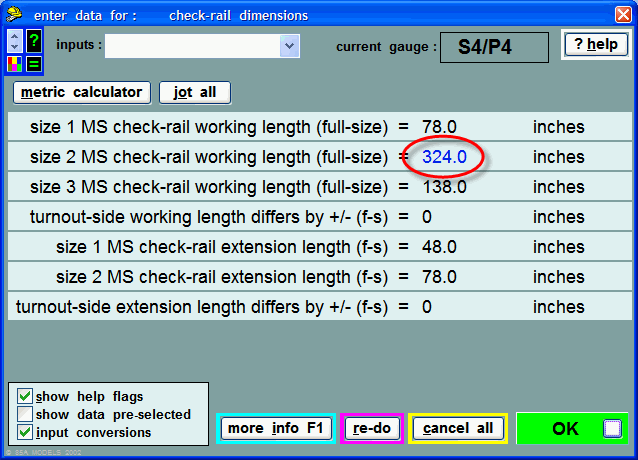
David wrote: I assume the two wing rails get constructed as one continuous rail, but that this kind of representation is sufficient.Hi Dave, It's sufficient, but having gone to the trouble to create partial templates for the slip crossings, you may as well do the rest of it os_check_rail.png  I split the check rail out as a separate partial template, then changed the "size 2 MS check rail working length" to 324 inches full-size (and reduced the blanking to see it). Sizes 1 and 3 check rails are not relevant at this crossing angle, and the other dimensions are unchanged: os_check_rail_length.png  That's at real > customize V-crossing > wing and check rails... menu item. Notice that the lower check rail needs extending to match, to ensure that the crossing is properly checked through the knuckle. regards, Martin. |
||
|
posted: 19 Nov 2008 03:25 from: David click the date to link to this post click member name to view archived images |
Martin Wynne wrote: David wrote:I assume the two wing rails get constructed as one continuous rail, but that this kind of representation is sufficient.Hi Dave, Hiya Martin I can see your point(pun unintended) martin, so I will finish the job properly, as you mention. In creating this outside slip, I have learn't to consider this multi layered approach to Template construction, which is extremely brilliant. Thanks for helping me to finish this formation off correctly. Regards Dave |
||
|
posted: 27 Nov 2008 20:18 from: JimH
click the date to link to this post click member name to view archived images |
Hi David, Impressive work! Could you tell me which tutorials you used to learn how to to all this? I'm going to work through them all ultimately, but I would like to start off in the right direction. Regards, Jim |
||
|
posted: 23 May 2009 02:36 from: pimin
click the date to link to this post click member name to view archived images |
Having great fun designing an outside slip. However, I cannot figure out how to get a V aligned on some intersecting check rails. Using multiple templates I can create a space for the flangeways. Some clues would be appreciated. Video How-to's, previous discussions, etc would be great. I'm probably searching on the wrong keywords. TIA, Paul |
||
|
posted: 23 May 2009 07:58 from: Stephen Freeman
click the date to link to this post click member name to view archived images |
Hi, I assume you are trying to aligh a common crossing rather than just a vee. You can align either on the Fine Point (FP), so it's just a question of setting the peg and notch to align it on. If you want to align it on the intersection of 2 rails, probably the easiest way would be to do it by setting the peg and notch by eye though Martin will no doubt frown on this and come up with something better. |
||
|
posted: 29 May 2009 18:56 from: pimin
click the date to link to this post click member name to view archived images |
Borg-Rail wrote: Hi,Hi, If I actually knew what I was doing I'm sure I'd be done by now!? *8^? I was trying to get a nice point on two check rails (one on each of two intersecting rails, one a main and the other one of the outside slip rails) where the check rails intersected. After looking at things for a while I realized that one of the check rails was there as a clearance guide and didn't need to be in the final layout ... so I deleted it (DUH!). Thanks, Paul N. |
||
| Please read this important note about copyright: Unless stated otherwise, all the files submitted to this web site are copyright and the property of the respective contributor. You are welcome to use them for your own personal non-commercial purposes, and in your messages on this web site. If you want to publish any of this material elsewhere or use it commercially, you must first obtain the owner's permission to do so. |