Templot Club Archive 2007-2020
|
|||
| author | remove search highlighting | ||
|---|---|---|---|
|
posted: 10 Jul 2009 13:09 from: m davies click the date to link to this post click member name to view archived images |
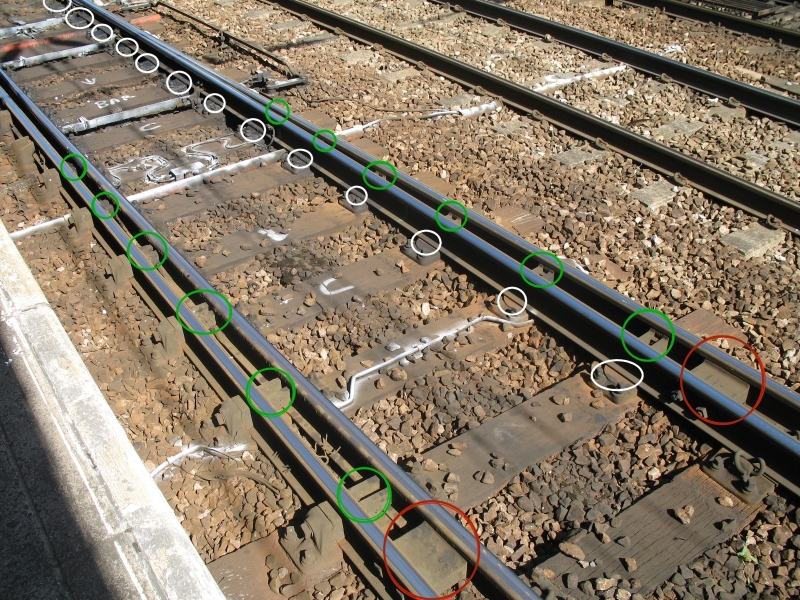
I've been on a little field trip for photos of modern trackwork, the objective is for prototype information for fine 7mm modeling and an attempt to come to grips with turn out naming and the real world. Attached a reduced image of the turnout (B1312) at Ipswich, I'm confused about what look like blocks between the rails (circled green) above the slide blocks (circled white), are these rubber ?, the blocks circled red are clearly substantial ironworks, I do have the COP document GK/RC0774 open here but haven't or don't seem to have found that page yet. Using Templot and sleeper spacings I've kind of guessed its a C or D 13, the crossing is definately 1:13 as stamped, its the length or full designation I'm after. Full size images here http://homepage.ntlworld.com/mickoo/Trains/B1312_03.jpg large image of attached http://homepage.ntlworld.com/mickoo/Trains/B1312_11.jpg overall view of B1312 http://homepage.ntlworld.com/mickoo/Trains/B1312_14.jpg closer view of B1312 Martin I've 15 shots, some in detail of this turnout if you think they're suitable for your collection then let me know and I'll send them over, plus any others I have you might want, one odd one in the yard entrance has clamp lock FB blades fixed to a BH crossing. Thanks in advance Michael |
||
| Attachment: attach_584_894_B1312_03_WEB.jpg 288 | |||
|
posted: 10 Jul 2009 16:51 from: Phil O
click the date to link to this post click member name to view archived images |
Hi Micheal These are slide baseplates (chairs on bullhead rail) "Attached a reduced image of the turnout (B1312) at Ipswich, I'm confused about what look like blocks between the rails (circled green)" These blocks are to prevent the switch rail from twisting under load "above the slide blocks (circled white), are these rubber ?," The areas circled white are the exposed areas of the slide base plate for the tongue of the switch rail to slide on when the turnout is reversed. All these componts are cast iron or steel "the blocks circled red are clearly substantial ironworks," These blocks anchor the switch rail to the stock rail to prevent movement Hope this is of some use Cheers Phil |
||
| Last edited on 10 Jul 2009 16:53 by Phil O |
|||
|
posted: 10 Jul 2009 17:17 from: m davies click the date to link to this post click member name to view archived images |
Phil, Thanks, that all sort of make sense  except the areas circled in green, if these are steel how do they compress, those near the start of the planning area certainly appear to be compressed, on the left of the turnout there is a good 3" gap, on the right no gap, as the blades move the gap moves to the other side, therefore the smaller blocks must adjust some how to the changing gap, I'm probably not making myself too clear here . except the areas circled in green, if these are steel how do they compress, those near the start of the planning area certainly appear to be compressed, on the left of the turnout there is a good 3" gap, on the right no gap, as the blades move the gap moves to the other side, therefore the smaller blocks must adjust some how to the changing gap, I'm probably not making myself too clear here .I will dig through the tech doc, it must be in there somewhere as to how these minimise switch rail twisting yet remain elastic under compression. I noticed several of the slide chairs also had small rollers at their toe ends, clearly to aid lateral movement. Kindest Michael |
||
|
posted: 10 Jul 2009 17:46 from: Martin Wynne
click the date to link to this post click member name to view archived images |
m davies wrote: if these are steel how do they compress, those near the start of the planning area certainly appear to be compressed, on the left of the turnout there is a good 3" gap, on the right no gapHi Michael, The switch spacers don't compress, they are solid metal. When the switch rail (blade) moves towards the stock rail to the closed position, the spacers bear against the web of the switch rail and take any side-thrust from the wheels. When the switch rail moves away from the stock rail to the open position, it also moves away from the spacers. It is not clear that this is happening in pictures because the head of the rail obscures the view of the gap between the spacer and the rail web. The switch rail doesn't need any support in the open position because no wheel runs on it. Many thanks for the pictures. regards, Martin. |
||
|
posted: 10 Jul 2009 18:21 from: m davies click the date to link to this post click member name to view archived images |
Martin, Really !, this I have to see , I'll take extra notice when I look next time, makes perfect sense though, sadly all our turnouts at work are manual, except maybe the master lead which might be controlled from Colchester or our 'office' in a portacabin, will check tomorrow anyway and get a load of reference pictures on Sunday when the terminal is shut down to traffic, I think I have a freightliner master contol computer to check on Sunday <hint> .You can collect all of the recent Ipswich images I have here http://homepage.ntlworld.com/mickoo/Trains/Track.zip let me know when you have it so I can clear FTP space, use and discard as you feel fit for your collection. Kindest Michael |
||
|
posted: 10 Jul 2009 22:27 from: Martin Wynne
click the date to link to this post click member name to view archived images |
m davies wrote: You can collect all of the recent Ipswich images I have hereHi Michael, Many thanks indeed for a fine collection of detail pictures. The yard tracks are typical of such places using recovered track material, with several different types of FB baseplates, bullhead and FB rails inter-mixed, etc. I have uploaded them in your name to the new Image Gallery on here. Just the sort of pictures the gallery was created for. To see them all, click the Image Gallery button at the top of this page. Then click the M button for user names starting with M, and then click Michael's user name, m davies. Click the small images to see them at normal size. To see the full detail, it's worth clicking the link below the normal image to view them at original size (they will take a few seconds to appear). Many thanks again, Michael.  regards, Martin. |
||
|
posted: 11 Jul 2009 07:43 from: mjbyyz
click the date to link to this post click member name to view archived images |
Michael: Thank you for those superb shots of track and switches - these are invaluable, not to mention the excellent clarity of all of them. I try making my own track (in TT-3) and maybe now I will be able to finely tweak my points in 7mm gauge. These pictures show all kinds of details I never knew even existed! John B. |
||
|
posted: 11 Jul 2009 10:37 from: m davies click the date to link to this post click member name to view archived images |
John, Your more than welcome, to be honest the shots didn't come out as well as I'd hoped, I think it was the full sunlight that has made the contrast too high, excellent weather for taking pictures of trains but not so good for detail shots, far better to have 60% cloud cover and take your pictures when the sun is clouded over, that way you get high light levels from the 40% uncovered but lower contrast due to the cloud. I have some images today of a manual FB A-7 thats tucked away at the back of the site, its handy to see that the crossing angles are marked on the crossing, usually internally where the wheel rim passes or alternatively the chairs are marked, ie A-7, B-7, X-7 etc, we have a nice three way A-6.5 which I will photo tomorrow when the terminal is shut down as well as some larger B-8s or C-8s, all manuals. I'm still trying to fathom how to designate whether its an A-B or C in relation to FB track, simple enough if theres break in the heel of the blade, but not so easy when the rail is continous from blade tip to crossing V. I think I left some other track fixings in that bunch of images, AWS magnets, if not do people still find these interesting, personally I do as they add that little extra touch, so often modeling goes into absurd detail on track fixings and types of fixing but misses things like flange greasers, LC treadles and clamp lock hydraulic packs or heaters. Whilst technically not track I still group them into track related information. Modeling the cast crossing and solid check rails will be a challenge even in 7mm but TT-3 !, thats something I'd hesitate to accomplish. Kindest Michael |
||
|
posted: 26 Jul 2009 18:56 from: m davies click the date to link to this post click member name to view archived images |
As promised, but uploaded much later than planned, a new selection of detailed images under M in the image gallery, all taken within the confines of PoF and adherance to agreed safety regulations. Kindest Michael |
||
|
posted: 27 Jul 2009 04:21 from: mjbyyz
click the date to link to this post click member name to view archived images |
Hi, M Davies: I just found your reply to my reply to your.....! Yes, I know what you mean - sort of - re lighting and photography. I was advised by a semi-professional photographer once that subdued lighting under a partly cloudy sky gives much better results 'in the shadows' so to speak. All this talk about ABs and so on just baffles me - I know what I SEE and haven't a clue much of the time what people are talking about on this chat line! [Ah calls er spade er spade!] But perhaps you can advise me further on using Templot? I have only just purchased it (a license) and have only dabbled in it briefly. As just mentioned, there is an awful lot of talk about using initials (I can't recall in what connection now - it's been a number of days) for selecting certain types of points, I think. My question is (and I'm sure there has to be one), is there a glossary of what all these initials stand for? I've gone through a number of the on-line videos, and they are v helpful. But those INITIALS!!!!! Perhaps I should be fielding this Q to Wayne, our illustrious moderator? From anyone, any help would be appreciated. I am an ex-mapper and have used some pretty sophisticated platforms in my past, and I note that this is often viewed as a hindrance, not a help - and I think that's right! But keep the photos coming - anything like that is what I need - I'm a visual person! John Burton (mjbyyz) 090726-23:23EDT |
||
|
posted: 27 Jul 2009 07:21 from: m davies click the date to link to this post click member name to view archived images |
John, Like you I have only just purchased Templot, I've read the tutorials but as yet, little or no spare time to dabble, it is one of those things that you know you will need several hours of unbroken attention to get decent progress. I am not sure on the types of code either and whilst dabbling tend to pick one or two turnouts that look right and go from there, highly un-technical but we all started somewhere. Glad the images are helpfull. Kindest Michael |
||
|
posted: 27 Jul 2009 16:13 from: mjbyyz
click the date to link to this post click member name to view archived images |
Hi, Michael: Glad we're in the same boat! Yes, I know what you mean about having a long bout of time to figure these sorts of things out - I do that from time to time, but it's my memory! You have to keep at it, I find!!! Thanks, keep in touch. John 090727-11:16EDT |
||
|
posted: 4 Aug 2009 02:28 from: Martin Wynne
click the date to link to this post click member name to view archived images |
m davies wrote: As promised, but uploaded much later than planned, a new selection of detailed images under M in the image galleryHi Michael, Many thanks indeed for providing such a fine collection of detail shots, and taking the trouble to upload them all. I have modified the Image Gallery so that the original size images no longer lose the left edge. They still need scrolling of course -- but well worth doing to see such clear photos of track detail. Here's a direct link, for those who haven't seen them (121 pictures): http://85a.co.uk/forum/gallery_view.php?user=1679#gallery_top regards, Martin. |
||


| Please read this important note about copyright: Unless stated otherwise, all the files submitted to this web site are copyright and the property of the respective contributor. You are welcome to use them for your own personal non-commercial purposes, and in your messages on this web site. If you want to publish any of this material elsewhere or use it commercially, you must first obtain the owner's permission to do so. |