| Templot Companion | search | remove search highlighting | if the A-Z Index tab is missing click here |
Timber spacings in Templot are set using the full-size prototype dimensions in inches. The spacing of a timber is measured from the centre of one timber to the centre of the next one, not by measuring the empty space between them.
 If you want to set the scaled model spacings in mm instead of the prototype dimensions in inches, you can prefix the entered dimension with the letter s. For example in 4mm/ft scale, entering s10 is the equivalent of entering 30 inches (2ft-6in), both setting the model timbers at 10mm spacings. If you want to work this way, you must be sure to set your correct model scale first. If you want to set the scaled model spacings in mm instead of the prototype dimensions in inches, you can prefix the entered dimension with the letter s. For example in 4mm/ft scale, entering s10 is the equivalent of entering 30 inches (2ft-6in), both setting the model timbers at 10mm spacings. If you want to work this way, you must be sure to set your correct model scale first. |
Prototype turnouts do not normally have constant timber spacing. For this reason there is no single place in Templot to set the timber spacings. There are 4 separate sections to a turnout, each of which has its own timber spacing settings:
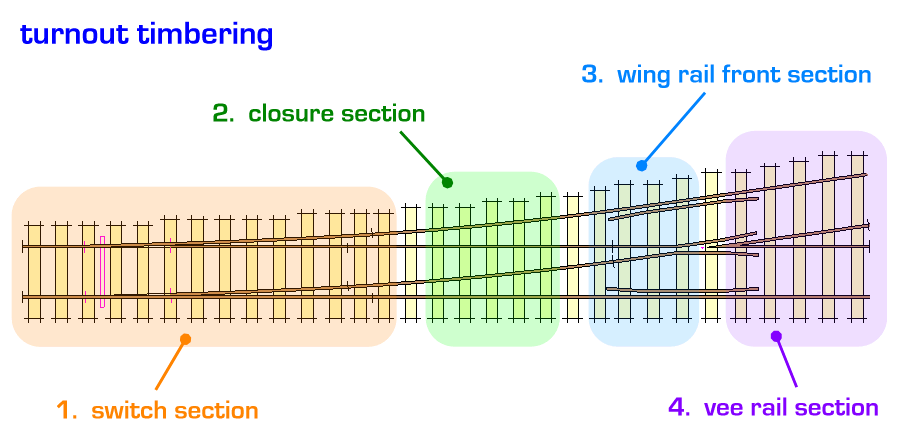
1. switch section Within the switch section, the timber spacings are determined by the design of the special switch block chairs and baseplates, which must fit the rails in the correct location. To set the timber spacings in this section, click the real > switch settings... menu item, and then click the set custom switch... button. Within this section the location of each timber is set individually, and the spacings can vary.
![]() Before making settings in the remaining sections, it is important to set the blunt nose on the V-crossing. This sets the relationship between the rail geometry and the timber positions. Click the real > V-crossing options > customize V-crossing > blunt nose... menu item.
Before making settings in the remaining sections, it is important to set the blunt nose on the V-crossing. This sets the relationship between the rail geometry and the timber positions. Click the real > V-crossing options > customize V-crossing > blunt nose... menu item.
2. closure section Within the closure section, timbers are evenly-spaced to fit between the heel of the switch and the front of the V-crossing. For this section you can set only the maximum spacing, at real > timbering > timbering data... menu item. Set the fill timber spacing dimension. Templot will normally use a slightly closer spacing, so that a whole number of timbers can be fitted within the available space. If you want to set a specific timber at a specific location within this section, you must use the shove timber functions.
3. wing rail front section Within the wing rail front section, the timber spacings are determined by the design of the special crossing chairs and baseplates, which must fit the rails in the correct location. To set the timber spacing in this section, click the real > V-crossing options > customize V-crossing > wing rail front... menu item. If you want to set varying spacings within this section (for example for GWR crossings) you must first set an average spacing and then use the shove timber functions. Note that the timber spacing settings in this section control the position of the rail joints in the wing rails.
4. vee rail section Within the vee rail section, the timber spacings are determined by the design of the special crossing chairs and baseplates, which must fit the rails in the correct location. To set the timber spacing in this section, click the real > V-crossing options > customize V-crossing > vee rail... menu item. The spacing in this section is normally the same as for the wing rail front section, but can differ. If you want to set varying spacings within this section (for example for GWR crossings) you must first set an average spacing and then use the shove timber functions. Note that the timber spacing settings in this section control the length of the vee rails to the rail joints, and hence also the overall length of the turnout.
More about setting:
switch timber spacing
closure timber spacing
wing rail front timber spacing
vee rail timber spacing
More about:
other settings for switches
other settings for V-crossings
timbering of K-crossings and half-diamond templates
sleeper spacings for plain track
link to this page: https://85a.uk/templot/companion/timber_spacings_overview.php