Templot Club Archive 2007-2020
|
|||
| author | remove search highlighting | ||
|---|---|---|---|
|
posted: 31 Jan 2014 19:30 from: Trevor Walling
click the date to link to this post click member name to view archived images |
Hello, I have been trying to do a RH-Curved tandem template following the tandem video tutorial. However I just don't seem to get it. I get as far as CTRL-F6 snake through peg and then I get stuck. Deciding where to slide to just becomes confusion. 2110_311411_540000000.png 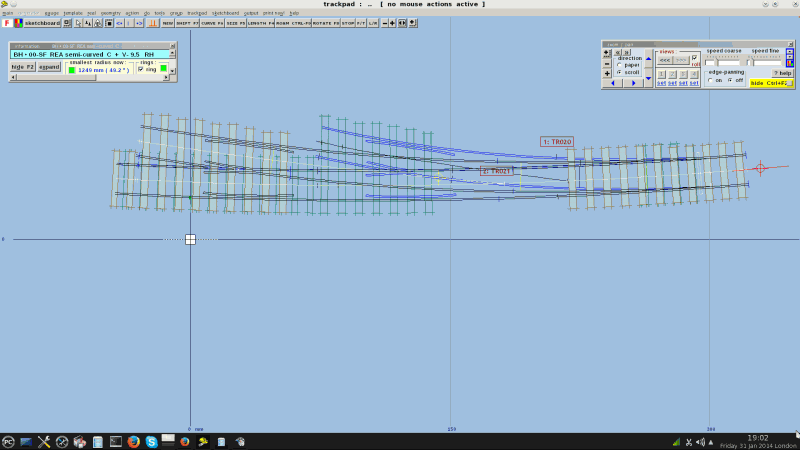 I tried to follow the tutorial in conjunction with the following from the Yahoo Templot group which I believe would be of help. Here's how to get started with a tandem: 1. Set up you first turnout, say a B8 LH, and store it on the background. 2. Get your second turnout, say an A6 RH, as the current template, and set it to have no timbering. 3. Click on the first one, then PEG/ALIGN TOOLS to align the current template over it, FACING-FACING. 4. Ctrl-F6 to SNAKE the current template over the background template until the following conditions are met: a) there must be at least 11" scale space (gauge-face to gauge face) for the second point blade to open behind the first one. This allows space for the slide chair on the second point blade and a bridge chair or bolted half-chair on the first one. Use the RULER tool (0.78.e) to measure the space. b) there must be at least 14" scale space either side of the middle V-crossing to allow space for the wing rails and the chairs on the adjacent rails. Sometimes the wing rails are shortened because of this and bolted half-chairs used for the running rail. Here's a picture showing that: http://www.scalefour.org/resources/images/chairs-4.jpg (Thanks to Keith Norgrove). c) no two V-crossings must be opposite one another, as this prevents the check rails being correctly positioned. You will soon discover that there are only certain combinations of two turnout sizes which will fit. You can't combine any two sizes which take your fancy. 5. Insert the middle V-crossing as multiple partial templates if you want a fully detailed template. 6. Shove the timbers so that all three V-crossings are properly chaired and supported. There is an example tandem-turnout which you can download and take apart at: http://groups.yahoo.com/group/templot/files/martin_stuff/3_way_tandem_EM.box Notes for this file: Example 3-Way Tandem Turnouts on 10 chains radius in EM gauge. B-8 Left + A-6 Right, the middle V-crossing (crotch frog) is 1:4.95 RAM (1:5 CLM). Intended for version 0.78.e , but in 0.74.b it will print ok with only minor discrepancies. You can see this particular tandem turnout in lovely 3D at: hc_tc8.jpg (Make sure you are viewing it full-size to get the best effect.) regards, Martin. ---------------------------------- email : martin@... web : http://www.templot.com Some of it is out of date but I find it helpful when used in conjunction with the video.Would it be possible to clarify the conditions to be met when snaking the current template over the background template please.An image of where to locate the ruler tool in the space for condition a) and b) would help.The position is unclear to me presently despite the description in a) and b) above.I hope to get a light-bulb moment with a little more assistance.I have sent my box file and it is to be 00-FS Thanks. Trevor |
||
| Attachment: attach_1734_2394_RHcurved_tandem.box 326 | |||
| Last edited on 31 Jan 2014 19:36 by Trevor Walling |
|||
|
posted: 3 Feb 2014 02:00 from: Martin Wynne
click the date to link to this post click member name to view archived images |
Trevor Walling wrote: I have been trying to do a RH-Curved tandem template following the tandem video tutorial. However I just don't seem to get it. I get as far as CTRL-F6 snake through peg and then I get stuck. Deciding where to slide to just becomes confusion.Hi Trevor, Tandem turnouts are not simple. They can be straight or curved. They can be double-sided (opposite hands), where the middle road is the main road for both switches. Or single-sided (both the same hand), where an outer road is the main road for both switches. Or they can be type 2 tandems (less common) where the second switch is in the turnout road of the first switch instead of the main road. The two turnouts can be dozens of different sizes, or quite odd sizes. The V-crossings can each be regular, generic, or curviform type. If regular type, the turnout lead lengths can be adjusted by changing the crossing entry straight. Somehow you have to find a way through this maze and find a workable design which fits your site. It is nearly always possible, but in the process there are several issues which you have to keep in mind and look out for, otherwise it won't work. Here are some of the things to watch for on a single-sided tandem: 2_022021_130000001.png  1. The first thing to look at is the relative position of the two switches when snaking the one over the other. A common beginner mistake is to have insufficient distance between the two switches. You need at least 10" scale offset (gauge-face to gauge-face) at the tip of the second switch to have room for the switch blade to open, room for the stretcher bar fixing when it is open, and space for the slide chair: 2_022021_120000000.png 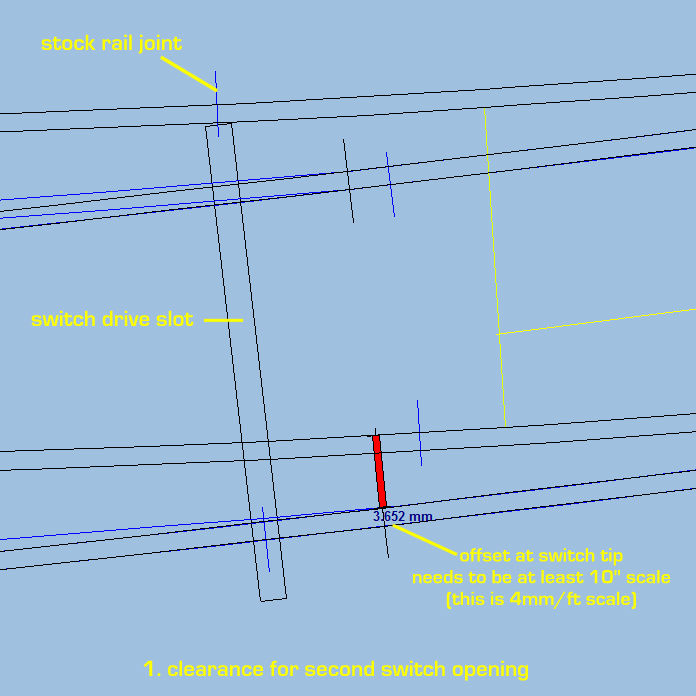 A handy rule of thumb for this with REA switches is to align Templot's switch drive slot (tie-bar mark) on the second switch with the stock rail joints on the first switch. This also conveniently aligns the switch tips with the timbering. If necessary you can check the offset with the ruler tool, as shown above. Or judge it by eye -- 3 rail widths in the gap between the rails gives you 11" offset.* *for UK 2.75" rail top. More next time. regards, Martin. |
||
|
posted: 3 Feb 2014 19:02 from: Martin Wynne
click the date to link to this post click member name to view archived images |
2 and 3. But in snaking the two base turnouts to create sufficient second switch opening you can't go too far, because that will cause other conflicts. Here is this single-sided tandem again: 2_022021_130000001.png  The first turnout is a B-6. The second turnout is a B-6.5 . That is often the case with single-sided tandems -- the two turnouts are similar in size. As you can see, there are some minor conflicts. At 2 the turnout rail of the second turnout is conflicting with the check rail of the first V-crossing, and at 3 the stock rail of the second turnout is not clearing the wing rail of that crossing to provide a sufficient wheel flangeway: 2_031309_060000000.png 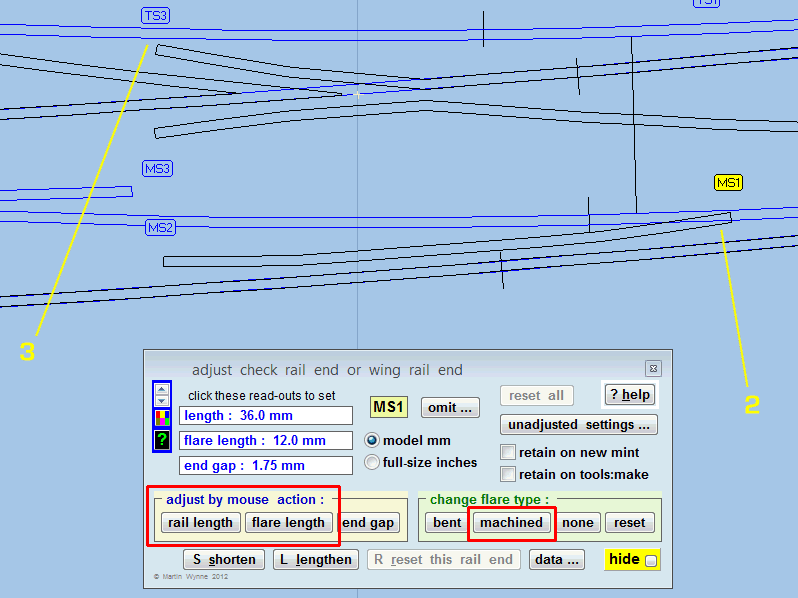 What to do about it? You have some choices: a. Use a longer first turnout, say a B-7, or b. Use a shorter second turnout, maybe an A-6. If this was a straight tandem, that might be an option. However it is not advisable to curve short A switches very much, which is why I used B switches in the first place for this curved tandem. However, both of these options are likely to create other problems in the positioning of the additional V-crossing at 4. So instead c. Modify the check and wing rails to fit. This usually the simplest solution in practice. It is usually possible to shorten the length, or the flare length, or both, of check and wing rails without affecting the working performance too much, especially in low-speed locations in yards and sidings. You can also change from the usual bullhead bent flared ends to machined flares on straight rail. This is less common prototypically because it means making a special rail which can't be easily repaired or replaced on site by the p.w. gang. Here I have made such modifications. You can see that you need at least 14" scale between a V-crossing and the nearest running rail to be sure of a workable design: 2_031351_520000000.png 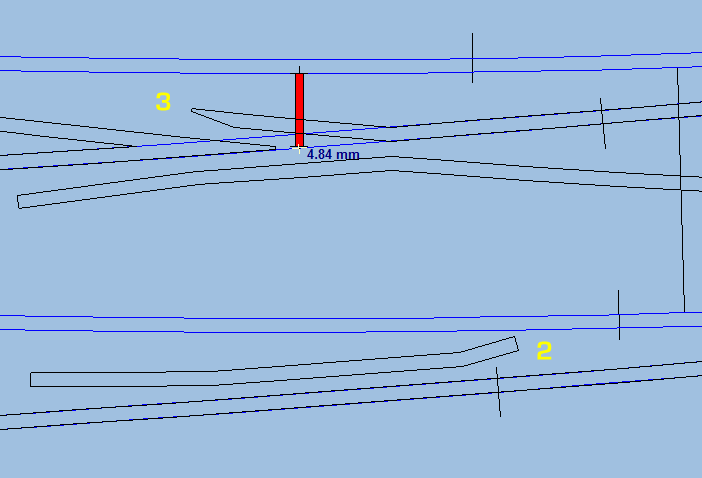 In making the adjustment at 2 you must always be sure that there is full checking remaining opposite the gap in the V-crossing, even in low-speed situations. So here it was necessary to shorten the flare length, in addition to shortening the whole rail. More next time. regards, Martin. |
||
|
posted: 4 Feb 2014 18:57 from: Trevor Walling
click the date to link to this post click member name to view archived images |
Hello Martin, It looks like you could write a book for the variables possible when making tandem turnouts.The information so far is very helpful and simple to understand.I think it is making the creation of a tandem turnout more achievable for those of us whom struggle with the concept.Thanks so far. Trevor. |
||
|
posted: 5 Feb 2014 15:30 from: Martin Wynne
click the date to link to this post click member name to view archived images |
4. Creating a tandem always involves making an additional V-crossing, and a major consideration in choosing the sizes of the base turnouts is in seeing where this third V-crossing will need to be placed. Quite small changes in the crossing angles of the base turnouts can produce big changes in the position of the third V-crossing. Also, we are not usually creating a tandem turnout in isolation -- it needs to be aligned with the surrounding track plan which restricts the scope for adjustment. Here again is this single-sided curved tandem. The first base turnout is a B-6. The second base turnout is a B-6.5 : 2_022021_130000001.png  You can see that the additional V-crossing will be positioned at 4. In deciding whether this will be acceptable there are several things to look out for: a. As explained in 3 above, it normally needs to be at least 14" scale from the nearest adjacent running rail. We are ok here, with the new V-crossing overlaid at 4. b. It will need its own check rails, and there must be room to fit these. As you can see there is a potential conflict here at 5: 2_050938_380000000.png 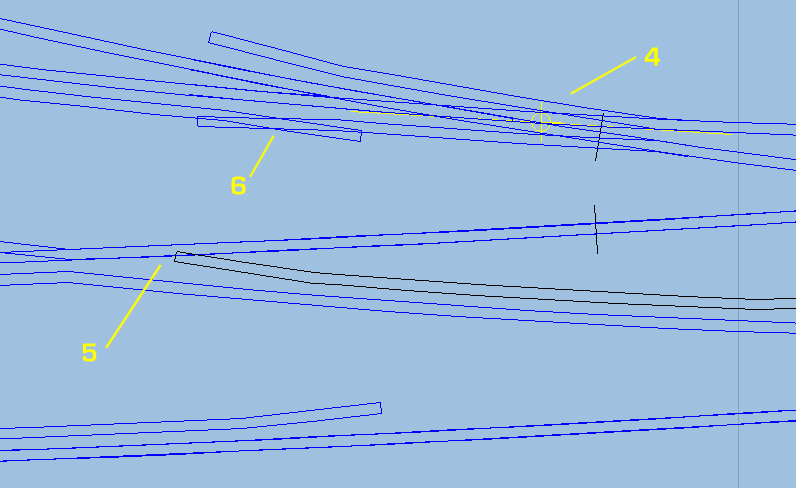 In this case we can deal with this by shortening the rail length and flare length to leave the required clear gap for wheel flanges, as before. In other cases the conflict may be too much -- i.e. the V-crossing is not in a tenable position and must be moved by changing the base turnouts. c. The V-crossing must not be too closely opposite* another V-crossing, otherwise it will conflict with that crossing's check rail. Here at 6 you can see that even though the crossings are offset, there is still a conflict between the new wing rail and the existing check rail. This can be dealt with by combining the two rails into one, which is known as a "parallel wing" V-crossing. In Templot there are two ways to do that. You can simply remove the flare from each rail and allow them to overlap on the templates. Or you can omit the check rail entirely and extend the length of the wing rail to replace it. Note that for this to work the check rail gap must be the same dimension as the crossing flangeway gap, so that it will not be possible to have any gauge-widening through this part of the tandem. d. Usually there will be other check rail conflicts too. Here at 7 two short check rails can be replaced with one long one: 2_051004_520000000.png 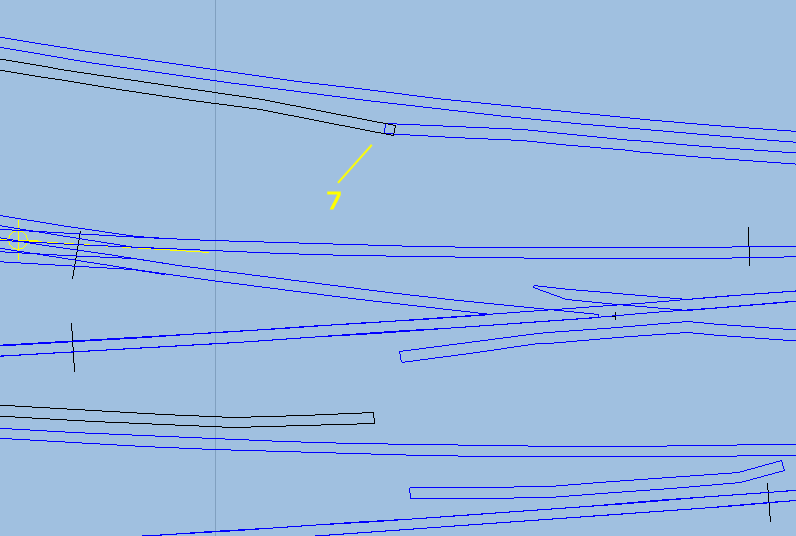 That would be done in Templot by omitting the new check rail and extending the existing one to replace it. e. Another consideration is the crossing angle required for the new V-crossing. Here at 4 the angle turned out to be about 1:10 which is a sensible working size. Bullhead crossings are not normally flatter than 1:20 angle, and you wouldn't want to build one flatter than about 1:12 if you are new to trackbuilding. After considering all these points, and much trial and error, you will hopefully arrive at a geometry for your tandem which fits the site and is a workable design. The next stage (if you want a neat result) is to split out the partial templates so that the duplicated rails under the V-crossings and elsewhere are removed from the template. And finally you put the timbering back on, and shove any conflicting timbers while retaining the correct timber positions under each V-crossing. Generally when working with partial templates in Templot you should keep the timbering for each crossing on the same template as the vee nose, so that the timbering under the V-crossing is correctly spaced. Here you can see the timbering of each V-crossing is on the corresponding template: 2_281657_530000000.png 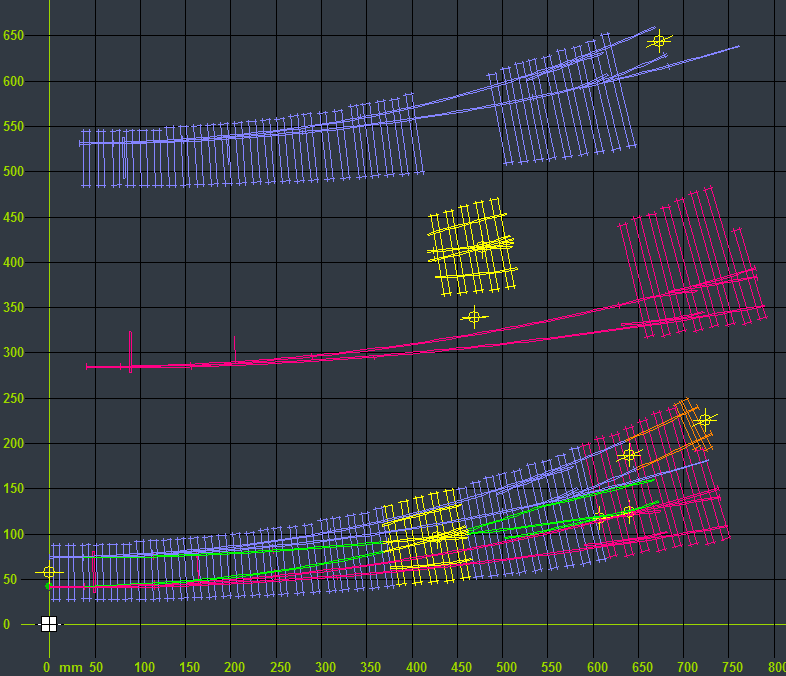 (The above screenshot is actually a 3-throw turnout, but the principle is the same for tandem turnouts.) More next time. *In yards and sidings you may be able to get away with V-crossings which are exactly opposite one another, each one checking the other. This is often the case in three-throw turnouts, and this imperfect checking is one of the objections to their use in running lines, in favour of tandem turnouts instead. regards, Martin. |
||
|
posted: 11 Feb 2014 18:48 from: Trevor Walling
click the date to link to this post click member name to view archived images |
Hello, I am making progress with my tandem turnout.However I have reached an impasse.I have got as far as this2110_111344_360000000.png 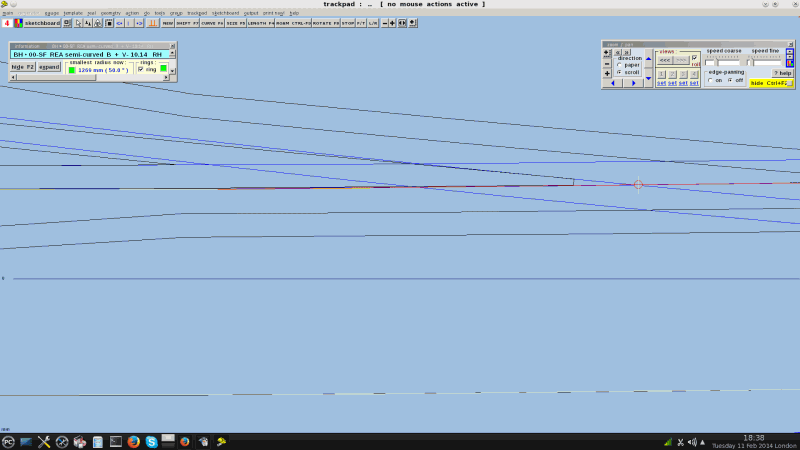 I don't seem to be able to find the option to lock the switch as below. 2110_111346_270000000.png 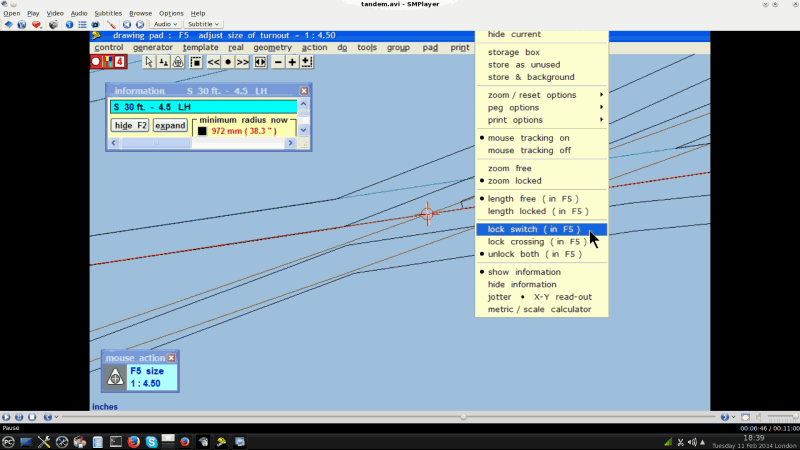 Is it in a different place in the current version of Templot or am I suffering from brain fade? Trevor. |
||
|
posted: 11 Feb 2014 19:11 from: Trevor Walling
click the date to link to this post click member name to view archived images |
Hello, Sorry the last post seems to have been a false alarm.I don't know what happened but it appears to have worked as in the last image.It worked by right clicking as it shows so I don't know what happened. Trevor. |
||
|
posted: 12 Feb 2014 14:27 from: Trevor Walling
click the date to link to this post click member name to view archived images |
Hello, I have progressed with my tandem but I just don't seem to be able to get the center crossing to line up correctly.I still have check rails and timbers to sort out but I would like to know where I am going wrong with the center crossing please. 2110_120921_540000000.png 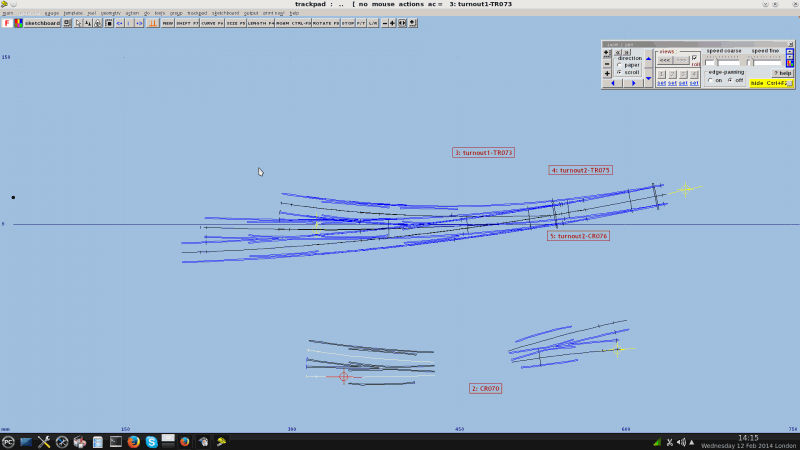 I have included the box file as well.Thank you. Trevor. |
||
| Attachment: attach_1752_2394_RHcurved_tandem.box 313 | |||
| Last edited on 12 Feb 2014 14:32 by Trevor Walling |
|||
|
posted: 12 Feb 2014 22:58 from: Martin Wynne
click the date to link to this post click member name to view archived images |
Trevor Walling wrote:I have progressed with my tandem but I just don't seem to be able to get the center crossing to line up correctly.Hi Trevor, Always use the CTRL-4 peg position to peg the third crossing onto the intersection: 2_121740_390000000.png 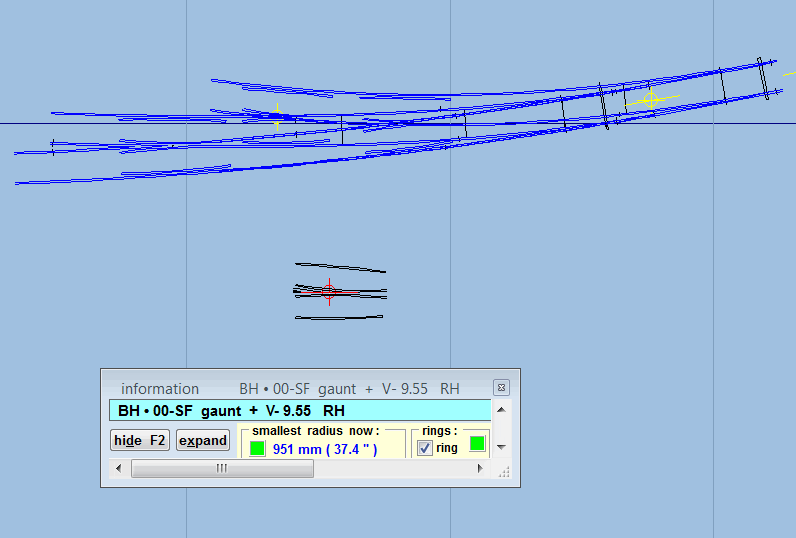 Use a gaunt turnout or an irregular half-diamond for the partial template. See here for more instructions: topic 1487 Or briefly: Adjust the curving (F6) to match the main road radius. Zoom in and adjust the V-crossing angle (F9) as close as possible. Alternate adjustments to V-crossing angle (F9) and gaunt offset (SHIFT+F12) until you get the best match to the underlying rails. (Adjusting the gaunt offset changes the radius through the turnout side of the V-crossing without changing the crossing angle.) I had a quick dabble and found a crossing angle of 1:9.55 .box file below -- over to you to split out the partial templates and remove the underlying rails. Once again I'm sorry that the tandem tutorial is out of date and does not use the gaunt method. regards, Martin. |
||
| Attachment: attach_1753_2394_trevor_tandem_vee.box 321 | |||
|
posted: 13 Feb 2014 17:58 from: Trevor Walling
click the date to link to this post click member name to view archived images |
Hello Martin, Thanks very much for that.It really helped knowing about the gaunt option in achieving progress with tandems.I remember seeing references to gaunt but I couldn't recall its purpose or find the relevant information.Please don't dwell on the tutorials being out of date as I like many others am very grateful for what you have made possible with Templot so far.I am getting ever closer to completing the plan for my layout which would be impossible without Templot and assistance from your good self and others. Regards. Trevor |
||
| Last edited on 13 Feb 2014 17:59 by Trevor Walling |
|||
|
posted: 1 Aug 2015 12:18 from: Martin Wynne
click the date to link to this post click member name to view archived images |
Some useful pictures of a tandem turnout just posted on RMweb: http://www.rmweb.co.uk/community/index.php?/topic/79414-pghs-photographs-of-british-railways-from-c1960/page-15#entry1971482 Martin. |
||
| Please read this important note about copyright: Unless stated otherwise, all the files submitted to this web site are copyright and the property of the respective contributor. You are welcome to use them for your own personal non-commercial purposes, and in your messages on this web site. If you want to publish any of this material elsewhere or use it commercially, you must first obtain the owner's permission to do so. |