Templot Club Archive 2007-2020
|
|||
| author | remove search highlighting | ||
|---|---|---|---|
|
posted: 18 Feb 2014 17:14 from: Hayfield
click the date to link to this post click member name to view archived images |
I have just followed the video the best I can on producing a 3 way turnout in P4. I must admit to getting a little confused between the video on Templot mark 1 and Templot 2 and lost it a bit around placing the new Vee. Sorry its a bit rough and untidy I was hoping if some kind person would pass a critical eye over the Template and let me know my errors please. The one area I am a bit concerned with is the curves from the Vee tip on the first common crossing to the other two I do have to tidy up the sleepering a bit and I need to find out again how to do breaks in rails to stop them running through the flangeway gaps in the common crossings, though this is just a cosmetic change. Thanks in advance |
||
| Attachment: attach_1762_2409_JJ_P4_3_way.box 345 | |||
| Last edited on 18 Feb 2014 17:20 by Hayfield |
|||
|
posted: 19 Feb 2014 13:06 from: Martin Wynne
click the date to link to this post click member name to view archived images |
Hi John, I'm afraid you have made the classic mistake of not having the two switches far enough apart. This means that there is not enough room to open the second switch blade with its stretcher bar fixing behind the first switch rail, or to fit the slide chairs. As a rule of thumb you need about 3 rail-widths of gap between the rails at the tip. You have only about half of that: 2_190757_580000000.png 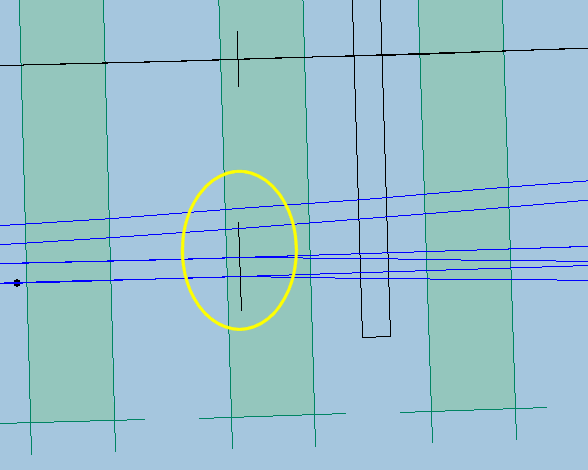 Remember that the template shows the switches in the closed position, and doesn't show the inside rail foot at the blade tips. More about all this in my recent posts here: topic 2394 - message 16119 regards, Martin. |
||
|
posted: 19 Feb 2014 15:17 from: Hayfield
click the date to link to this post click member name to view archived images |
Martin Thank you very much, I must have misunderstood the part when placing each turnout on top of each other. Unlike the tutorial I am using an A5 and B6, as the B6 went on second I gave it a radius as per the tutorial, but the tutorial was using two turnouts the same size. Is what I have done correct please. Thanks again, any other tips pleaseJohn |
||
|
posted: 19 Feb 2014 15:39 from: Trevor Walling
click the date to link to this post click member name to view archived images |
Hello John, You need to have the two turnouts with one common route dimension.One slides over the other to achieve the desired clearance.I used the ruler tool where Martin has circled to ensure the clearance was sufficient.As Martin pointed out in my post you then look to the crossing of the rails and check rails for conflicts. Trevor. |
||
|
posted: 19 Feb 2014 15:44 from: Martin Wynne
click the date to link to this post click member name to view archived images |
Trevor Walling wrote: I used the ruler tool where Martin has circled to ensure the clearance was sufficient.If you are using REA switches A, B, or C*, a handy rule of thumb is to align the switch drive slot on the second switch with the stock rail joint marks on the first switch: 2_022021_120000000.png 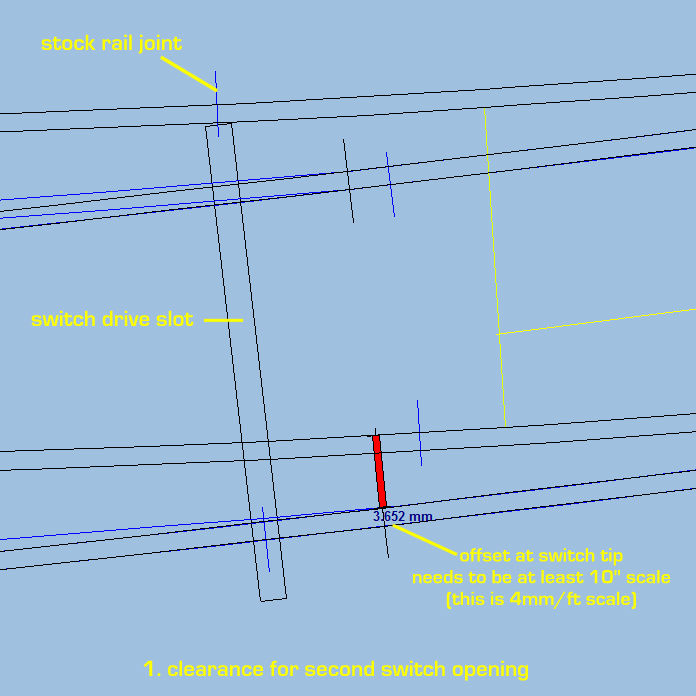 (These switches are facing right to left. In practice the stock rail joint will be moved for a tandem construction.) *The trouble with posting rules like this is that I can guarantee that someone will skip that bit, try it on some other switch, and then post a question about why it hasn't worked. Just to repeat, this rule of thumb is for REA switches A,B,C only. regards, Martin. |
||
|
posted: 19 Feb 2014 16:00 from: Hayfield
click the date to link to this post click member name to view archived images |
Trevor Walling wrote: Hello John,Trevor thank you for taking an interest and the advice. On the video it is using a B8 and A7, where I an using an A5 and a B6. The tutorial states the B8 is at a 3000 mm radius, which is what I have done with the B6, is that correct please. Is this correct please. Not too sure about the ruler tool (bit ham fisted with Templot) but Martins rule of thumb looks to be easier for me to use. Other than the start place of the second switch is the rest of the plan OK except for a bit of tidying up in places. Thanks again to both of you John |
||
|
posted: 19 Feb 2014 16:23 from: Martin Wynne
click the date to link to this post click member name to view archived images |
Hayfield wrote:On the video it is using a B8 and A7, where I an using an A5 and a B6. The tutorial states the B8 is at a 3000 mm radius, which is what I have done with the B6, is that correct please.Hi John, The video is just a tutorial showing the method -- for your own tandem you can use any turnout sizes on any radius which fits your site, if all the relevant conditions are met. I'm seriously considering deleting this video -- it is years out of date and seems to be causing more confusion than it solves. I will get a new one done soon. regards, Martin. |
||
| Last edited on 19 Feb 2014 16:24 by Martin Wynne |
|||
|
posted: 19 Feb 2014 17:01 from: Trevor Walling
click the date to link to this post click member name to view archived images |
Not too sure about the ruler tool (bit ham fisted with Templot)Hello, the ruler tool is easy to use once you find it.Go to tools/ruler/show ruler then use mouse action:move 1st end or 2nd end. There are other options in the same box. undefined 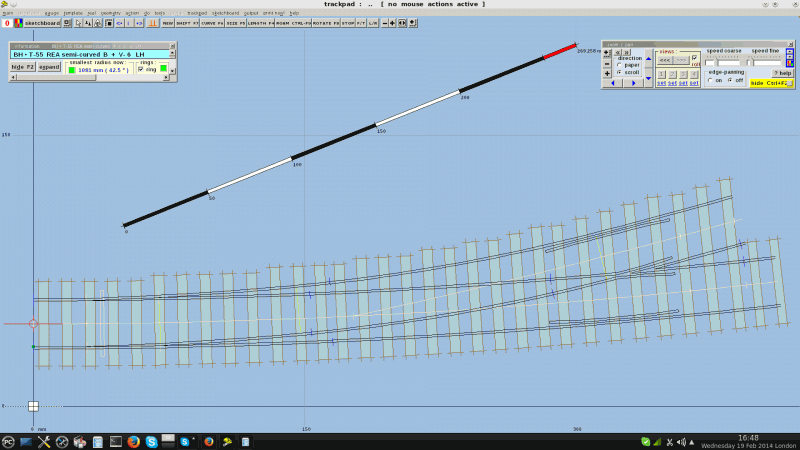 2110_191154_130000000.png 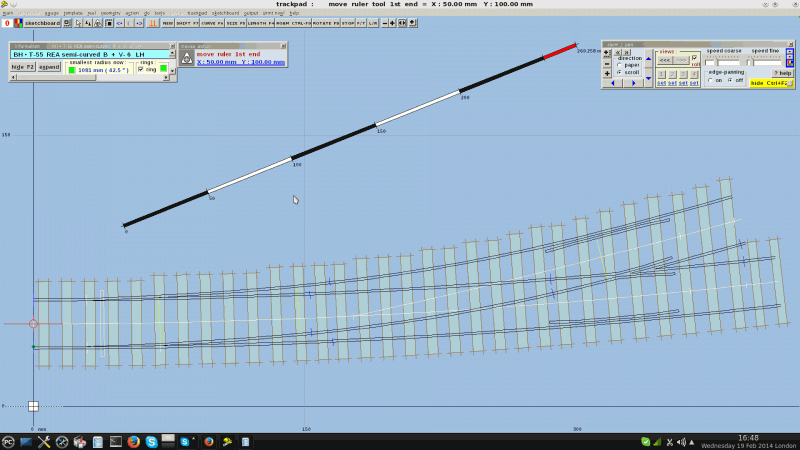 I think you need to meet the first requirement in order to see what is needed after it. Trevor. |
||
| Last edited on 19 Feb 2014 17:04 by Trevor Walling |
|||
|
posted: 19 Feb 2014 17:44 from: Hayfield
click the date to link to this post click member name to view archived images |
Martin Please don't remove it until there is a replacement, to me it looks that I am not too far away from a working 3 way, unless there is something else very wrong with it. There are some issues where names (pad to trackpad) have altered or in one case the function is gone (might be me not finding it), and Templot 2 being a bit different. I will have another go tonight Thank you |
||
|
posted: 19 Feb 2014 17:45 from: Hayfield
click the date to link to this post click member name to view archived images |
Trevor Thanks for showing me another tool and where it is John |
||
|
posted: 19 Feb 2014 17:57 from: Martin Wynne
click the date to link to this post click member name to view archived images |
Trevor Walling wrote:the ruler tool is easy to use once you find it.Go to tools/ruler/show ruler then use mouse action:move 1st end or 2nd end. There are other options in the same box.Also, ALT key + left click sets one end of the ruler at the mouse. ALT key + right click sets the other end at the mouse. You can change the mouse to precision cross-hairs with CTRL+FULL-STOP keys. With NUM LOCK on you can make tiny mouse movements by pressing the 1,2,3,4,6,7,8,9 keys on the number pad. This is useful when using the ruler and making fine mouse action adjustments. The 5 key makes a mouse click. When using these keys put the mouse to one side and don't bump it. regards, Martin. |
||
|
posted: 20 Feb 2014 19:05 from: Hayfield
click the date to link to this post click member name to view archived images |
Somehow I have had 2 tries at doing a new one, but somehow I just keep getting the geometry wrong. In frustration I have altered the first try, but not yet tidied up the timbering. Please is mk 2 any good. Thanks |
||
| Attachment: attach_1773_2409_JJ_P4_3_way_mk2.box 305 | |||
|
posted: 20 Feb 2014 20:06 from: Martin Wynne
click the date to link to this post click member name to view archived images |
Hi John, That's looking very good. You will need to shorten this wing rail end to clear the wheel flanges on the adjacent rail, as shown: 2_201501_260000000.png 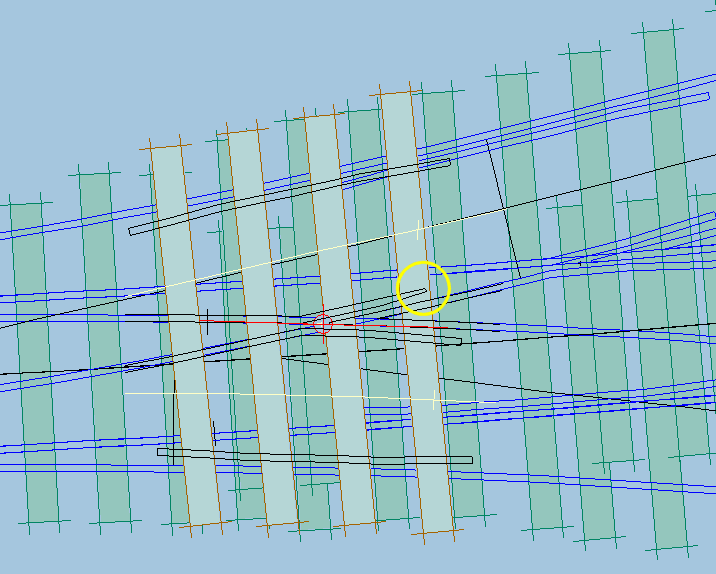 Also, use these timbers in this area, so that the special crossing chairs can be fitted in the correct place. You can straighten them up if you wish. Omit the other timbers. The same applies with the other V-crossings -- use the timbering on the same partial template as the V-crossing. The crossing nose must be supported in the correct place on the A timber. regards, Martin. |
||
|
posted: 21 Feb 2014 20:22 from: Hayfield
click the date to link to this post click member name to view archived images |
Martin Thank you for the comments, I have started to tidy up the 3 way, there are two items I would like to do, firstly I have a shadow plan behind the main plan. If you look at the left hand common crossing, I have put in a machined plair on the top wing rail and straightened the right end of the top check rail. There is a shadow behind I cannot remove Secondly I need to find the instructions to put a break into the rails running through two of the common crossings. I would appreciate some comments on the latest version Thanks |
||
|
posted: 21 Feb 2014 20:37 from: Hayfield
click the date to link to this post click member name to view archived images |
Martin thank you for the assistance. I have started to tidy up the template as Martin suggested, the timbers have been adjusted where necessary so the points of the common crossings are on a sleeper, then lengthened and moved as required. Sorry cannot attach the template as my windows 7 is in non-uploading mode. 2 things to do. Firstly I seem to have a shadow plan behind another, as where I have changed the wing rails to machined and check rails to straight ends the previous plan shows through What I am trying to find the the tutorial which shows you how to put a break in the rails, as I have running rails going through the flangeway gap. Sorry again for no uploads |
||
|
posted: 21 Feb 2014 21:17 from: Martin Wynne
click the date to link to this post click member name to view archived images |
Hayfield wrote:What I am trying to find the the tutorial which shows you how to put a break in the rails, as I have running rails going through the flangeway gap.Hi John, You need 3 partial templates. I've made a bit of Jing video for you: http://screencast.com/t/22lzweX6e I'm sorry it is so scruffy -- I am no longer capable of making smooth edited videos, it just takes too long. Also I can't show keyboard presses in a video. That's why I clicked in the info panel to show the control template -- instead of the HOME key. regards, Martin. |
||
|
posted: 21 Feb 2014 22:14 from: Hayfield
click the date to link to this post click member name to view archived images |
Martin Thanks, just had a quick try and it worked on one rail, then I did something wrong with the other. Will give it a go in the morning.Thank you again John |
||
|
posted: 22 Feb 2014 10:52 from: Hayfield
click the date to link to this post click member name to view archived images |
Here is it a bit cleaner but I seem to have too many overlays to remove the rails through the common crossings. Think I have tried too many adjustments. Still I do have a working plan | ||
|
posted: 22 Feb 2014 21:45 from: Trevor Walling
click the date to link to this post click member name to view archived images |
Hello, Have you checked you haven't got multiples of the same background templates over each other.It can easily occur and lead to the impression of many rails overlapping Trevor. |
||
|
posted: 23 Feb 2014 15:21 from: Hayfield
click the date to link to this post click member name to view archived images |
Trevor That's exactly what I have. I removed some which was fine then when I went to do the next(middle common crossing) I started to loose some stock rails. I think I have just made too many changes and pressed store to background to often In the end I have a workable plan, still needs a bit of refinement of sleeper spacing but a scalpel cutting through the gap tidies it up |
||
|
posted: 23 Feb 2014 15:59 from: Trevor Walling
click the date to link to this post click member name to view archived images |
Hello,I started to loose some stock rails.That is where you need partial templates.A copy of the template with everything else except the stock rails removed and the stock rails on the original removed.The partial template stock rails are then adjusted to suit the gap.It is a bit confusing getting the correct templates altered in the right order and it took me quite a bit of time to achieve the required result. Trevor. |
||
|
posted: 23 Feb 2014 22:18 from: Hayfield
click the date to link to this post click member name to view archived images |
Trevor Thank you, I think I get the drift, its just I was copying the video sometimes without really understanding what I was doing. With Templot 2 do I need to delete to control as I did with the older version. I seemed to have several of the same templates on top of each other. Still I got to where I wanted to in the end. Thanks for your help John |
||
|
posted: 24 Feb 2014 17:32 from: Trevor Walling
click the date to link to this post click member name to view archived images |
Hello.With Templot 2 do I need to delete to control as I did with the older version. I seemed to have several of the same templates on top of each other. I tend to use store and background just in case I do something wrong. I then shift the current template out of the way and activate the background template I want. Sometimes I hide the control template and go from there. I am probably not using the easiest method but it works for me. Trevor. |
||
|
posted: 25 Feb 2014 21:15 from: Hayfield
click the date to link to this post click member name to view archived images |
I don't know what happened but I had a little play with the template this evening and was able to remove 2 of the 3 lines through the common crossings. No idea why I was having so many problems before. Looks quite good | ||
| Please read this important note about copyright: Unless stated otherwise, all the files submitted to this web site are copyright and the property of the respective contributor. You are welcome to use them for your own personal non-commercial purposes, and in your messages on this web site. If you want to publish any of this material elsewhere or use it commercially, you must first obtain the owner's permission to do so. |