| Templot Companion | search | remove search highlighting | if the A-Z Index tab is missing click here |
Templot In Full - 99. origins and intent
This page is an explanation of the origins of Templot and the ideas behind it.
This is going to be a long-winded ramble because I think I need to recall some of the 40-year history of Templot, to explain how and why things are the way they are. The historical context is key to understanding Templot, and why it differs from other model track planning software.
Templot first saw the light of day in 1980. It was a product of its time in the UK model railway hobby, and much of the original design and intent remains largely unchanged today.
Here I am referring to the section of the hobby that regards model track as a scale model of full-size prototype railway track, in the same way that a locomotive or a signal box might be modelled as a scale representation of the full-size equivalent. Such track has to be built by hand in the home workshop, and often requires some ingenuity to fit it into the available space without departing too far from the original prototype methods and designs. The purpose of Templot is to assist in that design process.
There is a much larger section of the hobby which does not see track in that light, and is happy to buy ready-made items of trackwork without any regard to what prototype they might represent, or even much knowledge of that prototype. There are many computer programs available to design model layouts using such ready-made track, but Templot is not one of them. Templot is a design tool for model-makers who build their own track.
At that early stage in the 1980s the Templot program was primarily for my own use - it was before the days of home computers for everyone. For some explanation of why I needed it, see yes, I build track. I had no idea of where it would lead - the program developed as I needed new functions and bolted them on, Meccano-fashion. Some of that still shows in the program today.
There are 2 separate and distinct functions in Templot. Please read that again, it's important to the understanding of Templot.
Separate and distinct are not quite the right words nowadays because the two have tended to merge in the later more complex track design functions. But they were certainly the right words originally because there was a 10-year gap between the creation of the two functions.
For this page I'm going to call them the PHASE 1 functions and PHASE 2 functions of Templot.
To see what I mean by PHASE 1, start Templot from scratch and click the NEW button, or the template > new template (quick set) ... menu item.
In these two boxes on that dialog you have almost the entire original 1980s version of Templot. Notice that they refer to prototype turnout sizes and prototype curve radii:
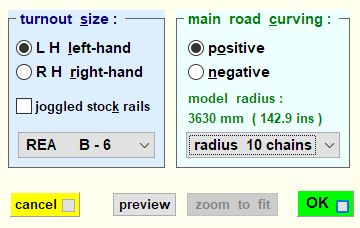
You can use them to change the input settings to the template generator, and the result is that a curved turnout template is drawn on the screen and can be printed out as a construction template. To watch a video of that, click your first printed template.
In PHASE 1 of Templot that was all you could do.
The templates so printed would be shuffled about on the baseboard to create a track plan, combined with others from commercial sources or the scale societies, and possibly some hand-drawn templates too. In order for the templates from Templot to align with hand-drawn ones, I adopted RAM unit crossing angles as the default in Templot, rather than strictly prototypical CLM angles.
And of course that is equally valid as a way of using Templot today. If you are happy to create a track plan that way, you don't need to read any further here. It all works almost exactly the same now as it did then.
But by the 1990s increased computing power was available, and I began to think of replicating the physical baseboard as a virtual baseboard on the computer screen. There would be no need to mess about with paper and ink and sticky tape and drawing pins, or to build a baseboard first. You would be able to keep trying different track plans on the screen using a collection of generated templates until you arrived at the optimum plan, without any waste of time, paper and materials if you scrapped any. It could all be printed in one go when the planning was complete.
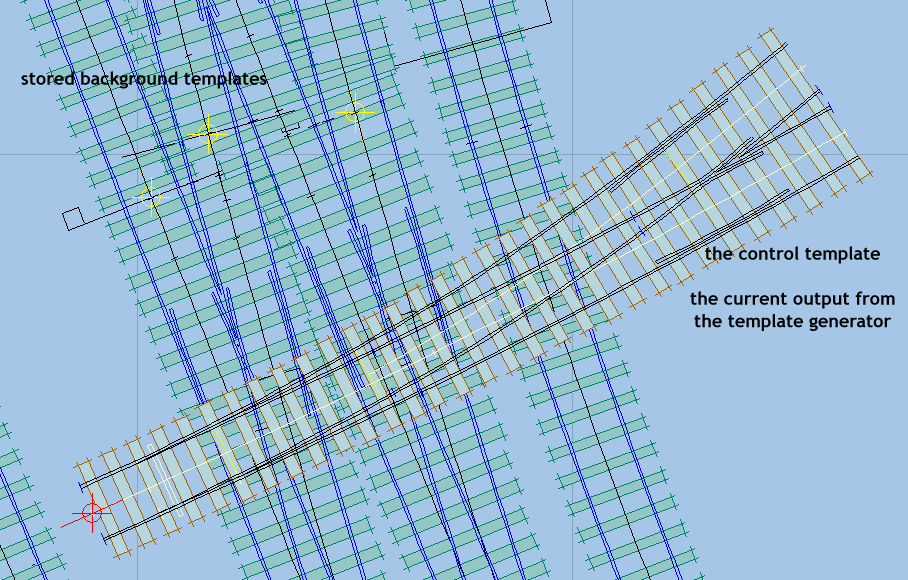
So I devised a screen display having 2 layers. A background layer which represented the railway baseboard, and on which a track plan could be gradually assembled from previously generated templates. And a foreground layer which would contain the original PHASE 1 template generator functions unchanged. As if they were taking place on a transparent plastic film floating on top of the track plan, but not part of it. I didn't want to do anything to change the PHASE 1 functions, so that they could still be used to print individual templates as before when needed:
So PHASE 2 of Templot was born. It would replicate as far as possible the work flow when track planning on a physical baseboard. There would be a virtual box in which to keep all your generated templates, just like your shoebox of paper templates on the baseboard. There would be a means to select one from the box and try it in position, and reject it if not suitable. There would be a means to pin it in position. There would be a means to link templates together in alignment with one another. And of course there would be a means to create the templates in the first place using the PHASE 1 functions, and to store them in the box ready for use.
So far so good, but I then had to write the program code to do all this. It soon became clear that the storage box was key to the whole process, containing a list of all the stored templates. It also became clear that the position and alignment on the baseboard had to be decided and included in the original PHASE 1 function, rather than trying to add it to a generated template after the event. So my original intent to do nothing to modify the original PHASE 1 code began to crumble. But I have mostly stuck to it, because 40+ years later it is still very useful to be able to switch on Templot, make a few settings, and print off a usable construction template.
Several functions were created to allow the PHASE 1 generated templates to be stored in and retrieved from the PHASE 2 storage box, and to replicate the process of transferring them to and from the virtual "baseboard", when creating a track plan on there.
Jump forward 25+ years, and this original scheme remains the same, underlying all the later changes and developments. The PHASE 1 output from the generator has been given the name the control template, to emphasize its unique nature and the fact that it is not itself part of the track plan. The work area on the screen, representing a physical baseboard, is now called the trackpad.
But the original idea that you would first create a collection of templates, and only then use them to plan a layout (replicating physical track planning methods on the baseboard) has been largely forgotten, although you can of course work that way if you wish. It is better to create the templates one at a time as they are needed in developing the track plan. This is a more prototypical approach, making it easier to get a flow of smooth curves through pointwork.
Templot is a tool, so the preferred way of working with it is a matter for individual users. Right from the start when the first public version was released, I made the assumption that users would be familiar with track-building, and would know what they wanted to do. And that it would be useful if there was more than one way of doing things, to fit in with the user's preferred way of working.
In the early years of the public versions of Templot those assumptions were largely accepted, presumably because users were familiar with traditional pencil and paper track planning on the baseboard.
In recent years there has been a demand for a more prescriptive approach - "what do I do next?" - for which see basic working methods.
Martin.
link to this page: https://85a.uk/templot/companion/origins_intent.php