Templot Club forums powered for Martin Wynne by XenForo :

TEMPLOT 3D PLUG TRACK - To get up to speed with this experimental project click here.   To watch an introductory video click here.   See the User Guide at Bexhill West.

   Templot5 - To join this open-source project on GitHub click here.  For news of the latest on-going developments click here.  Templot5 is now included with Templot2 - download.        WIKI

  • The Plug Track functions are experimental and still being developed. Some of the earlier pages of this topic are now out-of-date.

    For an updated overview of this project see this topic.   For some practical modelling aspects of using Plug Track see Building 3D Track.

    The assumption is that you have your own machines on which to experiment, or helpful friends with machines. Please do not send Templot files to commercial laser cutting or 3D printing firms while this project is still experimental, because the results are unpredictable and possibly wasteful.

    Some pages of this and other topics include contributions from members who are creating and posting their own CAD designs for 3D printing and laser-cutting. Do not confuse them with Templot's own exported CAD files. All files derived from Templot are © Martin Wynne.
  • The Plug Track functions are experimental and still being developed.

    For an updated overview of this project see this topic.   For some practical modelling aspects of using Plug Track see Building 3D Track.

    The assumption is that you have your own machines on which to experiment, or helpful friends with machines. Please do not send Templot files to commercial laser cutting or 3D printing firms while this project is still experimental, because the results are unpredictable and possibly wasteful.

    Some pages of this and other topics include contributions from members who are creating and posting their own CAD designs for 3D printing and laser-cutting. Do not confuse them with Templot's own exported CAD files. All files derived from Templot are © Martin Wynne.

Crossover timbering advice please

Quick reply >
I've drawn a trailing crossover and I'm trying to sort out the sleep positions. I wouldn't have noticed the problem had I not turned on the experimental 3D railchairs which show that my attempt means that I couldn't fit in a railchair for the straight route next to the opposite side checkrail chair.
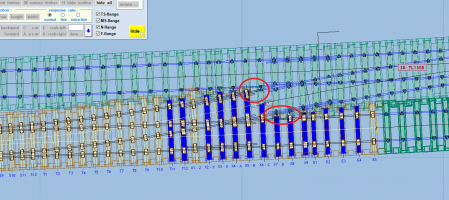
Crossover.png
The problem is the X5-B and X7-D sleepers. I've shoved the sleepers so that X2 to X8 are shared by both turnouts. At this point without 3D railchairs I would have been happy and somehow trimmed and squeezed railchairs in place. But the 3d railchairs show that X5 chair does not allow a chair on the X7 sleeper of the other turnout. I've tried Equalized sleepers and end up with a similar issue. I'm modelling 1904 Rhymney bullhead track just in case someone knows what they used to do!

Thanks,
Penrhos
 

Attachments

  • crossover_sleepering_2023_11_13_1427_17.box
    39.3 KB · Views: 138
_______________
message ref: 9052
Penrhos,

You need to extend those timbers right across both running rails, the section covering both Vees will be block timbering and may also be centre line incremental, I'm on my tablet, so I can't check it out at the moment.
 
_______________
message ref: 9056
Back
Top