Templot Club forums powered for Martin Wynne by XenForo :

TEMPLOT 3D PLUG TRACK - To get up to speed with this experimental project click here.   To watch an introductory video click here.   See the User Guide at Bexhill West.

  • The Plug Track functions are experimental and still being developed. Some of the earlier pages of this topic are now out-of-date.

    For an updated overview of this project see this topic.   For some practical modelling aspects of using Plug Track see Building 3D Track.

    The assumption is that you have your own machines on which to experiment, or helpful friends with machines. Please do not send Templot files to commercial laser cutting or 3D printing firms while this project is still experimental, because the results are unpredictable and possibly wasteful.

    Some pages of this and other topics include contributions from members who are creating and posting their own CAD designs for 3D printing and laser-cutting. Do not confuse them with Templot's own exported CAD files. All files derived from Templot are © Martin Wynne.
  • The Plug Track functions are experimental and still being developed.

    For an updated overview of this project see this topic.   For some practical modelling aspects of using Plug Track see Building 3D Track.

    The assumption is that you have your own machines on which to experiment, or helpful friends with machines. Please do not send Templot files to commercial laser cutting or 3D printing firms while this project is still experimental, because the results are unpredictable and possibly wasteful.

    Some pages of this and other topics include contributions from members who are creating and posting their own CAD designs for 3D printing and laser-cutting. Do not confuse them with Templot's own exported CAD files. All files derived from Templot are © Martin Wynne.

Experimental 3D plug track - up to version 244c

Quick reply >
Hi there,
Has anybody heard how Martin is doing after his accident?
che
Phil,
I am still in hospital but hope to be home with new shoulder joint tomorrow. Typing on impossible phone
 
_______________
message ref: 8921
I am still in hospital but hope to be home with new shoulder joint tomorrow. Typing on impossible phone

Hi Martin,

Have you been released yet, or are you having to make your own way home? If so, which hospital did they take you? I believe Redditch is not the easiest place to get back to Stourport, from.

Best wishes.
 
_______________
message ref: 8936
hello everyone,

i am back home in the last hour, and just getting sorted. out

thank you everyone for the kind thoughts and get well messages, they were very much appreciated.

i tripped over in the kitchen and smashed my left shoulder very badly, damaging nerves in the process. worcestershire hospital trust have been amazing and can't be faulted, thank you so much to all the wonderful people who helped me, they all deserve medals. it happened on sunday morning and by monday afternoon i was in the operating theatre in worcester having my shoulder joint completely rebuilt. i was warned that i may never have much use in my arm again, but in the event the surgeon was brilliant and able to repair most of the damage. i now have use of my hand, wrist and elbow again, but not yet my upper arm. it may take a long time to recover, and it's possible i may never drive again. but that looks more promising now than it did on monday morning.

i'm finger typing this one-handed which means no upper case and it is slow, but that is way it is going to be for the immediate future, sorry.

there is zoom meeting tonight at 8pm. i will switch it on and start the recorder, but i won't be joining in myself this time. please feel free to discuss templot stuff if you wish, and i will respond to any points which crop up later.

many thanks again for all the good wishes,

martin.
 
_______________
message ref: 8937
So pleased you are OK Martin, and back home.
Take it easy and please don't do too much.
It'll do us good to fend for ourselves for a bit, you look after yourself.

Wishing you a speedy recovery, let's us know if there is anything we can do to help. :)

James
 
_______________
message ref: 8939
Hi Martin.
Glad to hear your both home and on the mend, having read what happed to you, all I can say is you most certainly don't to anything by half's do you :)
cheers
Phil
 
_______________
message ref: 8942
hello everyone,

i am back home in the last hour, and just getting sorted. out

thank you everyone for the kind thoughts and get well messages, they were very much appreciated.

i tripped over in the kitchen and smashed my left shoulder very badly, damaging nerves in the process. worcestershire hospital trust have been amazing and can't be faulted, thank you so much to all the wonderful people who helped me, they all deserve medals. it happened on sunday morning and by monday afternoon i was in the operating theatre in worcester having my shoulder joint completely rebuilt. i was warned that i may never have much use in my arm again, but in the event the surgeon was brilliant and able to repair most of the damage. i now have use of my hand, wrist and elbow again, but not yet my upper arm. it may take a long time to recover, and it's possible i may never drive again. but that looks more promising now than it did on monday morning.

i'm finger typing this one-handed which means no upper case and it is slow, but that is way it is going to be for the immediate future, sorry.

there is zoom meeting tonight at 8pm. i will switch it on and start the recorder, but i won't be joining in myself this time. please feel free to discuss templot stuff if you wish, and i will respond to any points which crop up later.

many thanks again for all the good wishes,

martin.
Hi Martin, good to hear You are on the mend. Take care. P.S. maybe give one of the free speak-to-text software programs a go. I havent used them for years but with AI becoming mainstream nowadays I'm sure they must be quite good now?
 
_______________
message ref: 8982
Hi all,

Wishing Martin well .......

A while ago Martin posted a prototype picture of the switch blades meeting the running rail and in particular how the running rail was shaped to accomodate the blade...

But I cannot find the picture - looked all over this site.....can anyone else remember it? - was I dreaming? - or did I see it somehere else?

Michael
@Michael Woods

hi michael,

thanks. did you mean this one:

2_250340_390000000.jpg


On the left, this photo from Mick Nicholson very clearly shows the set bend in the stock rail, and the matching planing angle on the undercut switch blade.

martin.
 
_______________
message ref: 9000
Thank you Martin.....that is also very helpful.....making progress on my second point....in fact I have three in different state of preparation....hopefully this one will get finished this weekend..beautifully smooth run through the V....

Every part of this point (so far) has been fixed jaws....I have been able to slide in the rails without cutting any chairs or glue....everything very solid and true to gauge.....

1699706139243.png
 
_______________
message ref: 9002
@drduncan

Hi Duncan,

Unfortunately it's not that simple. :(

You need to specify whether you want solid or loose outer jaws.

And also what rail section you are using (and preferably dimensions from the batch of rail you are using). The default settings in Templot match some 10-year-old C&L nickel-silver code 75 bullhead rail which I have here. It might or might not match your rail. Indications from others are that the chairs are a fraction loose on the current C&L rail. There are also indications for the Mars printers that the rail fit for solid jaws varies according to the orientation of the chair raft on the build plate.

At present plug track is available only for chaired bullhead rail using REA chairs, i.e. the 1925 designs.

GWR broad gauge bridge rail is well down the list! :)

p.s. I'm still far from convinced that a resin-printed one-piece timbers+chairs base is a sensible way to go. There are shrinkage and warping considerations, and the home printer build plates are so small. The last thing I need at present is yet another viable option to take into consideration in the code and user interface.

My working default position is that the vast majority of users will want to go for FDM-printed bases:

index.php


cheers,

Martin.
Martin,

My apologies for the extremely slow reply and lack of clarity in my original post.

I was and am offering to print out some test samples in the photon monoX2 using different resins settings to see what might be best. I realise that the BG won’t be prototypical but it will allow me to test the track with stock. So I’m happy to have a panel with solid jaws and a panel with loose as different settings/resin may have differ success rates with loose/solid options
@drduncan

Hi Duncan,

Unfortunately it's not that simple. :(

You need to specify whether you want solid or loose outer jaws.

And also what rail section you are using (and preferably dimensions from the batch of rail you are using). The default settings in Templot match some 10-year-old C&L nickel-silver code 75 bullhead rail which I have here. It might or might not match your rail. Indications from others are that the chairs are a fraction loose on the current C&L rail. There are also indications for the Mars printers that the rail fit for solid jaws varies according to the orientation of the chair raft on the build plate.

At present plug track is available only for chaired bullhead rail using REA chairs, i.e. the 1925 designs.

GWR broad gauge bridge rail is well down the list! :)

p.s. I'm still far from convinced that a resin-printed one-piece timbers+chairs base is a sensible way to go. There are shrinkage and warping considerations, and the home printer build plates are so small. The last thing I need at present is yet another viable option to take into consideration in the code and user interface.

My working default position is that the vast majority of users will want to go for FDM-printed bases:

index.php


cheers,

Martin

Martin,

My apologies for the extremely slow reply and lack of clarity in my post.

What I meant was that, prototypical not withstanding I’d be happy to print out some panels (perhaps one of loose and one if solid jaws) in EM and BG to test resins and settings using the MonoX2. Having BG and EM will allow me to see how stock behaves too.

Regarding track I have some old Exactoscale code 75 hi-ni is stock and I’ll post measurements when I get a moment.

Regards,

Duncan
 
_______________
message ref: 9006
I have been busy with domestic matters today so little done since first thing.

On a positive note my glass bed arrived a week earlier than stated

On a negative still cannot download 3D builder, have asked my son in law to look in to how we can overcome this issue which seems a common problem

Having a bit of brain fog and could not replicate, or rather produce a file for the other half of the A6 turnout, have to have another zoom chat

Somehow I found/stumbled on a Vee filing jig and made a file but as I have not got 3D builder I cannot go further, when someone has a spare moment please can you put it through 3D build

Thanks

John
 

Attachments

  • 1_in_6_vee_filing_jig.stl
    219.6 KB · Views: 45
_______________
message ref: 9057
I have been busy with domestic matters today so little done since first thing.

On a positive note my glass bed arrived a week earlier than stated

On a negative still cannot download 3D builder, have asked my son in law to look in to how we can overcome this issue which seems a common problem

Having a bit of brain fog and could not replicate, or rather produce a file for the other half of the A6 turnout, have to have another zoom chat

Somehow I found/stumbled on a Vee filing jig and made a file but as I have not got 3D builder I cannot go further, when someone has a spare moment please can you put it through 3D build

Thanks

John
@Hayfield

hi john,

here is your filing jig fixed ready for use.

however if you print it using the same settings as for the timbering bases it would take 8 and a half hours.

i don't use those settings for the filing jigs, i use a different set of settings which take only 5 hours.

or you can print the north and south parts separatey which would take only 2 and a half hours each

you can make them faster if necessary by making the jig a bit thinner.

if you would like to have another zoom session this evening to get started with the jigs, i will switch it on at 9.30pm, join when you are ready, or anyone else.

cheers,

martin.
 

Attachments

  • 1_in_6_vee_filing_jig_fixed.stl
    155.7 KB · Views: 51
_______________
message ref: 9058
.
i have managed to get back to the coding this morning.

it's been obvious in recent zoom meetings that we need an easier access to the blanking function than remembering the keyboard shortcut or hunting in the menus.

there isn't space in the top beginner buttons for another one without a lot of rearranging, so i have put a button here:


blanking_button.png


you are not supposed to design a user interface on the basis of what can be fitted in where! but this is Templot after all. :)

martin.
 
_______________
message ref: 9142
.
i have finally got the first baby steps in the chair heaving function done.

the omit chair tick-boxes are working. please note this is the only part of the dialog working yet. so this is not new functionality, it simply maintains what is possible already:


heaving_dialog1.png


the new dialog is essentially an extension to the shove timber dialog. with a timber selected (T3 here), you can click the heave chairs... button to show the new dialog.

it uses rather too much screen space, but it can be dragged over the first one if you don't want to do any actual timber shoving.

if any changes from the defaults are made, the relevant rail panel shows yellow-ish as a reminder.

will be in 242a, hopefully very shortly.

cheers,

martin.
 
_______________
message ref: 9143
.
bug: mis-positioned chairs on twisted exit sleepers

it's not often that i give up, but i have spent many painful hours trying to find this bug, without success. it's a mystery, because identical code is used for the approach track, which is working fine.

given that there is a simple workaround -- split the exit track as a separate plain track template if you need to twist any of the sleepers -- i'm going to leave this for now so that i can get 242a out, hopefully later today.

i just know that 5 minutes after releasing 242a i shall spot the bug, which will be blindingly obvious. :(

242a contains some changed format in the BOX files, so please make sure you have your existing BOX files safely saved, and don't overwrite them with files from 242a. i've tested it as much as i can and it looks good, but let's not tempt fate.

cheers,

martin.
 
_______________
message ref: 9160
@James Walters

i have extended the store and shift multi function to allow single timbers at the switch front to be used as the source, in addition to plain track sleepers.

this makes it possible to create rafts of P slide chairs,

and a raft containing a row of CC check rail chairs on one side (extend the MS check rail back through the switch onto the J1 timber), with S1 chairs on the other side:

P slide chairs:

p_slide_raft.png


CC check chairs and S1 chairs:

cc_s1_raft.png


in 242a shortly.

martin.
 
_______________
message ref: 9167
.
242a is now on the server.

restart Templot to update.

Zoom meeting at 8pm UK time tonight (Tuesday) to discuss any issues arising.

cheers,

martin.
 
_______________
message ref: 9169
_______________
message ref: 9176
@James Walters

Blind sockets

The bind sockets tick-box accidentally got left behind on the layers tab:


blind_sockets2.png


It will be moved to where it belongs in the next update:

blind_sockets1.png


The purpose of the blind sockets option is to allow glue to be applied to the underside of the timbering base, or squidging it down in a layer of glue, without getting any glue in the sockets -- which would prevent later insertion of the chairs:


blind_sockets3.png


blind_sockets4.png


Normally chairs are inserted before installing the timbering base on the baseboard. But if that's not possible for some reason, such as the chairs not yet printed or available, the base can be made with blind sockets so that it can be glued down in advance if required.

Note when using blind sockets that it is important to cut the plug from the raft support as close as possible to the plug, and possibly give it a rub on abrasive paper, to ensure the plug can be inserted fully home without bottoming in the socket.

Martin.
 
_______________
message ref: 9195
@James Walters

Coming in 243a:


fixed_ccl.png


At present the only option is variable.

The new default will be fixed, meaning that CCL and CCR (fixed) chairs will be interchangeable, and able to be produced in bulk using the store and shift multi function (as the CC chairs can be in 242a).

This means that in most cases the preparation of rafts for the crossing chairs will be simplified -- it will no longer be necessary to include the check rail chairs with them. It will only be necessary to use (and include) the variable CCL and CCR chairs where the check end flare has been specifically modified to fit partial templates.

Will be in 243a, but maybe not for a few days.

At some stage I should have mentioned this function (part of the tandem turnout functions) which is handy when creating crossing chairing rafts:


isolate_xing1.png


Martin.
 
_______________
message ref: 9231
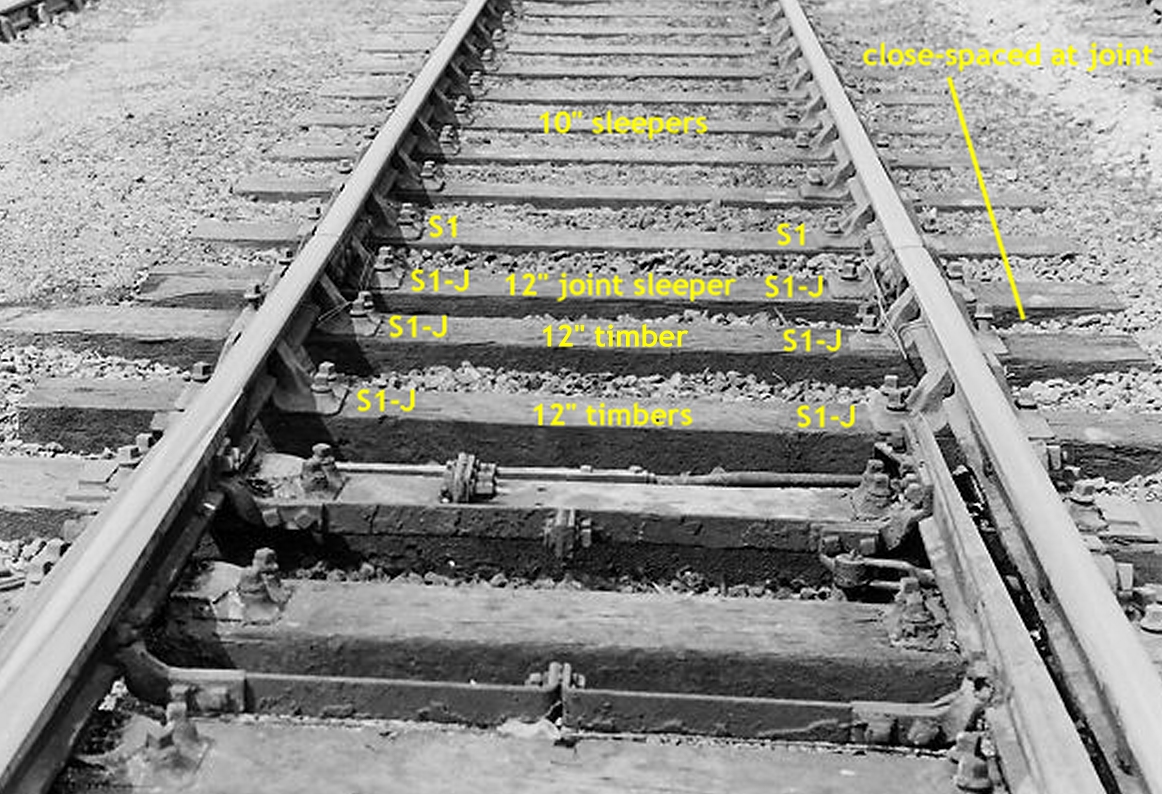
Hi James
In you latest video on the first part of turnouts which is again excellent, you mention that S1 and S1J chairs would not be common in the case of gauge widening at the turnout.
Implying in such cases special S1 and or S1 J would be required. Is that the case?
As my understanding was gauge widening if required, occurred by means of the socket in the timber moving over to accommodate whatever gauge widening was being used. I.e. the chairs are still the same its just the socket that moves.
Cheers,
Phil
 
_______________
message ref: 9232
Hi James
In you latest video on the first part of turnouts which is again excellent, you mention that S1 and S1J chairs would not be common in the case of gauge widening at the turnout.
Implying in such cases special S1 and or S1 J would be required. Is that the case?
As my understanding was gauge widening if required, occurred by means of the socket in the timber moving over to accommodate whatever gauge widening was being used. I.e. the chairs are still the same its just the socket that moves.
Cheers,
Phil
@Phil G @James Walters

Some water being muddied here.

The video is wrong. The S1 and S1J chairs are not affected by gauge widening.

The only chairs affected by gauge widening are the CCL, CC, CCR chairs -- where the flangeway gap is increased by the same amount as the widening of the gauge.

🌳 In the case of non-functional check rails (i.e. in the model, not needed for model running, purely cosmetic continuous check rails), it is a good idea to increase the flangeway by a little bit more than the gauge widening.

The actual widening of the gauge is done by modifying the track gauge, and no other chairs are affected.

Gauge widening can get quite complicated because a transition zone is needed at each end where the gauge changes progressively from normal to widened. I posted an explanation of how to do that quite recently, somewhere or other. Maybe in one of the Zoom meetings.

It would be better not to confuse beginners to Templot and plug track by mentioning gauge widening until they are more familiar with the basics.

p.s. Phil -- you tagged the wrong Martin.

cheers,

Martin.
 
_______________
message ref: 9233
Back
Top